Showing posts with label Project - Scrapbook Layout. Show all posts

Sunday, October 28, 2012

Family is ...


Hello scrapbookers.  Today I'm sharing a layout created using more of my stash and I'm linking it to the "family" challenge over at The Studio Challenge Blog .  One of the things I tried to drill into my little ones heads when they were growing up was that we will face enough obstacles out in the world.  We will meet un-kind people and people who may hurt or feelings .... and that is why we shouldn't have that in our home.  It should be a place where we feel secure and loved unconditionally.  And I wondered if this was even getting through to them at times, with all the disagreements they had.  But now .... as young adults I'm seeing that they are better friends, support one another and give each other advice during difficult times ... just maybe it did make a difference.  : )

The Studio Challenge Blog post their challenges twice a month but you have til the end of the month to complete the projects.  The second post this month was a sketch challenge HERE.  It's a little different than a lot of challenge blogs.  Instead of link to the actual challenge post, the link system is over on the side bar.  Very talented DT with lots of inspiration over there!!

My most used tool ...
Besides my paper trimmer, my most used took is definitely my deckled scissors.  I LOVE them and think they finish off edges so pretty.  And they are the star on this layout.  So I had the layout pretty much finished, but it just needed something else.  It was mounted on red cardstock with straight edges all the way around.  So I decided creating a frame with the deckled scissors would finish it off nicely.  I trimmed 12 x 12 strips of the red cardstock down with the deckled scissors, ink the edges and then adhered them around the outside edge of the layout.  Then I cut the corners from red cardstock.

What is your most used tool???

Have a great day!!
Melisa

You can check out all my Scrapbook Layouts HERE.
You can view my Mini-Albums HERE.

Thursday, October 25, 2012

We are family ....


My children were the typical siblings ... they didn't always get along.  God could not have produced 2 children who are so different.  I wonder how it is that I birthed these 2 sometimes, because they are so different, but each special in their own unique ways.  

I have a ton of "page kits" I put together years ago where I matched up paper / embellishments with photo's.  So I hate that I will be posting old products a lot, but I'm happy I'm using my stash!!  But I will try and share other tips or techniques that may inspire you.

Creating a paper frame :
I created the frame by cutting strips of the striped paper and mitering the ends.  I applied blue acrylic paint around the edges and randomly on top of the strips give it a worn look. I cut a second set from a piece of patterned paper that had circles on it (you can see it peeking around the edges of the striped frame), and adhered the 2 together.  I cut a red a red piece of cardstock into a 6 5/8" x 7 3/4" rectangle, adhered the patterned paper layers / frame to it and then used an exacto knife and metal ruler to cut out the opening along the inside edge of the patterned paper frame, creating an opening for the photo.  Next I cut another piece of red cardstock to 7 1/8" x 8 3/8" and distressed the edges with blue paint.  Lastly, I layered the base / photo / frame, popping the frame up off the base, creating a unique element for this page.   

Creating your own paper embellishments :
Consider creating your own paper embellishments to save money.  Look for patterned paper sets with different design elements that you can cut up and layer.  On this layout I cut flower elements from other pieces of patterned paper and created my 3-D flowers .  Then I finished off the layout with some rub-ons.

Hope you are inspired to look at your scrapbooking products a little differently and to create your own frame.  If you do ... I would love to see it.  Just stop back by and leave me a comment and link and I will check yours out.

Happy Scrapping!
Melisa

You can check out all my Scrapbook Layouts HERE.
You can view my Scrapbook Mini-Albums HERE.


********************************************************************

Challenges

Challenge Me Happy Scrapbook Layout Challenge Blog


My layout has blue, green, yellow, orange, and brown in it.

Tuesday, October 23, 2012

Pink Persimmon Style Girl Layout


Hello paper crafters!  Today I am sharing a 12 x 12 layout I designed using Pink Persimmon's new release stamp set "Style Girl"!  I really have been trying to use up my old scrapbook supplies, but I made a trip to my local scrapbook store recently (Archiver's), and couldn't resist some of the new My Mind's Eye.  The Sweetest Thing line is truely sweet!!


I used some old photo's of an aunt (my mom's sister) for this layout. 


Growing up I thought she was so cool!   She didn't have kids of her own, so my brothers and I were very special to her.  She was always laughing and joking with us.  A sweet and loving women who died way to young.  I think if she had lived to her sixties she would have still had a youthful and joyous approach to life.  It's just who she was.


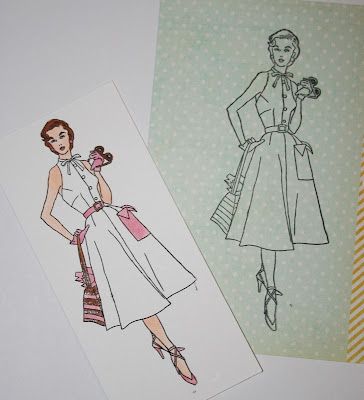
I paper pieced my Style Girl images.  Stamp the image on patterned paper and on white cardstock.  Color as shown with markers.  


Trim as shown.  Hard to see in the photo, but along the left side I trimmed around the hand bag by cutting into the dress to leave a little white cardstock to tuck behind the patterned paper skirt.  You can get away with not cutting around the handbag like that, but I had to trim the white out above it and around the hand on the hip, so it was just easier to cut out if I cut the handbag a well.  Layer the skirt and then adhere the white side of the hand bag to the back, and the thumb on top of the patterned paper skirt.  Adhere the pocket.  Adhere the top of the dress.  Color collar / bow and buttons.  The second girl was paper pieced the same way.  

I hope you will stop back by on Thursday for a background tutorial

Thanks so much for stopping by and have a blessed day!!
Melisa

Check out Pink Persimmon stamps HERE.

You can check out all my Scrapbook Layouts HERE
You can view my Mini-Albums HERE.
You can check out all my Pink Persimmon projects HERE.


****************************************

Project Details

Stamps : "Style Girl" Pink Persimmon
Check out Pink Persimmon stamps HERE.
Patterned Paper and Cardstock Embellishments : My Mind's Eye "The Sweetest Thing" by Jen Allyson
I used a sheet from the 6 x 6 paper pad for the doily and dresses
Die : "French Pastry Doily" by Cheery Lynn Designs
Tag : Donna Downey
buttons and lace : unknown
Markers : Copics E000 / E00 / R00 (skin), RV11 / R85 (pinks), E23 / 25 (browns)

***************************************

Challenges

My Mind's Eye - Use stamping with your My Mind's Eye products
The Paper Girls Challenge is a photo inspiration.  I used colors in the photo on my layout.

Catered Crop (sun) - use circles ( I have lots of circles in my doily, buttons, and paper embellishments )
deadline Oct 27th 8pm
Catered Crop


Red Carpet Studio (sun) - is looking for a Scrapbook Layout with polka dots, circles or a ring (I have polka dots on the paper pieced dress and some of the paper emblishments as well as circular elements)
deadline Oct 27th 11pm
Cupcake Craft Challenge (mon) - paper piecing
Make it Monday - anything goes every week
Ink Impressions (wed) - anything but a card
Ladybug Crafts (wed) - favorite embellishment (my favorite embellishment is to create my own using my stamps and my second choice is lace / trim )
Let's Craft and Create (wed) - add dimension
deadline Oct 30th 6pm CST (they are in the UK)
Word Art Wednesday - "Every good gift and perfect gift is from above, and comes down from the Father of lights" James 1:17 ( My family is the greatest gift my heavenly Father could have ever given me.  I'm hoping He will bless us with some additions so I can be a grandma someday.  That would be one of the biggest blessings of all!!)
Oozak's (monthly) - die cuts (I used my doily die)


Sunday, October 14, 2012

You + Me = Love


Hello paper crafters!  Today I'm sharing a layout designed with a photo of my in-laws, Chris and Fred Waldorf.  Married 48 years!  You don't hear that very often these days.  2 very special people with hearts that overflow with love, kindness, and the spirit of giving.  They are a blessing to all of us!


*************************************************************

Project Details

Patterned Paper : "Happy" from "The Good Life" line by Fancy Pants
Stamps : Hero Arts "Friendly Flags", 7 Gypsies "You + Me = Love", Gina K. Designs "Lovely Labels 2", Hampton Art (love heart), Technique Tuesday (script heart)
Dies : Cheery Lynn Designs (Nautical Wheeler doily)
Punch : Marvy Uchida (small butterfly)
Paper / flower embellishments : Dear Lizzy "Neapolitan" Emphemera Flowers
Smaller doily's and white butterflies : Martha Stewart
buttons : Jenni Bowlin Studio Vintage Style Buttons
************************************************************

Challenges

Scrappin' Happy - Use a one word title - "Love"
Scrap Fit - bows or buttons
Bearly Mine - pearls and swirls  (I have a swirly pearl embellishment extending from the top of the "you + me = love" image and one along the bottom under the love and butterfly, but I realized it's diffictult to see)
Top Tip Tuesday - things with wings
Word Art Wednesday - "kindness"
Let's Craft and Create - borders (lace border below photo)
Simon Says - dies or punches (doily die and small butterfly punch)
The Paper Shelter - love beats all
Fairytale - use a photo

*********************************************************


And here is another layout with a photo of my daughter Nicole and her cousin Adrienne.  They were at the end of a tunnel slide.  I used lots of old chipboard elements and buttons on this one.  And I"m linking it to the October challenge over at "Scrap It Girl".  She wanted us to use 12 or more buttons.  If you need challenge inspiration to get some of your photo's scrapped ... then you can check out my Scrapbook Challenge Blog List HERE.


You can check out all my Scrapbook Layouts HERE


Tuesday, October 9, 2012

My Mind's Eye Layout "The Sweetest Thing"


Hello stamper's.  Today I'm sharing a layout designed for this month's challenge over on the My Mind's Eye blog.  The October challenge is to use stamps.  You can check out the challenge HERE.


All the paper products / embellishments used are from the "The Sweetest Thing" collection.  I used doily stamps from the "Stella and Rose - Gertie" Collection by My Mind's Eye.


I used dies for the butterflies (Spellbinders) and buttons (Cheery Lynn Designs) as well.  I added texture using the burlap (Joann's Craft Store) and crocheted lace.  This layout would not have been the same without the burlap.  It really finished it off.  

These photo's are of my daughter from way back in 2002.  Wow how time flies.

Hope you are inspired to get those photo's out and scrapbook!
Melisa

You can view all of my Scrapbook Layouts HERE.

You can view all my Mini-Albums HERE.

Saturday, September 22, 2012

My Grandfather (Red Rubber Designs)


Today I want to share a layout I designed using a couple of my Red Rubber Designs stamp sets "Hope Perches" and "Background Soup".   I recently won the monthly Blog Hop prize with Red Rubber Designs.  Hop over to their blog and follow it so you can get a chance at winning as well!  

This is my grandfather in his younger days.  He loved to hunt, fish, and garden so I thought that a nature stamp set was just perfect to use on a layout for him.  


He was a wonderful Godly man who loved his family and who was very special to me.  We shared the same birthday.  I remember spending summers with my grandparents as a child.  I remember him singing to wake me up in the morning and that I loved his cologne and how he smelled.   I didn't know my father, so he was the man in my life I looked up to.  I wish he had lived closer to us and that I could have spent more time with him.  Special memories of a special man.

Thanks for letting me share!
Have a blessed weekend, Melisa

**********************************************

Project Details

Patterned Paper : My Mind's Eye (Hobby Lobby)

I used Stampin' Up Wild Wasabi to stamp the background images (polka dots and random letters).  I used VersaFine Vintage Sepia and Palette L'Amour Red to stamp the bird images and sentiment.  I created the tags from thin patterned paper, crumbled them up and then rubbed brown ink over the wrinkled area's and edges.


Wednesday, August 15, 2012

Scrapbooking with Papertrey Ink's "Star Prints"


I've been trying to work some scrapbooking in between my card making and mixed media / altered projects. I have soooooo many old photo's that I want to get done.  This one brings back so many memories.  My little guy is 24 now.  He was a tough little guy.  He loved basketball and baseball and would have played football if we would have let him.  He was often the smallest on the team, but tough and determined.


I have a lot of old 12 x 12 scrapbook paper to use up.  This set is from 2007 ( My Mind's Eye  "Confetti" ).  It would be easier to just run out and buy new stuff with all the cool coordinating embellishments they make these days.  But I knew with the combination of some of my newer tools I could pull it all together.  At least for this layout.


Papertrey Ink's "Star Prints"  and Sweet n' Sassy scalloped star border die ( Hearts and Stars Scalloped Border Die Set )coordinated perfectly.

Thanks for stopping by!
Melisa


**********************************************

Challenges

Over the weekend I started searching for scrapbook challenges to play along with.  Hopefully it will keep me  motivated and on track with Scrapbooking along with all my other crafty stuff.
So if your a scrapbooker, check these out.  I think most of them have monthly deadlines, so there should be plenty of time for you to join in on the fun as well!!
And here is a site that list challenges for you :
http://scrapchallenge.com/
just scroll down to see a list


Top 5

Woowhoooo!!!  This project was featured as a Top5 over at Crafty Cardmakers!

iClassygirl.com - Paint (splattered on the background patterned (deadline Aug19)
paper and around edges of the photo's)
True XoXo Scrapbooking - Olympics (sports photo's)
Scrap It Girl - Numbers (title and 2 of the stars)
Kaboodle - friendship
Crafty Cardmakers - sports
Papertake Weekly - Spots and stripes

Monday, November 7, 2011

Fall Centerpiece, Altered Tin, Altered Frames, Layouts,

Hello everyone.  I just wanted to share my November Classes with you.  If you live locally, I would love for you to join me for one of my classes.  You can get more info and register for the classes through meet-up.com.  My group site is here : http://www.meetup.com/Paperlicious-Fun/ .  It is free to sign up at meet-up and that will allow you to view the group site, join my group, and get the latest updates via email as soon as I post classes.  If you know somone who lives in the Houston area, I would appreciated you passing on the info to them.  The only way I have to advertise is through word of mouth and it would certainly be a blessing to me to see more people join the group!

******************************************************************

FALL CARDS AND A TREAT BOX CLASS


**************************************************************

THANKSGIVING PLACE SETTING AND GIFT BOX CLASS
Includes 6 place settings.


***********************************************************

FALL CENTER PIECE AND GIFT CONTAINER CLASS


You can view all of my Altered Projects HERE.

**************************************************************

FALL SCRAPBOOK LAYOUTS AND FRAMES CLASS


Thanks for stopping by!
hugs, Melisa

*********************************************************

PROJECT DETAILS

FALL CARDS AND A GIFT BOX
Card #1
Stamps : Inkadinkado "Happy Thanksgiving" #93023 is retired, but it is still available in online stores who have it.
Card #2
Stamps : "Happy Fall" Inkadinkado, "Twizzle Tree" Memory Box
Twizzle Tree is available at Ellen Hutson HERE
See all the detail for the "I'm Nut" About You" gift box HERE.

FALL PLACE SETTING AND PIE GIFT BOX

Pie gift box : Creative Cuts and More
Spellbinders Labels Sixteen (name plate and napkin ring) and Labels Eight (tag on top of pie box)
Stamps : Ornate Textured Background Stampabilities, Acorn and small leaves - Crafty Secrets Thanksgiving set

You can view all of my Altered Projects HERE

Wednesday, September 28, 2011

Sweet Baby Girl Layout

9x9 Layout

Good Morning Paper Crafters!  I bet you are wondering who this little cutie patootie is??  It's my neice 21 years ago.  What a sweet little face.  So I needed a sweet little layout to go with it. 
I wanted to use my "Baby Clothesline" set by Pink Persimmon, so I headed out to Archivers in search of the perfect patterened paper to create my layout with.  As soon as I seen this patterned paper I grabbed it.  I knew it would make a great shabby layout.  It's part of the My Mind's Eye "Blush" line.  It came in a 6x6 paper pad as well so I grabbed one, knowing the small patterns would be perfect for paper peicing the little clothes.  This set comes with the cutest little clothes pins so that you can create a little clothesline, adorable boy and girl clothes, and some cute little toys as well.  LOVE it!


I wanted to use my "Small Banner" set with the "Small Carnival Alpha" set though,  so I opted to layout the clothes randomly.  The Small Banner set comes with 6 different little patterns that you can choose to stamp your banner in.  You stamp the inside first, then the outside in black.  Then stamp your letters on each banner.  I colored the inside of the letters with a Copic marker R85.

I paper peiced the dress and bloomers.  I stamped the sweater, booties, and bunny on pink cardstock and then added shawdowing with my Copic Markers.  I used RV0000 with R85, tip to tip.  R85 would have been to dark to apply directly to paper.  I created a great shading by picking up a little R85 on the tip of my RV0000 markers.  I shaded the birds with N00.

It's hard to see in the photo, but I added glitter to the stripes in the dress, around the edges of the banners, over the birds, and over the swirly. 
I wanted to create a shabby mat so I layered 3 peices of pink.  I distressed the edges of layer one using a distressing tool.  I used my deckled scissors on layer 2.  I inked all the edges with Pearlescent Chocolate ink.   
To help create an interesting border along the side of the mat, I layered eyelet lace with white party streamer that I had gathered into a ruffle.  I needed more white on the layout so the clothes would show up, so I added some wide lace. 

I hope you are inspired to create a sweet little baby boy or girl layout of your own!
hugs,
Melisa

Check out Pink Persimmon stamps HERE.

You can view all of BABY themed projects HERE.


**************************************

Supplies
Stamps : Baby Clothesline, Small Banner and Small Carnival Alpha sets by Pink Persimmon
Patterned Paper :  My Mind's Eye "Blush" line
Ink : Brilliance Pearlescent Chocolate, and Momento Onyx Black
Glitter : Stampendous
Small Roses : $1 aisle at Micheals SCORE!!
Wide Lace in background : I just bought it at Hobby Lobby
White party streamer, buttons, small eyelet lace, and chipboard : my stash
Distressing tool :  My favorite is by Making Memories.  But I also use the one by Tim Holtz.

Tuesday, August 16, 2011

Back to School

9x9 Layout


Good Morning Paper Crafters!  Today I'm sharing a 9 x 9 layout designed using my sweet husbands 1st grade class photo.  I don't even remember 1st grade, do you???  And I don't have a photo, so I would love to tell you that I just love my teacher, if I could only remember her, HA!  What about you??  Can you remember any of the Elementary years??   But ...  I'm sure I was a little angel, enthusiastic about learning and very obedient ...  every teachers dream, teehee. 

The "Little Red Wagon" stamp set was just perfect for this layout.  You can use the boy or girl image and there are so many cute items to load the wagon up with.  There is a birthday cake, valentine hearts, pumpkins and more!  A fun sentiment for a friend when creating a card  using this image would be "When you wagon is full, I'll help you pull".  You can check out this set HERE

"Little Red Wagon" looks great combined  with Kaiser Crafts "Class of '87" 12 x 12 paper collection for this layout.   I used "Timeless Tables", "Show and Tale", and "Sports Day" from the patterned paper collection, along with the matching rub-ons.  The line comes with  some other great embellishments and a 6 x 6 paper pad as well, HERE.


My sweetie is the short little guy standing by the teacher with the crew cut.  
What a handsome little guy he was.  Still is!!
******************************************

Project Details
Stamps : Pink Persimmon "Little Red Wagon"
Patterned Paper / Rub-ons : Kaiser Crafts
Border Punch : Fiskars
Trim red patterned paper 9 x 9".  I  used only certain horizontal strips from the "Sports Day" sheet and combined them to create the bottom part of the background.  Trim background patterned paper slightly smaller than 9 x 9 and adhere to red cardstock base.  Doodle around edges.  Ink edges of photo with red ink.  Use scalloped border punch to create a border from red cardstock.  Adhere to bottom backside of photo.  Adhere green ribbon.  Adhere photo to page.  Stamp Little Red Wagon's boy, stack of books, and wagon on white cardstock.  Color with markers.  I paper pieced the shorts because I didn't have the correct shade of blue to match.  Adhere to layout.  Trim just the "A" and "B" sections of the "Show and Tell" patterned paper sheet and adhere to layout.  Doodle around edges.  Embellish rest of page with rub-ons and buttons.

*************************************************************************

You can view more of my Pink Persimmon projects HERE.
You can view more of my Scrapbook Layouts HERE.

You can view more of my Back to School / Teacher Appreciation projects HERE.

Wednesday, July 27, 2011

Look who's one!

9 x 9 Layout

Who's this sweet little guy???  This is my son Travis 22 years ago, sitting in his grandmother's lap.  Look at those smiles!  It makes me smile just to look at them.  And look at Namaw, encouraging him to be bad and stick his hand in the cake.  I have to say, he never needed much encouragement.  He was my little stinker!

I don't know if you can tell, but there is a clown on the cake.  So I just new that my Pink Persimmon stamps would be sooooo cute on this layout, and I think I was right.  And these images would be perfect for birthday cards as well.  I used Vintage Cupcake and Small Banner set.  The cupcake set has lots of other cute toppers you could use and an adorable scalloped border.  This is the 3rd time I have used the small banner set and I can't wait to use it again.  There are several banner patterns to choose from and 2 other sentiments in addition to happy birthday.  Now I need the large banner set.
The Pink Persimmon website has a great gallery to inspire you.  But you can view the latest projects designed by the new design team by subscribing to the blog, HERE.  To sign up for their newsletter click the grey border across the bottom of the home page HERE.
Thanks for stopping by and letting me share a few of my memories with you.
Stop by tomorrow for a summer mini-album blog hop and some inspiration on how to scrapbook those summer photo's.
hugs, Melisa
**************************************************************
Project Details
Trim red cardstock 9 x 9" and ink edges with black ink.   Trim white cardstock 8 1/2" x 8 1/2" and ink both sides with black ink.  Adhere to red cardstock. Trim striped paper 8 1/2" x 3/4" and ink edges.  Create blue scalloped border with Fiskars border punch and adhere to underside of striped border.  Ink edges of scallops then adhere to bottom border of white cardstock.  Years ago when chipboard was so popular, I purchased a pack of 12" chipboard shaped borders and the scallop was one of them.  I never used the actual chipboard scallop because I wanted to use it as a pattern.  That is how I created the scalloped border along the top.  I did a search and found that a chipboard company named Magistical Memories has one HERE.  Stamp cupcakes on white cardstock and on colored cardstock or patterned paper.  Color cupcake with Copics.  Trim liners from colored paper and adhere to front of cupcakes.  Normally I use Liquid Applique to add dimension for icing, snow etc.  But I'm out, so I decided to try something new.  I used my Aleene's Tacky Glue.  It's so thick allowing me to build up the icing.  If I got in on the line, I used a toothpick to remove it.  Sprinkle with glitter.  Stamp cupcake toppers, color with Copics and adhere.  Set aside to let icing dry.  Stamp banner, trim, and punch mini holes in eash corner.  String with floss.  Paint chipboard letters for the "one".  Arrange / adhere photo's and decorative elements.  Stamp "look who's" using the SodaPop Alpha set.

****************************************************************************

You can view more of my Scrapbook Layouts HERE.
You can view more of my Pink Persimmon projects HERE.

Sunday, September 19, 2010

Scrapbook Inspiration Challenge : Stamping on other mediums

Hello. I hope you all had a wonderful weekend. I have been studying for some test I have to take for work, yuck! I did get one of them taken Saturday night and I passed, YAY! One more to go!
You may remember from last month, that I started co-hosting the Scrapbook Inspirations Challenges over at SCS. Well it’s that time again. Now don’t be too impressed. I made these layouts a few years back.  We would love to have you come over and join us.  You can check out all the Scrapbook Challenges over at SCS HERE.
The challenge this time is to stamp on a different medium than paper.  I have several samples to inspire you.  I love using my stamps on so much more than cards.  And it's fun creating my own embellishments for Scrapbook Layouts.
Stamping on Cork


I just love the cork paper and it is really easy to work with.  If you want a casual look, this is perfect.

Next up is clay.


Stamp on the clay and trim around with an exacto knife.  Then bake per manufacturer guidelines.


I didn't have matching brads so I decided to make tiny clay circles to substitute.


Stamping on other scrapbook embellishments.


**********************************************

You can view more of my Scrapbook Layouts HERE.
Related Posts Plugin for WordPress, Blogger...