Showing posts with label Project - Scrapbook Layout. Show all posts

Sunday, August 22, 2010

Scrapbook Inspiration Challenge : Punches and Dies

Good Morning!!  As I shared with you the other day, I begin posting Scrapbook Inspiration Challenges over at SCS today and I'm so excited.  And this specific challenge is SIC80. I'm sure you can use some of these idea's in your cardmaking. So I will share on my blog as well.  However, if you enjoy scapbooking, then please hop over and join us.  I will be giving away a Creative Cuts and More gift package.  For all the details, check out the thread HERE.  And you can earn an extra point for my August blog candy give-away just by stopping by and saying hi.  Make sure you give me your blogger ID in your message there, so I'll know who to credit it to.
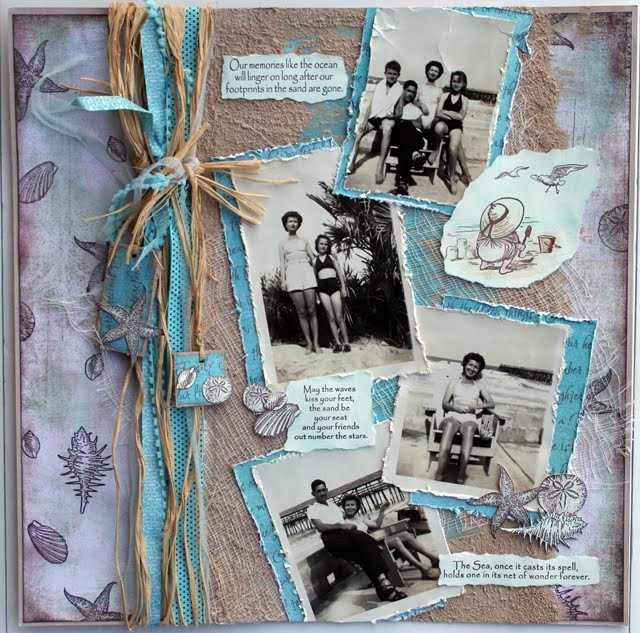
So let's get started.  For the next 2 weeks I am challenging scrappers to use punches and dies in a creative way.  Here is my inspiration piece and a few inspirational photo's of ways to use punches / die.

This is my little guy when he was actually little (he's 22 now).  I have always loved this photo so much.  I have one of my daughter as well.  They were taken at the Christian Private school they attended.  Travis was definitly unique and free spirited.  About this time I was reading a book by Dr. James Dobson called "The Strong Willed Child".  Need I say more, teehee. 


Idea #1 is to use a punch around the edges of a mat or frame.  I used a star shaped hand punch to create a one of a kind photo mat for this one.

These are 3 of my neices / nephews.

I used my circle punches from my Making Memories Eyelet Setter set on this one.  It came with 3 different size holes punches and they are perfect for punching holes in area's that a regular punch can't reach. 


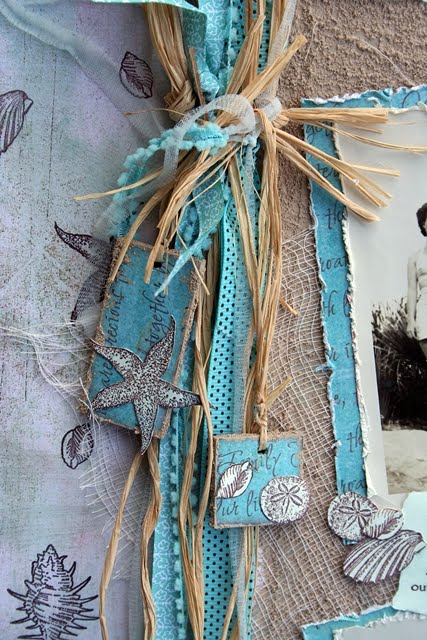
Idea #2  Stamp on a punch or die shape.
Idea #3 Use a shaped punch to create your own buttons.  I punched the circle 6 times and layered/adhered them together.  To get your holes lined up, punch the circle on a thinner piece of paper, fold it in half and then into quarters, creating a criss cross across the button.  Use these fold lines to help you see where to put your button holes.  After you have them punched on this pieces, line it up over your button and use it as a guide to punch the holes.


Idea #4 Use punched images as mask.


Idea #5  Create a monochromatic patterned paper using your punches.  To make them pop a little more, use a .005 Micron pen to doodle around the edges or ink the edges.  See the four flowers near the top.


Idea #6  Use a punch or die (I used Spellbinders here) with patterned paper or book paper.  I sprayed my bird with Glimmer Mist.  I created the wing using a scalloped corner punch and folded/gathered.

Idea #7  Use a punch on a different medium besides regular paper.  I created the flowers using my Spellbinders die with tissue paper.  Other idea's : cork, acetate, foil or thin metal, vellum, or fabric (paint the back with Gesso first to stiffin it).  And I'm wondering if a Spellbinders would cut through felt??


Idea #8 Add texture to a pre-cut die or punch using an embossing folder.
See the red apple die (Creative Cuts and More)


Idea #9 Embellish a pre-cut die with patterned paper, stamps, glitter, Fun Flock, etc.  I used a pink and white cupcake die (Creative Cuts and More)  for this one.  I stamped this pink cupcake liner with black polka dots.  I trimmed the white cupcake frosting and candle off of the white cupcake die and adhered it to the pink one.  I covered the icing and flame with glitter.  I colored the pink candle with a black marker.


And on this one, I covered the pre-cup party hat die (Creative Cuts and More) with patterned paper, then embellished with the frill at the top and spiral (it came with the hat). 
And a few more idea's that I don't have photo's for:
10. Journal on them.
11. Sew across them
12. Piece together several shaped punches to create a new shape.
If you need pre-cut dies, then you should visit Creative Cuts and More.  They have a great selection of shaped dies, cards with shaped windows, 3-D paper projects that are pre-cut and pre-scored, and much more!

Thanks for stopping by today!  I hope you will be inspired to get those punces out and use them on what ever project you want to create.  If you have any creative uses for dies, I would love to see them.

Have a great day!


You can view more of my Scrapbook Layouts HERE.

Wednesday, August 18, 2010

Sun, Surf and Sand

Good Morning!  I have lots to share today and would like to begin by letting you know that I will begin co-hosting the Scrapbook Inspirations Challenges over at SCS starting on Monday!  Did you know that SCS had Scrapbook challenges??  They have several.   

You can check out my challenge thread at HERE.  And you can check out all the Scrapbook Challenges HERE.


Today is Creative Belli Challenge day.
The goal of the Creative Belli challenges is to encourage you to use up those old, forgotton supplies.  Not hard to find in my scraproom because I've been hoarding for years.  We would love to have you join us and play along HERE!

This weeks challenge is "circles" and "metal".  There is a sketch as well, but it is optional.  Well the circles are kinda obvious.  I used a metal tag clip and metal brads.  The background paper is by My Minds's Eye So Sophie collection.  The scalloped circle is Bazzill.  It just didn't look right as a solid color, so I grabbed my swirly stamps and created my own dp background.  That's the wonderful thing about stamps!  So many options.

So I decided to do a layout.  And chose to use my Layers of Color "Under the Sea" stamp set.  These images are so cute and worked just perfectly for this layout.  These photo's are from 2000.  My daughter was 10 (photo to far left) and my son was 12.  The 2 extra's are my neices.  We have never lived close enough for us to be able to spend time with them.  So I used to have them for a week every summer.  And go to the beach was always a part of our fun summer activities.


We would love to have you join us.  Hop over to the Creative Belli blog and check out what the other designers have created to inspire!

I hope all of you have a wonderful day filled with blessings!
Melisa

Wednesday, July 28, 2010

Another Layout with Layers of Color

Good Morning.  This is week #4 of my Layers of Color Guest DT gig.  I have had sooooo much fun using their images.  And I want to say thank you so very much to Laura, the owner and her wonderful DT.  These ladies are so gracious, kind, supportive and it has been wonderful to be a part of their team this month.

Today I want to share with you another layout and the story behind it.  This is my daughter many years ago being baptized.  I was blessed to lead both of my children to salvation.  And I remember the joy that I felt as a parent watching my little one being baptized and giving her heart to our Lord and Saviour.  So many people think that young children don't really know what they are doing when they make professions of faith.  But I'm here to tell you that this little one did, and she has never waivered. 


I designed this layout using "Gothic Crosses" and "Royal Birds".  I created the paper flowers using punches.  That really cool molding in the corner at at the top is by Pink Paislee.  This stuff is soooo cool.  It comes white and you can ink it or paint it to match you project.  I used the tissue paper and a Spellbinders die to create the dollie.


Once I looked at this close-up, I realized that it needed something more.  So I added a stick pin.  But I was toooo tired to go back and shoot more photo's.  So you will just have to use your imagination, teehee.


Challenges :
The Studio Challenges   is a scrapbook challenge blog that I found recently.  I really want to get more scrapbooking in this year and I think Scrapbook Challenge Blogs can inspire me to do just that.  This challenge was to use "old and new stash".  This paper is probably greater than 5yrs old.  The corner punch is pretty old too, probably about the same amount of time.  Something new ...  Pink Paislee created these really cool 3-D rubbery feeling embellishments that you can paint or ink.  You can see them in the bottom left corner of my layout and behind the cross.  I just love them.  And my Layers of Color Royal Bird Stamp set is still pretty new as well.


Here is another card using "Vintage Roses".  I created this one for a couple of the Dare to Get Dirty Challenges.  One of the challenges over there was posted by my buddy Joan Ervin.  She wanted us to create a project that was mostly orange.  I would have NEVER came up with this without that challenge.  Thanks Joan for making me stretch my creative muscles!

I started with a peice of DP that was mostly orange (background) and the backside was orange, so that was great.  I created a second pattern on the solid orange using a "tone on tone" technique.  I used Apricot Appeal (SU) ink and stamped some of the smaller images in the set.  And then to tie it in better, I used the DP again for the vase.  The white Spellbinders and background circle were too stark when I layered them.  So to soften it up, I added white VersaMagic ink around the edges of the orange circle and orange chalk (Pebbles, Inc) aroung the edges of the Spellbinder's die.  If you decide to give this a try, get the pearlescent chalks, they blend on better and go on smoother.  Doing this brought it all together.

I'm just wondering if anyone else who is playing along is as creatively tired as I am.  I don't think I have ever created this many projects in one week.  33 challenges total and I have 5 to go by friday.  I saved the 2 hardest / altered pieces for last, but I will probably enjoy those the most. I know exactly what I'm going to do and what stamps sets I'm working with.  So I'm actually excited about getting a few of the others knocked out and moving on to these.
Thanks to all of you who have been so kind in leaving me comments.  I truely appreciate them and feel so very bad that I haven't made it to your blogs.  With all this creating the last 6 weeks, it's been difficult to keep up with everything.  But I'm hoping things will be calming down after I complete my 2 Guest DT's at the end of the month, and these 33 challenges. 

************************************************

You can view more of my Scrapbook Layouts HERE.
You can view more of my Faith Art HERE.

Wednesday, July 14, 2010

DAY 2 - Mark's Finest Papers' Blog Hop

Double post today because I am blessed x2.  Today I am posting projects for both of my Guest DT gigs.  To check out Layers of Colors, please scroll down!

We are back again today to share with you another fun stamp set from Mark's Finest Papers' and more opportunities to win!!  All the details for the prizes are at the bottom of the post!  The set we are showcasing today is called "Southwest Cowboy".  I decided to showcase the images on 2 12x12 Layouts and a mini-album.


This mini-album is from a kit by Cosmo Cricket way back when.  It was easy to put together, you just punched out the pages and folded as directed.  Can you see the little cactus charm??  It's from MFP as well.  I colored it with my copics.
Faith has 10 pages of charms to choose from over in the store!


See ya tomorrow with more of MFP!

Layers of Color Scrapbooking!

Double post today, because I am double blessed!!  I'm am blessed to be on both the Layers of Color and Mark's Finest Papers' this month.

Today I am sharing projects I created using 2 of Layers of Color stamps sets.

This 12x12 Layout features "Joyful Noise" .   As soon as I saw this set I fell in love and new I would be able to use it for more than just card making, since my daughter plays the violin.  I used the butterfly, treble clef, and musical flourishes.  But there are 2 other stamps in the set, so take a peak at the link above.
I wish you could see it up close.  I used old music paper and distressed it to create the border along the side.  And the background DP is so cool.  All the flourishes are velvety feeling.


Frame Tutorial
I started by drawing the outlines of a rectangular frame on cardstock.  The outside measurement was 4 3/4" x 5 3/4"  and the inside was 3/4".  You want your pencils lines light enough to go back and erase later.  Then I stamped and embossed the musical flourish around the inside of the frame, allowing some parts to extend outside the lines of the frame.  I decided which parts of the flourishes that extended outside of the frame I wanted to keep.  I used an Exacto Knife and metal ruler to begin trimming along the pencil lines, making sure not to cut off the part of the flourishes I wanted to keep.  Then I used sissors to trim around the the parts that extended outside the frame.  The I adhered this peice to the brown paper and began trimming to create a mat.


Flower Tutorial
I made my own paper flower on this one.  Very simple to do.  I cut multiple sizes using my Spellbinders Scalloped Circles dies from old book paper.  Before cutting, I had colorized the paper using some pigment ink.  I simple folded over and layered the different scalloped circles until I got a shabby look.


The card below features "Royal Birds" and "Touch of Elegance".  These images are just a sneak peak of the whole sets, so make sure you click the links about and check them out!


Frame Tutorial using Spellbinders
Begin by tracing around the edges of a Spellbinders die - Classic Frames on patterned paper or cardstock using a marker to create the frame.  Then stamp the decorative swirlies at the top and bottom.  Trim around the inside and outside of the frame.  


I have had so much fun designing with these stamps, they are just gorgeous!!

Thanks for stopping by!

Wednesday, June 2, 2010

Summertime, summertime!

Good Morning.  Well I don't know about where you are, but here in Florida things are heating up.  And summertime is definitely here.  So what better way to kick off June than with a summer project!  I used Crafty Secrets Seaside stamp set for this project.


This is a layout I created using the Seaside stamp set, last fall.  But I decided to wait for a warmer day to post it.  I had ALOT of fun with this one.  I started with distressed background paper by Basic Grey.  As you can see I stamped the shells to create my on designer paper.  I added a strip of blue down the center of the layout.  I found the perfect sheet of blue dp in one of my Crafty Secrets Paper pads to mount my photo's on.  Then I started adding elements that work well for a beach page.  If you know me, you know I love texture.  On the detailed photo's below you can see how I layered Course Pumis Gel (gritty medium found in artist section at local craft store) and cheese cloth.  Add of course I had to throw some raffia on there. 


I created my own chipboard charms to dangle.


And I embellished the rest of the layout with some of the wonderful images from the Seaside set.


Doesn't it make you want to head out to the beach??

Thanks so much for stopping by!

Sunday, May 2, 2010

Crafty Secrets Sew Special Set


Good Morning!  I'm so excited to share with you that I was chosen to be the Guest Designer over at ABC Toys and Crafts this week!  Don't be fooled by the name.  The tools they sell are "our kinda toys", teehee!!  You know how I love Crafty Secrets, right !??   Well, they sell Crafty Secrets and many other stamp manufacturers.  Plus lots of other cool stuff like Spellbinders, border punches, copics, ink ...
Today I'm sharing a layout and card I designed using Crafty Secrets "Sew Special".

I created my own embellishments and background DP using the stamps.  The floral DP is from one of Crafty Secrets Paper Pads.  Don't you just love the faux stitching.  Thank goodness I have faux stitching, because I would be lost on a sewing machine, teehee.  


Tip / Technique : Modeling Paste
I added some texture with a fabric swatch and some modeling paste (see the circle cluster along the bottom). It's really easy to work with the modeling paste and it adds so much texture to your work.  Lay a metal dry embossing stencil over your paper.  Use a spackling knife or old credit card to smear the modeling paste over the stencil until the holes are filled.  Clean off your knife and go across the stencil again, smoothing off the top.  Let dry.  Now just rub over with inks or paints.  You can sand it as well.   I happen to have 2 brands of modeling paste.  They both seem to work well.  The first one is by Liquitex and you can purchase it at a local craft store in the artist section.  The second is called an Embossing Paste and it is made by Dream Weaver.  Dream Weaver sells their own line of metal emobossing stencils as well.  I like doing this so much, I'm going to be on the look out for more patterns that would look good in the background of my work.


Thanks for stopping by!

Wednesday, February 3, 2010

Creative Belli Challenge #84 - Ribbon


Good Morning!  Today is Creative Belli Challenge Day and I am excited to be joining the very talented DT over there as a Guest DT Member today!  Creative Belli is all about using up some of those embellishments you have lying around.  You know, the ones we hoard.  Yep, we all do it.  A couple of years ago there was a phrase spreading around that said "She who dies, with the most supplies, WINS!!  I think we all took that a little too seriously, teehee.  We would love to have you join us as we encourage you to use up some of your stash and also offer up a little give-away as well!  So hop on over, check out all the inspirational projects by the DT, and play along!
Creative Belli Challenge Blog 
The challenge today is "Ribbon".  Who doesn't have ribbon!  So no reason for you to not to play along!
I created a layout for this challenge.  No patterned paper here.  And look at all the ribbon I used out of my stash!  I wanted to do something a little different to inspire you so I used some fishing "thingy's".  You know, the kind you find in DH's tackle box.  They may be a little difficult to see, but they are the small black links connecting the ends of the ribbon (third from the top and fourth from the bottom).  Since the colors were black and pink I thought they worked out great.  Another great embellishment to use like this would be bracelet links or charms.  I hope you are insprired to think about a fun or unusual way to use ribbon today!
And in case you are wondering, that photo is from a VERY long time ago, 20 years.  This is my daughter and I.  She has become a fine young women who I am so proud of.  Thanks for letting me ramble!
I'll be back tomorrow!

Sunday, January 10, 2010

Crafty Secrets Cherish Stamp Set


12x12 Layout
I designed this vintage style layout using the "Flourishes" and "Cherish" stamp sets from Crafty Secrets.  I love their stamps and I can't wait til the new release that is coming very soon!!


Frame and Masking Tutorial
This is a close-up of the frame I built using masking tape.  If you take a look at the stamp sets, you can see that I used a couple from Cherish, but most of the frame was built using one stamp from the Flourish set and stamping it over and over, masking where needed.  I started with a penciled frame (rectangle) as guidelines on off-white cardstock.  I used the photo size to determine the size of the inside window.  I started stamping in the lower left corner and then continued up the left side, across the top, down the right side, and across the bottom.  I stamped the first image on the left lower corner of the frame and again on Eclipse Masking tape.  I trimmed the image from the Masking tape and then layed it over the same image I had just stamped on the project, masking - or protecting it.  Then I stamped the second image up the left side - "love" and again on Eclipse Masking tape.  Trimmed it and layed it over the same image on the project.  At this point I started using the one flourish image to finish the frame.  Again stamped the image on the project and again on Eclipse Masking Tape.  Trimmed it and layed it over the one on the project.  Seeing a pattern?  Here's the good news ... I can use the same flourish mask the rest of the way around the frame!  I know it's a little extra work creating the mask, but it will be worth it once you finish!  Giving you a one of a kind layout.

Now that it is all stamped, I trimmed out the inside of the frame using an exacto knife and a metal ruler.  I cut the "straight" area's first, stopping when a straight line intersected with a curved area of the image. Then I went back and trimmed around the part of the image that exteded over the pencil line.  That's how I got the unique shape on the inside and outside border.  I used a stipple brush to add red ink and distress.  I also traced around some of the swirls and inside the florals with red prismacolor pencil and blended with OMS to add some color.


2 more close-ups


I used Glimmer Chips on corners and here.  I think the patterned paper is Creative Imaginations as well.


Card
For this card I stamped the image on a Creative Imaginations Patterned Paper Frame.  I used Copics to color with.  I think the Creative Imaginations frame works great to create a romantic mood.


Thanks so much for checking out my blog!  I hope you are inspired to create this week!

Thursday, November 19, 2009

FCD November Blog Hop!!


Pamela sent each of us 2 of her new Christmas Sets to work with for the next 2 months.  I have been having a ball creating with Mistletoad and Christmas Phrases.  It's not to late to order YOUR christmas stamps.  Order online today!  Shipping is fast with Pamela! 

On the 8x8 Layout above I used one of the phrases from Christmas Phrases along with one of Pamela's other Christmas stamp sets, Season's Greetings.  The tag below was designed using Season's Greetings as well.   

Pamela also designed a special Manger Digi for us to work with as well.
I combined it with Christmas Phrases to create THIS CARD.
And you can check out the projects I have designed using Mistletoad HERE.  Only 2 Mistletoad sets left at the store, so check out these projects and then place your order today!  While you are over there check out the Flower Soft and Shimmerz!

I can't wait to share the other projects I have designed using these sets.  Please check back weekly to check out some more options using these sets!
Thanks for stopping by!!
Related Posts Plugin for WordPress, Blogger...