Showing posts with label Project - Home Decor. Show all posts

Sunday, January 22, 2012

Valentine Printer's Tray


Hello paper crafters.   I have a corner in my studio that I would like to decorate with seasonal projects.  I've been working of Valentine projects.  Tonight I"m sharing a printer's tray designed with photo's of my sweetie and I from 2006.   This printer's tray was purchased at Hobby Lobby for $9.99, I think.  It's similar to the one made by 7 Gypsies, except the window's are in the opposite direction and it runs $19.99.  Each window is 4 x 6.  I have been collecting Valentine products for a long time, so it was really nice to use some of my stash on this one.  All of the patterned paper used is by Making Memories "Je t" adore".  I LOVED this release last year and stocked up on some of the paper and embellishments.

Window #1


Window #2


Window #3

Window #4


Window #5


Window #6

You can view all of my VALENTINE projects HERE.
Thanks for stopping by today!
Melisa


You can view all of my Altered Projects HERE

********************************************************

Project Details
Patterned Paper - Making Memories "Je t' adore"
Roses - Wild Orchids Crafts
Ink - Ranger Distress Ink - Vintage Photo (used around edges of patterned paper and embellishments to distress)
Distress tool
Deckled Scissors
Golden Glaze "Fresco Cream"  (brushed on paper doily's)
Heart and round paper doilies from Michaels
All the rub-ons are really old - Creative Imaginations Marah Johnson Swatch Book Impress-ons Bliss Designs except for the "If I live to be 100 ..." and "I love the way you love me" in window 6. It is Cloud Nine Designs. 
Window #1
Angel cut-out - K&Company Valentine Emphemera by Kelly Panacci
Spellbinders "Fancy Tags 1"
Stamped doily with "love text" from "Love Struck" stamp set by Tim Holtz

Window #2
Chipboard heart and key / lock charms unknown.  I coated them with gesso and then painted them with cream acrylic paint.  Then applied the distress ink with a eye shadow applicator.
Cupid in background is from "Love Struck" stamp set by Tim Holtz

Window #3
Heart resin embellishment is Melissa Frances "With All My Heart"
Angel Digital image / cut-out - Lisa's Altered Arts

Window #4
Digital image / cut-out - Etsy Digitalimage4You
Chipboard - Maya Road

Window #5
Digital image / cut-out - Etsy Cottonfield Farms sheet #101

Window #6
Postcard - unknown
Angel - K&Company Valentine Ephemera by Kelly Panacci
"love" chipboard Fancy Pants
***************************************************************

Challenges
Flourishes - Anything but a card
JUGS - red / pink / white
Sugar Creek Hollow - go girly / shabby chic
Dancing in Pajama's - color challenge
My Time to Craft - favorite embellishement
Papertake Weekly - Buttons, bows, bling, or blooms
Crafty Emma's Store - Anything but a card
The Crop Stop - distressing, vintage, shabby

*************************************************************
Link Parties
Nifty Thrifty Sunday @ Nifty Thrifty Things
Sundae Scoop @ A Time To Create
Sister Sunday Link Party at Sister of the Wild West
The Sunday Showcase @ Under the Table and Dreaming
Make Monday Marvelous @ C.R.A.F.T.
Made by You Mondays @ Skip to my Lou
Inspire Me Monday @ Singing Three Little Birds
Uncommonly Yours @ Uncommon Designs Online
Whatever You Want Wednesday @ Free Pretty Things
WOW Me Wednesday @ Gingersnaps Crafts
A Crafty Soiree @ Katie's Nesting Spot
Watcha Got Weekend @ Lolly Jane Boutique
Show and Tell Friday @ My Romantic Home
Feathered Nest Friday @ French Country Cottage
Strut Your Stuff Saturday @ Six Sister' Stuff
Check Me Out Saturday @ A Vision to Remember

Friday, September 17, 2010

Altered Cigar Box


Last week I was searching for items I could use in my art, at a local antique store, and found this wonderful wooden cigar box for $2.50.  I also found some tiny bottle brush trees that I hope to use with a Christmas or winter scene in the future.  Pink Persimmon sells these adorable little chipboard houses, Vintage Colonial House by Melissa Frances and I have been wanting some.  Now I have to get them so I can use my little trees!!  Do you ever go to "antique stores" looking for great finds like these??  Not all of it is "antiques".  And you know what they say, "One man's junk is another man's treasure".  You have to be careful though.  Some of that stuff is priced crazy. 

I knew as soon as I seen the cigar box what I was going to do with it, because it has been one of those projects I've been planning on creating for a while.  I wanted to make a gift card set for my sweet mother-in-laws birthday in november and had been considering what I would store them in.


 I used "Butterfly Collector" and an art stencil - "Botanical Swirls",  by Layers of Color.


 If you have been following me for very long, then you know I LOVE butterflies.  And this set by Layers of Color is so gorgeous.  Especially that medallion.  Wanna see my butterfly shadow box I created earlier in the year??  Check it out HERE.  Sorry to get off subject, but it is one of my most favorite projects I have ever created and enjoyed seeing it as I walked through my diningroom this spring.  I even wrote a little poem to go with it with the intentions of creating a framed project using the poem, to set beside my butterfly box.  I'll have to add that next spring!

Tutorial
This project was a little messy to create, but worth it.  I could have just used patterned paper, but wanted more of a handmade, textured feel.  So, I created my own background. 


I honestly wasn't sure where I was going when I began the process and the end result was an accumulation of errors and layering color until I got the look I wanted.  So I will describe the process the best that I can, but know that what you should take from this is that sometimes you just have to sit down and play with color and mediums until you get the look you want.  My first panel turned out horrible.  But I learned from that and I'm very pleased with the results of my second panel. 

I started with a heavy cold pressed watercolor paper and trimmed to the size of the top of the box.  I watered down some acrylic paint, Making Memories Wisteria and brushed it over the paper.  I completely covered it with this wash and then let it dry.  Then I used my stencil to create some texture.  I used stencil adhesive, but the modeling paste is so thick, it might not be necessary.  Sorry, I haven't tested it.  With a palette knife (Just a plastic knife with a bent handle for easier handling.  Found in local craft store in the art section for about $1.  Well worth it, because that angled handled really helps) I spread light modeling paste (also found in the art section of local craft store) over the stencil.  Use the palette knife to level the paste and wipe off the excess.  Let this dry.  I really rushed mine and used a heat gun to help it along, because I had to move the stencil over to cover the entire panel.  You can see the raised area's created with the modeling paste a little better in this photo.


Next I realized I wanted two shades of purple.  So I used a stipple brush to pounce on another purple, Brilliance Pearlescent Purple.  These inks have just a little shimmer to them.  I inked up the Tim Holtz applicator tool with Pearlescent Chocolate and gently began adding it to the raised, modeling paste design.  Some of the ink got on the background, but that was ok.  I also distressed up the edges with it as well.  Then I decided I wanted to use gold as an accent, so I added a little gold pigment ink to the background.  It didn't really show up very well.  At this point I decided I had covered up too much of the lightest color purple I started with and began to pounce on some Brilliance Moonlight White to lighten some of the area's.  See how this process works, teehee.  And lastly I wanted the modeling paste swirls to stand out a little more. So I used a tiny paint brush and began adding Shimmerz Golden Wheat and Shimmerz Blingz Gold Glimmer here and there.  I didn't want to cover all of the swirls, because I wanted different shades.  By this time I had a mess and took a break to clean up the stencil / palette knife and my stipple brushes. 


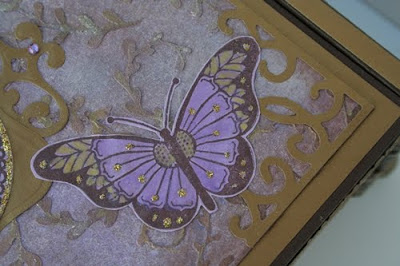
I found a very old piece of DP in my stash by Colorbok that was a little lighter purple than the background.  I stamped my butterflies with Pearlescent Chocolate (This is my all time favorite brown ink.  I use it all the time, especially around the edge of images or projects to distress them).  Heat set.  Cut around edges with cuticle scissors (You have so much more control when cutting small images, or around curved lines, with cuticle scissors).  Add Shimmerz Golden Wheat and Lilac with a very small paint brush as shown.  If I got too much on a brown line, I used a tooth pick to scratch it off while it was still wet.  Add Stickles Glitz - Champayne to the little dots on the butterfly wings and on the body of the smaller butterflies.  Also add it to the outer border of the butterfly medallion.  Set this aside to dry.

Use Spellbinders Labels 1 and one of the Fancy Tags layered over one another to create a background for the butterfly pendant.


I realized that I needed  something in the corners so I found this really awesome Sizzlet set with decorative corners, Architectural Accents Set.  I think they turned out great!


After I finished the top panel, I painted the box brown.  I cut the side panels and ran them throught my Big Shot with a Cuttlebug embossing folder, then adhered them to the sides. I covered the top of the box with gold paper and then my butterfly panel.  I added these really awesome "feet".  They are by Tim Holtz.

There is nothing worse than having someone describe a process to you and not having an idea what they are talking about.  So, here are some photo's of some of the other tools I used to create this:


I like this stipple brush because the hairs are different lengths and soft.  Mine looks like this, but the handle is solid wood.  Unfortunately there is no manufacturer on the handle and I would love to find more of them.

I hope you were inspired to get really messy and try something new this week. If you find this tutorial inspiring and use it on a project of your own, I would love to see it!!
Thanks again for stopping by!

You can view all of my Altered Projects HERE
You can view all my Altered Cigar Boxes HERE

Wednesday, July 7, 2010

Altered Wooden Box


Good Morning!  It's time for another Creative Belli Challenge and this challenge we were ask to alter something we had in our stash.  My stash is HUGE in this catagory.  I love to alter, so when I see neat things to alter I grab them. Of course I always plan on getting it altered asap, teehee.  HUGE STASH.  Hmmmm maybe I should offer some up for blog candy. 

I went with red/ black again.  Sorry if you are sick of it, but I wanted this little box to match my craft room.  Aren't those roses on top gorgeous!  Well they are from Layers of Color.  I'm so excited to be a Guest Designer for Layers of Color this month.  They sell the most wonderful stamps and stencils.  You can check them out HERE.  This particular set is called Vintage Roses.


I started by removing the hinges on the back and lock on the front.  When I'm shopping for alterable items, I always think about how easy it will be to disassemble and alter.  Then I painted the base black around all the edges.  I use old music paper around the base.  I had this really cool 3-D frame made by Making Memories that I thought would look good around the glass window.  It was part of their "Sabrina" Collection. 
Then I stamped and colored my image from the Vintage Roses set.


Hope you were inspired to alter something you've been hoarding. We would love to have you join us over at the Creative Belli Challenge Blog.   You can check out the challenge details and more wonderful altered projects there by their awesome DT!

But before I go, I want to share one more Layers of Color project with you using Vintage Roses.


Thanks for stopping by and have a blessed week!

You can view all of my Altered Projects HERE

Thursday, July 1, 2010

Altered Paper Mache Pot

Good Morning.  I am so excited to announce that I have the pleasure of serving as a guest designer for Layers of Color this month.  I will be sharing projects using several of their stamp sets this month.  Layers of Colors sells the most wonderful artisitc stamps with a vintage flair!  They also just released a line of Art Stencils that are fabulous.  Their design team has been showing off lots of idea's for using the stencils.  Their GALLERY is just loaded with awesome idea's to inspire you.  You can find more wonderful inspiration on the Layers of Colors BLOG.  Laura with LOC is making my guest DT announcement on her blog today, so if you get a minute to hop over and leave a comment, that would be awesome.
LAYERS OF COLOR

Today I am showing off "Nature Walk".


I thought this project would be a great gift for a co-worker or friend. They could sit it on their desk at work to brighten their day. The Birthday Wishes sentiment could be removed later. It's a fun and easy altered item. I picked up this paper mache' pot at a local craft store, covered it with old music paper and coated with a red glaze. You could probably create your own glazes by thinning down acrylic paint. But I have several colors made by Golden. I also have a bottle of "Golden Acrylic Glazing Liquid". I mix this with acrylic paint to create my own glazes. Glazes are fun because they are translucent and allow you to add color without covering up whats below.


I did add a decorative image from another LOC set called "Touch of Elegance".  I used it in the center of the smaller flowers. I found these fun fabric brads at Hobby Lobby. They are called "Spare Parts" and made by Paper Studio.


You can see the back doesn't look so great. I twisted green floral wire to create the stems. I punched white circles to help secure the wire to the back of my flowers. 

I will be sharing another altered project using Layers of Color stamps next wednesday!  So please stop back by.

You can view all of my Altered Projects HERE

Saturday, April 17, 2010

Layers of Color - Gothic Crosses


I loved this set the minute I seen it.  I have a Gothic Cross Collection in my home, so I thought it would be nice to create a few home decor pieces to go with that theme.  Now I just have to find a frame.  Guess I should have started with the frame.  For now, there is an easel on the back so I can set it out.
I love collage, and texture!  So this one is just that.  No pumus on this one, modeling paste instead.
Stamps : Layers of Color Gothic Crosses and Touch of Elegance
GinaK (bible verse)
Tutorial : Using Modeling Paste
1. I started with corrugated cardboard as my base.  Use gel medium to adhere some music paper.

2. Brush over this with a glaze by Golden - Sea Foam Green and then age it with some brown distress ink - vintage photo.
3. Stamp various Gothic Crosses and emboss.  This set has a 2 step option and you can stamp the center first, mask it, and then stamp the cross.  I used my Eclipse Masking Tape for this, I LOVE that stuff.  Once I stamp and cut a mask, I store it with my stamps for future use.
4. Create texture using modeling paste and a metal embossing template (circles). I rubbed on more modeling paste around the edges and brused it randomly. You can see the texture better on 2b view.  Let that dry. 
5. I'm having a hard time remembering if I rubbed more glaze over the modeling paste (it's white) to make it green or just sprayed with Glimmer Mist - Garden Fairy.  Either way I did spray with Glimmer Mist last.
6. Stamp verse and cut with your favorite Spellbinders die.  I used Labels #5.  I used chalk to get the green background.  Add decorative element at the top using one of the images from "Touch of Elegance".   Add jewel.  Secure to base, and then as an after thought, I sprayed with Work Fixative, since I used chalk on the label.
If you missed my other Corrugated Home Decor pieces then scroll down.  I just posted 3 others earlier in the week.
Thanks for stopping by!

************************************

You can view more of my Faith Art HERE.
You can view more of my Cardboard Art HERE.
You can view more of my Mixed Media / Collage Art HERE.

Wednesday, February 17, 2010

Butterfly in a Box


Good Morning!  Today I am sharing with you a Home Decor Project.  As I have mentioned many times, (and will do again for any new readers), I love to use my stamps to create many different type projects and I want to encourage you to do the same.  It's nice to walk through the house and see some of my favorite images on display.  Spring has arrived and it's time to bring out my altered birdhouses and I'm so excited to add a butterfly collection to my Spring Decor this year.  I am using this project for the Copic Creations "Coloring embellishments" challenge.  I colored the 1/2 pearls in window 4 and 5 for this challenge. Scroll down to see those windows.

Before I get to the details, I need to tell you that I am using this project for the Creative Belli Challenge to use butterflies.  But don't forget to hop over and check out the Belli Blog Give-away for this challenge!  $30 worth of stamps!  Check it out HERE!  We hope you will decide to join us for our butterfly challenge!

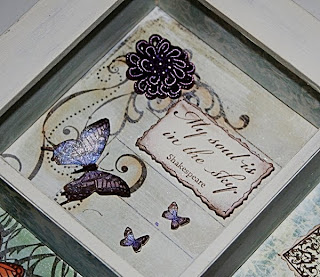
I spent alot of time working on this one.  I purchased the shadow box on sale at a local scrapbook store. It was solid black, so I started by altering the box, inside and out.  Then I brought out my butterfly binder collection and started stamping some of my favorite butterflies.  Next, I searced for quote, phrased that match.  Alot of what I used is from a Cornish Heritage Farms set called Vintage Butterflies.  Most of the rest of the products used are from The Angel Company. While I was working on my box, I wrote a little poem.  Now, I am NO WRITER, and I'm terrible at english, so try to restrain your criticism, teehee.
Here we go...

Yesterday I caught a butterfly and put him in a box,
So I could enjoy his beauty.

Today I heard a tap on the glass, and the butterfly said,
"M'am, this is not my duty".

He further expained, I have been ordained,
by the one who sits on high,
To share this beauty with many others,
by floating in the sky.

So, I let him out of the box.

Melisa Waldorf 2010

Alright, enough with silly poems!  Lets get to the detailed photos!

Window 1

Window 2


Window 3

Window 4

Window 5

Window6

Window 7

Window 8

Window 9
(quote by me!! and I thought is was very clever)

Window 10

Window 11

Window 12

Thanks for stopping by!

You can view all of my Altered Projects HERE

Sunday, May 11, 2008

Altered Bird House - Spring


I'm out of my rut! I had so much fun last month creating some spring decor to display in my diningroom. I bought wooden bird houses and paper mache eggs at a local craft store and altered them. I used pp, paint, stamps, and ink. I hope you like them!


You can view all of my Altered Projects HERE
View all my Altered Bird Houses HERE.
Related Posts Plugin for WordPress, Blogger...