Monday, March 1, 2021

Art Journaling with Shawn Petite Stencils and Collage

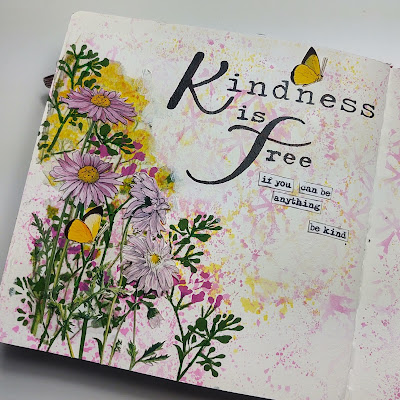
 Hello art friends.  I try to mix things up a little here and there and try new things in my art journal.  Sometimes I try different background techniques or different color schemes and today I"m doing both!  I love the bright colors on this one.  


I will also share my experience printing florals on tissue paper and tell you how I fixed a little issue with printing my some of my florals.


I'm also going to tell you how you can get free printables from Shawn Petite.


It's a a short video today, but I packed a lot of info in there so I hope you will watch all the way through!


Hope your inspired!

Melisa


(click on each of the names of stencils and collage packs for direct links.  These are NOT affiliate links.  Shawn has discontinued her affiliate program.  You can support my channel by liking, commenting, and subscribing.  Thank YOU!)

SUPPLIES :

INK : Ranger - Mustard Seed Distress Ink, Picked Raspberry Distress Oxide Ink

STENCILS : Shawn Petite - Vintage Quartrefoil, Modern Pattern 3, Little Flower Statice, Little Flower Baby's Breath, Love Always Wins

COLLAGE PACKS : Shawn Petite - Sacred & Ordinary, Wander, Vintage Butterfly

PAINT : Liquitex - Cadmium Oxide Green, Medium Magenta

OTHER MEDIUMS : Liquitex - Gesso & Super Heavy Gesso, Aleene's Tachy Glue

Saturday, February 27, 2021

TIM HOLTZ Paper Doll Art Journal Layout with Video Tutorial for beginners

 Hello art friends!  Today I have sharing another Tim Holtz Paper Doll art journal layout.  I used ephemera, stencils and stamps by Tim Holtz as well.  


If you’ve watched my other paper doll video’s, you know I love what I call “the sitter’s” and finding things for them to sit on.  I paired this sitter with a bird image from one of my favorite stamp companies, RedLead Paperworks.  


And I actually have several Paper dolls already paired up with some of their stamp images sitting on my desk waiting for me to write their story.  


So this layout started with the little girl on the back of the bird.  This little girl is so cute and I imagined her peacefully laying in a field of flowers, listening to the birds sing, & day dreaming.   Her imagination takes her on adventures on the back of a bird. So like my last paper doll video, I decided to write a poem to tell her story.   If you like the poem and font I can send you a copy in a Microsoft Word Document.  Just like the video and leave me a comment and I will share my email.


Check out the video below to see how I used collage, stamped and stenciled tissue paper, gesso and supper heavy gesso to create this dreamy looking background.


Watch MORE PROJECTS using Tim Holtz paper dolls on this playlist HERE

Watch MORE PROJECTS using Shawn Petite products on this playlist HERE

Hope you are inspired!

Melisa


Supplies :

Ephemera : Tim Holtz Idea-ology Paper dolls, Field Notes, Botanical, Collector, Keepsakes, Salvaged Tags   Small Talk phrase stickers

Stamps :  "She is Wating to Fly" RedLead Paperworks     "Fragments"  & "Game Pieces" Tim Holtz Stampers Anonymous

Stencils : "Flourish" "Gothic" - Tim Holtz

Mediums : Matte Medium, Gesso, Super Heavy Gesso, Liquitex Prussian Blue Hue


Monday, February 15, 2021

Wanderlust 2021 - Week 6 with Kristin Peterson

 Hello art friends!  In week 6 of the Wanderlust Class I'm attempting to use collage and paint in Kristen's style.  So much fun!!  The challenge was to combine a variety of ephemera : old, new, found, self made.  I don't have a lot of details to share because it's literally just loosely and messily laying down collage and paint.  I had to really let go of my control issues with this one!


I did pre-select my ephemera.


The background was a hot mess and I unified all of it with the last layer, stenciling white.


Watch MORE PROJECTS using Tim Holtz paper dolls on this playlist HERE

Watch MORE PROJECTS using Shawn Petite products on this playlist HERE


Hope your inspired!

Melisa

Sunday, February 14, 2021

Wanderlust 2021 - Week 5 with Kasia

 Hello art friends!  I made it to week 5.  I am determined to catch up and allowing myself some grace if I want to skip a week here and there.  Week  5  starts a new theme - Ephemera.  And Kasia challenged us to include contrast.  Not contrast in color, but in style!  So today's project includes something old - the photo, and combining it with an abstract style.  


I'm still working in my  5 1/2" by 5 1/2" Arteza Art Journal.  I'm going to try and do all my Wanderlust layouts in the same journal.  I used Tim Holtz paper dolls, ephemera, stamps, and stencils on this one.


The stencil REALLY helped me get a little more of an abstract look.


The stencils are "Well Rounded" by The Crafter's Workshop.  I used both the 6x6 & 12x12.

Watch MORE PROJECTS using Tim Holtz paper dolls on this playlist HERE

Watch MORE PROJECTS using Shawn Petite products on this playlist HERE

Hope your inspired!

Melisa

Tuesday, February 9, 2021

Wanderlust 2021 - Week 4 with Shay Michelle

Hello art friends!  No you did not miss my week 3, I decided to skip it and move on to week 4.  Week 3 was a self portrait and it was going to be extremely difficult for me to do that one.  Maybe some day.  


Week 4 was a lot of fun.  We used watercolor in an unconventional way and Shay showed us a really cool technique.  I tried the technique, but I didn't do something right and I didn't get the same results Shay did.  But my attempts resulted in a layout I kinda like.  So not all was lost!


I can't want to share Shay's technique from her class, since it's a paid class.  But I can tell you Shay challenged us to work with a dandelion as a focal point.  And our theme was still Reflection with Shay's twist - Wishes.

I ended up going in a little bit of different direction as far as the artistic part of the layout though.  For the base I started with blue watercolor paint over gesso.  When Shay's technique didn't pan out for me I decided to try again, by adding some purple paint and I like how the background turned out .... Serendipity!


I started out adding the stems and centers with a brown acrylic paint pen, then used a white acrylic paint pen to start drawing lines out from the center.  Then added little "v's" along those lines.  I added some glitter glue along some of the lines.  While that was drying I used a script stamp and Whisper White "craft" ink by Stampin' Up.  Then I sprayed both pages with "Workable Fixitive".  I wanted to set everything so I could add more layers if I wanted to without reactivating the water color background.   


At this point the white acrylic paint of my dandelions was not showing up as well as I wanted.  I added a little purple between the lines, another layer of white.  After the paint dried, I added some darker lines with a charcoal pencil.  This one is really hard to explain.  Video would definitely make mores sense.

I hand wrote the title on tissue paper and used water to tear away around each word.  That aloud me to move the words around and figure out the placement.  I also stamped the little girl on tissue paper.  I used matte medium to adhere them down.

Hope your inspired!

Melisa

SUPPLIES

Watercolor paints, acrylic paint pens, glitter glue, charcoal pencil

Stamped image of little girl from my stash - really old and discontinued

Related Posts Plugin for WordPress, Blogger...