Showing posts with label Tutorial - Mixed Media Background. Show all posts

Thursday, March 8, 2012

Mixed Media Tutorial / Artist Trading Card / Pink Persimmon

Artist Trading Card 2.5" x 3'5"

My weekend begins tomorrow and I'm looking forward to it. I was able to get off tomorrow and will be going to the community "Scrapsisters" get together tomorrow, and then 3 of my very good friends, Deb, Robin, and Melayne are joining me to stamp away the morning Saturday. And then, to top it all off, my sweet girl is flying in from Florida!!! I know we will be sharing some crafty time together as well!    I hope all of you are blessed to be surrounded by crafty friends as well!
 I am also excited about Pink Persimmon's newest release!  I enjoy creating ATC's and this set is PERFECT for those.  And of course they can be used for other projects as well.  So today I want to share an ATC that I created using background stamps from 2 of the sets, "Fairy Tale Patterns" and "Spring Time Patterns" and the girl from "Hello Vintage Girl".  

I don't participate in gossip, but I couldn't resist the phrase, "No! She didn't".  I imagined her on the phone with one of her crafty friends, and the friend is telling her something VERY important, like, "You will never believe what Susan did the other night at the crop.  She used  a hammer instead of a Crop-a-dile", teehee.   Women can be so funny! 

I also have a card to share using another set, "School Uniform".   I am also sharing a step by step tutorial on how to create the background and the paper pieced girl.  

For beginners, let me explain that Artist Trading Cards are little 2.5" x 3" pieces of art that you can swap with friends or collect for yourself.  If you are not familiar with Artist Trading Cards then you may want to take a moment to check out this post HERE.

Are you ready to get messy???  I hope you didn't just get your nails done.   Let's get started!
1.  Begin with a piece of watercolor paper.  I used Canson 140lb.  Trim to 2.5" x 3.5".  Spray with Glimmer Mist Black Cherry.   Dry with your heat gun.  I'm hoping this step will help to heat set the spray ink, so it doesn't bleed so much later.

2. After it is dried, stamp with the polka dot pattern from "Spring Time Patterns" and VersaMark Ink. Sprinkle with clear embossing powder and heat emboss.


3. Coat with white acrylic paint. I used a soft bodied paint by Liquitex. It's thicker than cheaper paint. But by all means use the cheaper brands. You just may have to apply several coats. After dry, use a lightly damp paper towel and begin wiping it across the card. Most of the paint should come off of the polka dots because the embossing powder resist the paint. Some of the paint on the background may come off as well. All to dry and repeat process as many times as needed to get the distressed look below (I did it twice).


4. Use the script background from "Fairy Tale Patterns" with black Staz-on ink. Staz-on is an ink that adhere's to non-pourous surfaces like the embossed polka dots. It may be possible to use another type ink.  I didn't experiment. You are going for a distressed look, so practice on a piece of paper first to figure out where you want to apply pressure so that the whole image does not get stamped.


All the mess is over with.  Now we are going to paper piece our "Hello Vintage Girl image" .  It's time to get out those cuticle scissors or some other type percission scissors that allow you to cut details.


5. Stamp your Vintage Girl 3 times as shown below.


6. Color the area's shown below. Notice I didn't worry about being super neat because I knew I was going to cut her out.


7. Trim all the pieces as shown below. 


8. Stamp Vintage Girl on the card front with Staz-on ink. This serves as a template for where to put your pieces as well as add the area's you are not piecing, the phone cord.


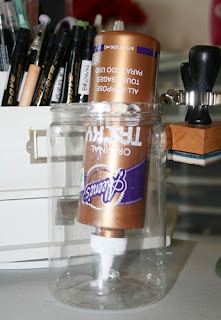
9. Adhere her blouse and skirt as shown below. I use Aleene's Tacky Glue ($1.47 at Walmart). This is my favorite adhesive and I use it 95% of the time. I like the control I have and that I'm able to fully adhere my pieces. Here's a tip : It's thick so I like it ready to go. I store it upside down in a peanut butter jar that has a little dimple in the bottom. It's a wet glue, so it can warp your paper if you use too much and if the paper is supper thin.  A dab will do.


10. Adhere the rest of the peices as shown below.


11.  Trim the card down a little so that it will still be 2.5" x 3.5" after you add the deckled background (3/16").  Adhere to black cardstock and trim with deckled scissors.  Create words on computer, trim and adhere.


I hope you enjoyed today's tutorial!
big hugs,
Melisa

Check out Pink Persimmon stamps HERE.

You can view all of my ATC's HERE


See all my MIXED MEDIA TUTORIALS HERE
See all my MIXED MEDIA / COLLAGE PROJECTS HERE
See all my ART JOURNAL PROJECTS HERE


This card uses "Scottie Dogs",  "Vintage Greetings", one of the backgrounds from the "School Uniform".  The background die is by Spellbinders, "Labels 21"

Thursday, December 8, 2011

3 Mixed Media Background Tutorials / Artist Trading Card

Artist Trading Card 2.5" x 3.5"

I have to tell you that the best part of these 3 ATC's for me was creating the backgrounds!  Back in Oct, my friend Deb and I got together for a mixed media day and experimented with some different techniques.  I have a really great book, "Surface Treatment Workshop" and it has some fun techniques in it.  Most of the technique's I have either tried or seen before, but all the projects using the techniques in the book were very inspiring.  In addition, it's nice to have 1 book with so many techniques.  I tend to forget things, so even though I've done something before, looking through the book reminds me / inspires me to do it again.  Artist Trading Cards are great size for just practicing since they are only 2.5" x 3.5" and fast to create.  If you are new to Artist Trading Cards, then you can take a look at a basic article I wrote way back in 2010 HERE.  And view all of my other ATC's HERE.

The first one was a "rinse aid resist" technique.  It's the rinse aid that is found on the dish washing liquid aisle at the grocery store.  Mine doesn't look as good as the projects in the book, but I still like how it turned out.  I used 3 different color acrylic paints and 140lb water color paper.  hmmmm .... I knew you were going to ask me what colors, teehee.  I only wrote I used 3 colors, but not the colors, teehee.  Well obviously pink and yellow. 
1.  Apply coat of paint and while it is still wet, let the rinse aid drip down the card from top to bottom. 
2. Let the paint dry and then wipe off the rinse aid.  Mine didn't resist so well, so I definitely want to try this one again.  So I added more paint and rinse aid, dried and wiped again.  I can only assume at this point I did the process again with a 3rd color since I wrote I used three colors, but I can't remember.  My background is the result of a technique gone bad, teehee.  So I just kept trying it with a different color and this is what I ended up with.
3. Stamp it with a script image and with orange ink.  My girl with wings and the words are from Lisa's Altered Arts.  The image is kinda fuzzy, if that makes sense.  I don't know if they are intended to look that way or if it's my printer.  My printer doesn't work that well at times.  I guess I"m just used to clean crisp images.
4.  Trim words (Lisa's Altered Arts).  You can create your own with your computer.
5.  Doodle around work blocks and edges.
6.  Add button.

Artist Trading Card 2.5" x 3.5"

I have been using paste for a couple of years. After seeing a project in the book that had raised circles using the paste and the colors aqua / red, I was inspired to create this background.  Paste are found in the artist section at your local craft stores.  I've used Aquitex and Golden and both work fine for me.  It comes in white.  You can add acrylic paint to it.  Or spread it on and after it dry's add paint over it.  It's fun to use with stencils.  I punched circles in heavy cardstock to use as a stencil.  You can get lots of fun stencils from Layer's of Color and from Crafter's Workshop

1. Spread modeling paste over the entire background with a palette knife (also found in the artist section of local craft store).  
2.  After dried I used my self-made circle stencil and applied more paste. 
3.  Apply paint (red, aqua, and a dab of white) until you get the distressed look you want.  I often use fan brush to add little wisp of color here and there. 
4. Distress using a script stamp.  The one I used was already distressed (Prima).  It's a 2 1/4" x 2 3/4" clear stamp.  I swiped ink over parts of the stamp and added small parts of the image hear and there.  see below.


5.  Hand cut grass, flower, and banner from patterned paper, then doodle around the edges.

Another great book with fun background idea's and great ATC inspiration is "Artist Trading Cards Workshop" .

Artist Trading Card 2.5" x 3.5"

The above background was created using a paper towel.  I've read can also use a baby wipe, I've just never done it.  Paper towels are more readily available at my house, thank goodness, teehee.

1. Wet  paper towel and lay over some watercolor paper.
2.  Add watered down acrylic paint.  Just enough so it is thin enough to be absorbed easily.  The paint bleeds together a little. 
3. Pick up your paper towel and lay it down somewhere to dry.  I use wax paper.
The paint will bleed through on to the watercolor paper and you can use this for the base of backgrounds as well.
 4.  Lightly swipe more paint here and there if needed to get the distressed look you want.  Whenever I do this, I use a fan brush. 
5. Trim down to slightly smaller than ATC.  Stamp randomly with a script image and black ink.  Adhere to black cardstock.
6.  Tear and add a patterned paper. 
7.  Add cut-out butterfly's and words.
8.  Doodle around the edges of word blocks and patterned paper.  I just realized I forgot to doodle around the sides, so I will be going back and adding that.

I hope you are inspired to experiment with some new background techniques!
I would love to see ATC's you create using these techniques.  Email my a link when you have posted yours.

hugs,
Melisa

You can view more of my Artist Trading Cards HERE.
You can view more of my Mixed Media projects HERE.
You can view more of my projects using Modeling Paste HERE.
You can view more of my tutorials HERE.


***********************************************

Modeling paste

Palette Knife

This is a fancy set.  I just own one ... the first one on the left.  You can buy just the one at local craft store

Friday, November 25, 2011

Artist Trading Card / Faith Art

(artist trading card 2.5" x 3.5")

Good morning paper crafters.  I hope you had a wonderful Thanksgiving day and are not too stuffed.  We had a wonderful day and I had fun trying some new recipes this year.  Today I will be relaxing and putting up some christmas decorations.  No black friday shopping for me.  I don't like crowds and univited people in my personal space.  Thus I avoid fairs, concerts, and Walmart for the entire month of december, teehee.

Today I am doing the Faith Art Friday post over on the Layers of Color blog.  I hope that you will check it out every friday.  Here's my post :

"Isn’t it wonderful how we can see and experience God all around us!  The last few months  have been heartbreaking for me because someone who is dear to me, and had been a follower of Christ, shared that he no longer believed there was a God.   This person is very scientific and believes that there is no evidence that there is a God and that He created this wonderful world that we live in.  I was deeply saddened knowing the consequences of our unbelief.  It’s difficult for me to understand how some people can NOT see the evidence, it’s all around us. 
The whole earth is full of His glory!  Isaiah 6:3

I am so thankful that I can see, and for all the beauty that God surrounds us with.  I am so thankful for a loving God who gave so much for me that I might have eternal life.  It’s a free gift to anyone who wants to receive it, to anyone who can see the evidence of God all around them"
If you would like to know more about what I am talking about, just email me at luv_2_stamp@yahoo.com

Hugs, Melisa

***************************************************

Project Details
Stamps : Touch of Elegance, and Dotted Peonies art stamp sets.
Copic Markers : RV10, RV34, RV19, YG61, G21, G24
Spellbinders : Nestibilities Labels Two and the Grand Calibur

The background was created using the circular image from the "Touch of Elegance" art stamp set. It's difficult to see. But I stamped the image with VersaMark ink and then embossed with white embossing powder on 140# cold press water color paper. This works as a resist. Next I rub the orange paint over the entire card, let is set for a minute and then used a damp paper towel to rub some of the paint off, exposing the embossed images. It gives you this cool distressed look. Next I rubbed hot pink paint around the edges to distress it even more. 

Gotta share!!!  I'm so excited ...  I just figured out how to find the code for the font color I want online and then change it in the HTML here!!!  Whoowhoo!  I like to make my links a different color but I want it to match my art.  I have no idea why Blogger doesn't offer more colors for us computer illiterit folks.  My children will be so proud of me.


You can view all of my ATC's HERE
You can view more of my Faith Art HERE.

Wednesday, March 2, 2011

Mixed Media Tutorial / Tag

Hello Papercrafters.  I had some questions about how I created the tags I posted last friday.  So I decided to create another one and take step by step photo's.  I created this one using the cutest little tree stamp set by The Stamps of Life.  I have to say thank you very much because I won it by playing along with one of the CPS challenges a while back!  Stephanie, the owner let me pick out the set I wanted!  THANKS Stephanie!
You can check out The Stamps of Life HERE.


Supplies
Green and Yellow ink
Yellow, blue and green acrylic paint
tag
charcoal pencil
old book or music paper

**********************************

Project Details


Start by cutting a peice of old book or music paper slightly smaller than a tag.  The acrylic paints I use are really thick, so I added a little water to them in a dish to make them a little easier to smear around.  Paint yellow onto the word paper and blue onto the tag.  After the yellow is dry, brush on some blue paint.  Allow paint to dry between all steps.


Smear on some green paint.


Using a fan brush lightly wisp on more yellow.  Are you getting the picture now.  It's so easy, you just keep layering paint until you get the look you want. 


Adhere book paper to front of blue painted tag.  Smear on a little yellow paint around the edges here and there.  In this photo you can tell I lightly added more green with the fan brush.  Don't be afraid to use your fingers to smear it around as well.  Once I had decided what stamp I wanted to use (the tree), I decided to add more blue, so that the leaves would stand out a little more.  Used my finger on that one.  Outline with a charcoal pencil and draw on your scallops.  Distress edges with black ink here and there.

Paint inside the scallop green.  Add  Stamp the tree image and both birds.  Paint some old book paper yellow and then stamp the birds again, trim the bodies and adhere to tag as shown.  Stamp yellow and green leaves.  Doodle around the edges with fine tip pen - Micron 005, cut, and adhere around tree branches.  Add ribbon at top.

You can check out the other 2 Bookmarks I created using this technique HERE.

See all my MIXED MEDIA TUTORIALS HERE
See all my MIXED MEDIA / COLLAGE PROJECTS HERE
See all my ART JOURNAL PROJECTS HERE

If you are inspired to create a distressed painted background of your own or a book mark, let me know.  I would love to check it out.
I hope your week is a tree-mendously wonderful one!
hugs,
Melisa

Tuesday, October 19, 2010

MIXED MEDIA / ART JOURNAL PROJECT

Look what I whipped up last night!  I have to tell you that I am having the best time playing with canvas and background techniques!! I have been watching some of the background techniques that Donna Downey teaches over on her blog. She does weekly video's in her Inspiration Art Journal. I had been looking for some raw canvas to work on, but I'm wasn't sure where to find it. I just happened to be looking around in the artist section of Michaels and found this "Medium Texture Real Artist Canvas" by Fredrix in a pad format and decided to give it a try. I knew I needed something that would hold up against lost of wetness, me spraying it with water. AND IT WORKED!! I'm so excited.  I will say that I have also created a panel with a heavy watercolor paper and it works as well.  You can check out Donna's art journal pages HERE.  And her "Inspiration Wednesday" video's HERE.  Now some weeks may not be your style or you may not like them at all, but take away the technique and create your own version.  That's what I did with this one.  This doesn't look anything like what Donna would create!


Donna used a "journal" to explore techniques. But I don't have one. So I decided to finally use that 7 Gypsies Photo Stand I've had forever. I'm going to hang each panel on it, so I can flip through my pages. I trimmed the sheets down to 6 x 8".


 LOVE mixed media, but really don't have any skills in that area. So this will truely be an artistic journey for me. You should have seen me staring at the blank canvas when I first started this one.  It took me forever to get me background done.  If you are interested in this kind of art / growing as an artist, then I encourage you to check out Donna's Blog! I also found some downloadable Mixed Media Video's over at Cloth Paper Scissors. Here is a link to some FREEBIES.  And here is a link to some you can purchase for 14.95 (scroll down the page to see them) : HERE.

I got a chance to ask Donna about here journal in a video chat the other night.  They are handmade using a very heavy cardstock.  You can check them out HERE.  Or be a rebel and do your own thing, like me! 


Since it's Fall it just seemed like the logical direction to go in for this panel.  And when I think of fall, I think of rich colors and texture.  I started with some acrylic paints then started layering old book paper and some tissue paper, then more paint and Glimmer Mist - Harvest Orange.  The 2 large dies are from Creative Cuts and More - HERE.   Mine started out a bright orange.  I ran it through the Big Shot with an embossing folder and layered on some acrylic paint and Glimmer Mist - Harvest Orange.  I used some really old "Provo Craft" dies to create the smaller leaves.  Again adding acrylic paint.  Adhered to front of panel and traced around the edges of the leaves and edges of panel using a charcoal pencil (you can get these in the artist section at local craft store).


Next I opened up my Fall embellishment drawer and found these old rub-ons.  I did a google search and found this great quote.  I typed it up (leaving lots of space between the sections of words and printed.  But I didn't want the background to be white, so I cut some thin cardstock chalked up the paper, lightly adhered it over the words on the computer paper and then ran that same sheet through the printer again.  Now the words printed on my chalked paper.  I sprayed the paper with "Fixative" spray, tore close to the words around each one, and inked up the edges.
BTW the creamy chalks are the best.  I used my Craft T Products set for this project.


The other chalks I like to use are the Pearlescent ones from Pebbles Inc.  I think you can get them at Hobby Lobby.


Thanks for letting me ramble along again!  Hope you were inspired to create something fun and make sure and email me if you have any questions!

See all my MIXED MEDIA TUTORIALS HERE
See all my MIXED MEDIA / COLLAGE PROJECTS HERE
See all my ART JOURNAL PROJECTS HERE
I'm linking this one to the following inspiration challenge blogs!
The Shabby Tea Room posted a gorgeous fall colored cake to inspire us.
and The Pink Elephant challenged us to use orange and brown!
Don't forget to hop over and join us for the Creative Cuts and More blog hop tomorrow.  Lots of holiday idea's!!

Saturday, April 17, 2010

Layers of Color - Gothic Crosses


I loved this set the minute I seen it.  I have a Gothic Cross Collection in my home, so I thought it would be nice to create a few home decor pieces to go with that theme.  Now I just have to find a frame.  Guess I should have started with the frame.  For now, there is an easel on the back so I can set it out.
I love collage, and texture!  So this one is just that.  No pumus on this one, modeling paste instead.
Stamps : Layers of Color Gothic Crosses and Touch of Elegance
GinaK (bible verse)
Tutorial : Using Modeling Paste
1. I started with corrugated cardboard as my base.  Use gel medium to adhere some music paper.

2. Brush over this with a glaze by Golden - Sea Foam Green and then age it with some brown distress ink - vintage photo.
3. Stamp various Gothic Crosses and emboss.  This set has a 2 step option and you can stamp the center first, mask it, and then stamp the cross.  I used my Eclipse Masking Tape for this, I LOVE that stuff.  Once I stamp and cut a mask, I store it with my stamps for future use.
4. Create texture using modeling paste and a metal embossing template (circles). I rubbed on more modeling paste around the edges and brused it randomly. You can see the texture better on 2b view.  Let that dry. 
5. I'm having a hard time remembering if I rubbed more glaze over the modeling paste (it's white) to make it green or just sprayed with Glimmer Mist - Garden Fairy.  Either way I did spray with Glimmer Mist last.
6. Stamp verse and cut with your favorite Spellbinders die.  I used Labels #5.  I used chalk to get the green background.  Add decorative element at the top using one of the images from "Touch of Elegance".   Add jewel.  Secure to base, and then as an after thought, I sprayed with Work Fixative, since I used chalk on the label.
If you missed my other Corrugated Home Decor pieces then scroll down.  I just posted 3 others earlier in the week.
Thanks for stopping by!

************************************

You can view more of my Faith Art HERE.
You can view more of my Cardboard Art HERE.
You can view more of my Mixed Media / Collage Art HERE.
Related Posts Plugin for WordPress, Blogger...