Showing posts with label Theme - Love / Valentine Day. Show all posts

Sunday, January 8, 2012

2 more Valentine Cards


Here are 2 more Valentine Cards I created using "The Love Chapter" art stamp set by Layers of Color!  I guess you have figured out tha I LOVE this set because of all the different projects I created with it.  And isn't that cupid die so cute!


Fun news - I'm working on my first VIDEO TUTORIAL!  I hope to have it ready to share soon!
Thanks for stopping by!
Melisa

You can view all of my VALENTINE projects HERE.


*******************************************************************

Project Details
Card #1
Stamps : Layers of Color " The Love Chapter"
Patterned Paper : Making Memories
Cardstock : Bazzill and Papertrey Ink
Ribbon : Offray

Create A2 card from cream cardstock. Trim patterned paper slightly smaller and adhere to card front. Stamp phrase image multiple times on cream cardstock creating a background. Trim down to 3 x 3.75”, adhere to cream cardstock and trim around edges with deckled scissors. Wrap with red ribbon and adhere to card front. Stamp love block on cream cardstock and trim down. Adhere to red cardstock and trim around edges with deckled scissors. Adhere to card front. Stamp “i love you”
on cream cardstock and trim with deckled scissors. Adhere to card front.

Card #2
Stamps : Layers of Color
Cardstock : Bazzill
Ribbon : Offray
Roses and gems : Recollections
Cupid die : Quickutz
Trim cream cardstock 4.25" x 5.5".  Stamp phrase stamp vertically down left side with red ink. Stamp love block on cream cardstock, trim and adhere to black cardstock.  Trim around edges with deckled scissors and adhere to card front.  Create cupid with Quickutz die and adhere to card front.  Add gems.  Wrap with red ribbon and add red rose.  Adhere panel to black cardstock and trim around edges with deckled scissors.  Adhere to A2 card.

Friday, January 6, 2012

More Valentine Treat Bags


Here is another set of Valentine treat bags.  Designed using "The Love Chapter" art stamp set by Layers of Color.  They were very easy to put together by stamping the image on the front of the glassine bags using black Staz-on ink.  Adhere a bow / paper rose / and ticket. Trim patterned paper to fit inside bag.
Ribbon : Offray
Roses : The Wild Orchid
If you don't know about "The Wild Orchid" then you need to check out all their flowers.  Great deals.

thanks for stopping by!
Melisa

You can view all of my VALENTINE projects HERE.

Thursday, January 5, 2012

Shabby Chic Valentines


Good Morning!  I am back today with some shabbalicious cards created using some digital images I purchased from Cottonfield Farm!  Lots of vintage valentines to check out.  And you can't beat the prices!  I paid 1.99 and got 8 images.  These images are from a set called "Cupids and Fairies 2".  I'm not sure if there is a way to resize them.  I just printed the whole sheet and trimmed.  Service was very fast.  She sent me the jpeg of the entire sheet (8.5 x 11), I saved them, and printed them.

And ...  I have to share about the roses.  Aren't they beautiful.  Last month I made my first purchase from Wild Orchids.  I don't usually order from over sea's but the prices are awesome compared to Prima (sorry Prima ) and the service was great.  I was surprised at how quickly they arrived.  If you can find a better price on them, please let me know. 


I kept these pretty simple, so there isn't a whole lot of explanation needed.  I will say the I just brushed acrylic paint over a white paper doily for card #1.  Hope this puts you in a shabby mood!
Have a blessed day!
hugs, Melisa

You can view all of my VALENTINE projects HERE.
You can view more of my Shabby Chic projedts HERE.
You can view more of my projects using Digital Images / Stamps HERE.

**********************************************************

Project Details

Vintage Valentines images : Cottonfield Farm
Roses and lace : Wild Orchids
Patterned paper : Card #1 Glitz "Beautiful Dreamer"  (LOVE their supplies!)
Card #2 My Mind's Eye 12x12 Paper pad from Hobby Lobby.  The paper is really thin, but you get sooo much in the paper pad, and then with a 40% off sale  ....  It's a steal!
Pink Ribbon : Offray

***********************************************************

LINK PARTIES

Nifty Thrifty Sunday @ Nifty Thrifty Things
Sundae Scoop @ A Time To Create
Sister Sunday Link Party at Sister of the Wild West
The Sunday Showcase @ Under the Table and Dreaming
Make Monday Marvelous @ C.R.A.F.T.
Made by You Mondays @ Skip to my Lou
Inspire Me Monday @ Singing Three Little Birds
Uncommonly Yours @ Uncommon Designs Online
Whatever You Want Wednesday @ Free Pretty Things
WOW Me Wednesday @ Gingersnaps Crafts
A Crafty Soiree @ Katie's Nesting Spot
Watcha Got Weekend @ Lolly Jane Boutique
Show and Tell Friday @ My Romantic Home
Feathered Nest Friday @ French Country Cottage
Strut Your Stuff Saturday @ Six Sister' Stuff
Check Me Out Saturday @ A Vision to Remember

Thursday, December 29, 2011

Valentine Treat Boxes

I'm ready to start sharing Valentine projects!  I meant to get started in December, but just ran out of time and energy to write the post.  I stacked 4 boxed together and secure with a ribbon.  Isn't that little cupid die too cute!

I hope you are inspired to get started on some Valentine projects of your own.
Have a blessed day!
Melisa

You can view all of my VALENTINE projects HERE.

*******************************************

Project Details

Stamps : Layers of Color “The Love Chapter
Boxes : Creative Cuts and More
Chipboard letters : The Paper Studio
Punch : EK Success
Die : Quickutz
Glitter Glue : Stickles
Ribbon : Offray
Fold and adhere pre-cut, pre-scored boxes. Stamp background images on cardstock, trim and adhere to box front. Paint chipboard lettersand adhere to box front. Punch hearts, add glitter glue and die cut cupid. Adhere to box front. Stack four boxes and tie with ribbon.

Monday, February 14, 2011

Altered Paper Mache Heart Ornaments

Good Morning Papercrafters.  Today I am sharing 3 paper mache Valentine Ornaments I created.  I started with 3 pre-made paper mache heart ornaments from a local craft store.


This is the first time trying a project like this, so I think it will look much better the next time.  Since the ornaments were round, I needed to stamp on something that I would mold around the ornament.  So I used tissue paper.  The only problem was that I was determined I wanted the base color in beige, not white.  Well I didn't have beige tissue paper.  You would think I would have given up and just went with white ...  but no  .. .  that would have been too easy, teehee.  I decided I could color the tissue paper with ink, or paint.  And that's great, except he tissue paper color doesn't match my crackle paint color, so it doesn't blend well with the background. 


Now that I'm told you everything I don't like about it ...  let me tell you that the over all plan was a really good one that worked great and I will definitely try it again now that I have lived and learned!


Project Details

Stamps : The Love Chapter art stamp set by Nina Brackett for Layers of Color
Renaissance Hearts (marked down to $10.95), Royal Birds, and Regal Wings art stamp sets by Layers of Color. 
Paper Mache Ornaments pre-made, local craft store.

1. Coat each ornament with crackle paint and set aside to dry.
2. Stamp images on tissue paper ( I used pigment ink, Tsukineko VersaFine Onyx Black).
3. After the ink is dry, spread a few drops of water around the edge of the image.  The water allows you to tear the tissue paper easily.  Just make sure you don't get to close to the image and rip into it.  If you do get the water too close to the image, let it dry and start all over.  Better to do that, then tear into your image by accident.  When tearing, I keep 1 finger along the inside of edge of where I want to tear.  This also helps keep you from tearing to far in.  I like the torn look better than just cutting it with scissors.
4. After dry, use modge podge to apply image onto ornament, smoothing edges around curved area's.

At this point it's looking a little boring and definitely needs some red to spice it up.

5. Stamp bird, wings, hearts, and "L" onto beige cardstock with Momento Tuxedo Black and color with Copic marker.  Trim around the edges of each image and adhere to ornaments as shown. 
6.  Embellish with red rub-ons (I added the little swirly things).

The ornaments come with a gold cord coming out of the top.  I wanted red!
7. Tie red seam binding around gold cord at the top of the ornament.  Now pull the gold cord back and secure with a piece of tape/glue.  Ok there is probably a better way to do this, but I was in a hurry!  You could probably create a knot and then glue that to the top of the heart, and just cut the gold cord off.
8.  Embellish with little red roses (  I got mine at Michaels).


Thanks for stopping by!
hugs,
Melisa

You can view all of my VALENTINE projects HERE.
You can view all of my Altered Projects HERE

Monday, February 7, 2011

Vintage / Shabby Valentine Cards using digital stamps

Hello Papercrafters!  I'm sooooo excited to share these projects with you today because I think the images are soooo stinkin' cute!  Now I know you would never wait til the last minute to create your valentines.  But ...  let's just say you did ... then you might want to give a digital stamp a try.  And these 2 are just perfect!  The are from McMahon Five Designs.  I love their vintage digital stamps!


This little guy is called "Valentine Airline".  


And this little girl is "On the Phone".  I'm sure some of you could come up with a very clever Valentine phrase for this one, I'm just too tired!    You can check out McMahon Fives "Valentine" section to see all their Valentine digitals.

And I finished another Vintage Valentine using an image I had purchased at a local antique store.


Here is what the card looked like, before I cut it up:


And in case you missed it ...


This is a card I created using this old valentine -


These vintage images just make me smile!!

Oh and I want to tell you about a few more Valentine digital stamps I like :
and
"Give My Heart Wings" by FireCracker Designs by Pamela
I used white glitter on the wings for this one.


I'm sure there are lots more wonderful Valentine digitals out there.  If you happen to find any that fit my style, especially vintage, leave me a message or email me.  I would be thrilled to find more like the M5D ones!

When I download digital images, I save them in files organized by theme.  And I name the file according to who makes the image and the name, so I know who to give credit to.  For instance the one above is "FCD Give My Heart Wings".

When I'm ready to print ...  I open a new Microsoft Works document.  Select "Insert", Select "Picture", Select "from file".  Once the image is in my document, it will have handles in the corners and I resize it.  Sometimes I use the ruler along the top of the document to size.  But if I really want to be exact, I right click on the image.  Select "Format Object".  Select "Size" along the top.  And adjust the size.  Only problem is that this is not very high tech tool.  So it doesn't automatically adjust the height and width proportionately.  So you have to do a little math.

I hope you will be encoraged to create your own Vintage Valentine this week!

You can view all of my VALENTINE projects HERE.
You can view more of my Shabby Chic projects HERE.
You can view more of my projects using Digital Images / Stamps HERE.

*********************************************************************

Tons of Vintage Valentines to download HERE!

More Vintage Postcards to download HERE!


Sunday, February 6, 2011

Pink Persimmon "Small Banner Set" and "Vintage Cupcake"

Good Morning Papercrafters.  I have a few Valentine cards to share today.  But first I want to tell you what I love about some stamp company's.  I love it when the stamp sets fit togther so wonderfully.  I love it when I can mix and match images from several sets, coming up with a project that is unique.  Layers of Color and Pink Persimmon are 2 of those company's!
Were you thinking that Pink Persimmon came out with a Valentine set and you missed it?  Nope.  I just compined images from Vintage Cupcake, Little Red Wagon, Small Banner set, and Carnival Alpha set.


I had so much fun baking up my cupcake!  I used liquid applique for the icing and then glitter over that.  The background is from a box of pre-embossed cards by DCWV.


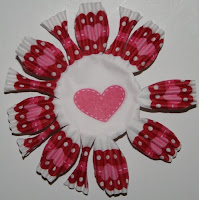
I was inspired to use some mini cupcake liners I had left over from last year.  Last year I showed you how to cut and fold these in a way to create a frilly Valentine rosette.  You can check it out HERE.  This year, I used it as a border.  I cut the center/bottom out.  It's hard to pull it out straight, so I snipped it along the bottom border.  I used my Aleene's tacky glue to "force it" straight. 

Thanks for stopping by!
Melisa


Saturday, February 5, 2011

Artist Trading Card / Valentine Day

Good Morning Papercrafters!
I hope you all have been busy crafting this week.  I have been working on some Valentine projects.   Hopefully I will finish some of them up so I can share this week.

This project will not be finished for a while, but I wanted to share my progress.  This is my Valentine ATC Collection (ATC's are Artist Trading Cards and measure 2 1/2" x 3 1/2").  My goal is to have a seperate   "7 Gypsies ATC Revolving Holder"   for Thanksgiving, Christmas and Valentine Day.  Here are a few of the cards I have created for it this week.  I will share more next week.


Created using Layers of Color Vintage Roses and The Love Chapter (designed by the fabously creative Nina Brackett!) art stamp sets.


Created using The Love Chapter and Renaissance Hearts art stamp sets and Brick Wall cling art stamp.


The Love Chapter   and Renaissance Hearts art stamp sets.
If you are interested in starting your own ATC collection.  Check out some of the cool supplies over at Your ATC Store
Thanks for stopping by and have a great weekend!!

You can view all of my VALENTINE projects HERE.

You can view all of my ATC's HERE


Saturday, January 15, 2011

Vintage Valentine Card


 This is the last day of my sneak peeks.  I really enjoyed making this one, because I used some items from a recent purchase at a local "antique" store.  I'm not sure how antique some of it is??  Some of the booths are loaded with  marked up garage sale items I think.


For this one I used Renaissance Hearts and Love Chapter art stamp sets.  You can see all of Love Chapter on Monday during the blog hop.  And I cut out this adorable little girl from one of the old Valentines I had purchased.  I know I've said it 100 times, but I love finding old stuff nobody wants and creating something new with it!  Isn't that red lace yummy!  And this is my most favorite red ink - Brilliance Rocket Red by Tsukineko.  I have been using this little Dew Drop for years now and just keep renewing it with my refill ink.  I'm very picky about ink colors and tried several different reds before finding this one.


And here are some photo's of my recent Antique store finds.


The insides of the cards are soooo cute


If you don't have an anique store near you, then there are lots of digital artist out there you sell cute valentine digi images.  And as I have mentioned before, there is Dover Publishing.  Check out their Vintage Valentine Book.  It's loaded with gorgeous clip-art for Valentine day.  I actually found a good deal on my "Holiday" version at a local used book store.
 And you can print out Free Vintage Valentines from Cora's Clearly Vintage blog HERE. 

I'll be back on Monday!  Enjoy the rest of your weekend and I hope you get a chance to get crafty!
Melisa

You can view all of my VALENTINE projects HERE.

Friday, January 7, 2011

Collaged Valentine Cards

Good Morning Papercrafters!
Tonight I am sharing a Valentine Card set.


These were created in the same way and using the same supplies as wednesday.
Again I have combined my Layers of Color clear art stamps - Renaissance Hearts, Fleur Hearts, and Regal Wings with Creative Inspirations "Bliss" paper and Impress-on Swatch book by Marah Johnson.


All of the images for these are from the Dover Holiday Vignette book I talked about on wednesday.
This is another example of "masking" (see wed. post).  That beautiful black ink I used is VersaFine by Tsukineko!


and the edges of those were trimmed with deckled scissors.

Hope you like my LOVE-ly creations!
Have a wonderful weekend.
Melisa

You can view all of my VALENTINE projects HERE.

Wednesday, January 5, 2011

Collaged Valentine Tags


Good Afternoon Papercrafters!
Today I'm sharing a Valentine tag set.


For each of these I started with Marah Johnsons (Creative Imaginations) Bliss Paper and Bliss Swatch Book Impress Ons (rub-ons).
You can purchase yours HERE and HERE.   It was the perfect match for my Layers of Color art stamps - Renaissance Hearts, Fleur Hearts, and  Regal Wings.


On this one I stamped my Fluer heart image in VersaFine Black Ink by Tsukineko.  This is my favorite black ink pad when I'm not using my copics.  I used a rub-on "My Love" from the Creative Imaginations Swatch Book.  I picked mine up at Hobby Lobby.   I added this little vintage cut-out.  I had found a Dover Holiday Vignette Book.  Loaded with lots of vintage images for each holiday.  I found mine at a used bookstore.  Just google Holiday Vignettes dove and it will come up.  In fact if you love incorporating vintage images into your projects then you should really check out the Dover Vignette and Clip Art books.  Yes!  it was that easy!


Tag #2.
I mixed it up and added some music paper.  Adhered a my Valentine image.  I picked up the Valentine images on this one and the one below from The Shabby Cottage HERE.  I REALLY like the digital Collage sheets she sells.  Check out these Easter collage images!  Stamp on patterned paper using an image from Renaissance Hearts.  And next Christmas you will definitely see some of these Christmas collage images on my projects.  You can download and print them yourself or purchase them already printed.  She has 2 different catagories over in the left column.  One says "digital downloads"  and the other "printed", so make sure you are in the section you want.  Here is a link to the Store Front.


Next just stamp the Fluer Heart image.  Then stamp it again to create a mask.   I use Eclipse Masking tape because it has a very light sticky back, like a post-it note.  HERE is a link to the site.  You can get this from lots of online stores.  When you are masking, you just stamp your image a second time, cut it out, and lay it over the other stamped image.  This technique is used when you want to stamp an image over an image and you don't want part of the second image to obsure the first.  And lastly I used the rub-ons again along the bottom and on the image of the couple.


This one was pretty much made the same way.  I just switched the direction that I tilted everything. 


The clock is part of the rub-on booklet as well.  This little booklet is loaded with rub-ons.

Thanks so much for stopping by!
I'll be back friday with a set of Valentine cards.
Melisa

You can view all of my VALENTINE projects HERE.

Friday, February 12, 2010

Altered Metal Tin


Tip / Technique : Stamping on Tissue Paper

I had so much fun making this!  I purchased one of those $1 tims from Michaels that already had the black and off white florish design you see in the background.  Did you know you can stamp and emboss on tissue paper.  Thought I'd give it a try, and it worked!!!  I painted a light layer of gesso over the top of the tin.  I stamped the heart, "love", birds, and butterly on tissue paper with pigment ink, and embossed.  I actually stamped the "love" first and then mask it off, stamped the heard and "forever" on the same peice of tissue.  I cut the tissue paper around the images but not close, because I wanted to tear it.  I painted water around the endges so that the tissue would tear and leave a distressed edge.  I used the gesso to adhere the tissue images and repeated the same steps with the birds and butterfly.  I stamped around the edges with a swirl and red pigment ink.  The other qoutes and cupid are rub-ons and the glittery heart is a brad I cut the prongs off of!
Stamps : The Angel Company
I think the rub-ons are Basic Grey, but the package is long gone, these are really old.

thanks for stopping by !
Melisa

You can view all of my VALENTINE projects HERE.


You can view all of my altered projects HERE


Another Candy Pouch - Tree Ornament


Challenge Project for Creative Card Crew "Valentine" Challenge and another entry for Fab an Funky's Shabby Chic Challenge.


Like the one below, I designed this one as a candy pouch as well, hoping to have enough to someday hang on a Vintage Valentine Tree!  These photo's are so inspirational!


So am I crazy or what???  Anyone else have a Valentine Tree??

You can view all of my VALENTINE projects HERE.

Floral Cupcake Liner Tutorial


I have several different post over the next couple of days for Valentine's Day.  I would like to have a Valentine Tree someday, covered in Valentine Oranaments and handmade papercrafts.  So I decided to get started this year by creating a couple of candy pouches I could hang on a tree.  This is the first one.  I created my own template for my pouch, scanned it, and can now print it over and over again.  I also created my own frilly/floral embellishment using some mini cupcake liners I had.  The image is from the same Dover Vignette Clip Art Publication I have mentioned before.  I got mine at a local used book store and it was loaded with vintage images for all the holidays.  Here is a link where you can get it from from Dover :


How to use mini cupcake liners to create a handmade frilly embellishment :

I just love the fan fold on the sides of cupcake liners and decided they would make the perfect embellishment.  So I played around with them until I came up with the following.  I hope you are inspired to look at cupcake liners in a whole new way from now on!

Floral #1


Flatten and cut 4 cupcake liners as shown above.  Layer them, staggering them so that now gaps are seen.  Fluff them.

Floral #2

 
Fold cupcake liner in 1/2.  Then fold in 1/2 a second time.

 
Fold in 1/2 a third time and snip the pointy end off.  Fluff as shown above.

 
Create 4 of these and then join them together as shown above, slightly overlapping the edges.


Adhere to Floral #1 as shown above.  Now you are ready to embellish the center with whatever you like!!

You can view all of my VALENTINE projects HERE.
Related Posts Plugin for WordPress, Blogger...