Showing posts with label Theme - Bird / Birdhouses. Show all posts

Monday, November 8, 2010

Layers of Color "Fruit of the Spirit" Blog Hop!

Welcome to the
"Fruit of the Spirit" Designer Blog Hop!
If you got here from Linda's blog you are in the right place! If not, please start at Layers of Color blog.
The blog hop order is:
LOC blog, Diana, Grace, Jennie, Linda, ME, LOC blog

This week we have teamed up with the 2Sketches4You Challenge Blog
All week long, both teams will be participating in this "Fruit of the Spirit" theme.   And Layers of Color is sponsoring them this week.   Play along with this weeks sketch and you could win Fruitful Harvest art stamp set, Belle Brocade art stencil, and Botanical Swirls art stencil!!  So after you complete the "Fruit of the Spirit" blog hop head over and check out the challenge to quailify.


But wait, not so fast. 
Make sure you comment on each of the Design Team's blog today.  Laura, Layers of Color owner, has such a generous heart and is allowing each of her DT members to give away either a free art stamp set or art stencil.  Want to know which set I'm giving away??  Make sure you read to the bottom of the post!  All you have to do is leave a comment on my blog and I will draw a winner!

One of the things I LOVE about Layers of Color is their desire to share God with others.  So when ask to participate in this special hop, I was so excited.  This verse is near and dear to my heart.  When my children were small, I had a book series I used to read to them.   Each book explained each fruit of the Spirit.  I also stenciled each fruit of the Spirit along the ceiling down our hallway.  I wanted these words to be a daily reminder of what we should be living out.  Many of you may be familiar with this wonderful bible verse.  God did not leave us to wonder who we are or who we should be as His children.  This verse is just one of so many that leads us in the direction living a Godly life.  While none of us are, nor will be, perfect, this verse reminds us that if we walk in the Holy Spirit, we can exercise these characteristics.  We can experience the joy of living the life our God intends for us.

"But the fruit of the Spirit is love, joy, peace, long suffering, kindness, goodness and faithfulness."  Galatians 5:22-23

If any of you have questions about becoming a Christian, then please contact one of us.  Each and every member of this team would be thrilled to share with you God's great plan for salvation.

Your next stop is the Layers of Color blog.  If there is a broken link, just head back to the LOC blog for a full list.

Layers of Color has a special 30% off sale on select art stamp sets this week!!

My give-away is "Birday Party" art stamp set.
Here are a couple of cards I have created previously using this fun set.
I used Vintage Medallion art stencil on this one as well.

Birday Party card #2

Birday Party card #2

I hope to see you again tomorrow for the continuation of the "Fruit of the Spirit" Blog Hop!

Join us on Facebook HERE.
 And don't forget to subscribe to the Layers of Color blog for Faith Art Friday, Guest Designer Wednesday, tutorials, exciting upcoming news, and unique colourful ideas! May God bless you with layers of color!

Wednesday, August 4, 2010

Happy Bird-day!

Good Morning!
I have some fabulous news to share!  I have been ask to stay on the permanent DT for Layers of Color!  I'm so excited.  I just love their Art Stamps.  And today I am introducing you to another set, "Happy Birdday".  This set just makes me smile. 

And I'm using for today's Creative Belli Challenge.  Yes, it's been two weeks and it's time to use some of your old neglected supplies.  Today's challenge is to use paint on your project.  And my paint is REALLY old, so I was surprised it wasn't dried up.  I used some of Making Memories - "Spotlite".  It's a lime green color.  We would be thrilled if you joined us in this week's challenge.  Please hop on over to the challenge blog for all the details on how to play and to view all the wonderful inspiration that the designers have created.  I will also list their links at the bottom of the post here.


I wanted to created my own background and I had no idea where is was going with it when I started.  See the pattern in the background???  It's one of Layers of Color Art Stencils.  If you have never seen them, then hop over.  The patterns are gorgeous.  And so easy to use.  This pattern is called "Vintage Medallion".  I cropped mine up a little.  The actual stencil pattern is actually larger.

Tip / Technique - Create you own background
 I layed my stencil over a pale pink piece of cardstock and stenciled on Palette Bordour Blush.  Then I ran it through the cuttlebug creating the raised dots.  Next I lightly began to apply my green paint with my finger.  And lastly I lightly rubbed some brown ink to help the dots to pop off the background.  Seriously, this took only minutes to do.  And I love it!!  I didn't have to search for DP!

And then my little bird images just finished it off perfectly.  The green folded ribbon is by Pink Paisley.  Picked it up a while back and so glad I finally used it.
Thanks for stopping by and I hope you will join me again for more Layers of Colors projects!

Wednesday, July 28, 2010

Another Layout with Layers of Color

Good Morning.  This is week #4 of my Layers of Color Guest DT gig.  I have had sooooo much fun using their images.  And I want to say thank you so very much to Laura, the owner and her wonderful DT.  These ladies are so gracious, kind, supportive and it has been wonderful to be a part of their team this month.

Today I want to share with you another layout and the story behind it.  This is my daughter many years ago being baptized.  I was blessed to lead both of my children to salvation.  And I remember the joy that I felt as a parent watching my little one being baptized and giving her heart to our Lord and Saviour.  So many people think that young children don't really know what they are doing when they make professions of faith.  But I'm here to tell you that this little one did, and she has never waivered. 


I designed this layout using "Gothic Crosses" and "Royal Birds".  I created the paper flowers using punches.  That really cool molding in the corner at at the top is by Pink Paislee.  This stuff is soooo cool.  It comes white and you can ink it or paint it to match you project.  I used the tissue paper and a Spellbinders die to create the dollie.


Once I looked at this close-up, I realized that it needed something more.  So I added a stick pin.  But I was toooo tired to go back and shoot more photo's.  So you will just have to use your imagination, teehee.


Challenges :
The Studio Challenges   is a scrapbook challenge blog that I found recently.  I really want to get more scrapbooking in this year and I think Scrapbook Challenge Blogs can inspire me to do just that.  This challenge was to use "old and new stash".  This paper is probably greater than 5yrs old.  The corner punch is pretty old too, probably about the same amount of time.  Something new ...  Pink Paislee created these really cool 3-D rubbery feeling embellishments that you can paint or ink.  You can see them in the bottom left corner of my layout and behind the cross.  I just love them.  And my Layers of Color Royal Bird Stamp set is still pretty new as well.


Here is another card using "Vintage Roses".  I created this one for a couple of the Dare to Get Dirty Challenges.  One of the challenges over there was posted by my buddy Joan Ervin.  She wanted us to create a project that was mostly orange.  I would have NEVER came up with this without that challenge.  Thanks Joan for making me stretch my creative muscles!

I started with a peice of DP that was mostly orange (background) and the backside was orange, so that was great.  I created a second pattern on the solid orange using a "tone on tone" technique.  I used Apricot Appeal (SU) ink and stamped some of the smaller images in the set.  And then to tie it in better, I used the DP again for the vase.  The white Spellbinders and background circle were too stark when I layered them.  So to soften it up, I added white VersaMagic ink around the edges of the orange circle and orange chalk (Pebbles, Inc) aroung the edges of the Spellbinder's die.  If you decide to give this a try, get the pearlescent chalks, they blend on better and go on smoother.  Doing this brought it all together.

I'm just wondering if anyone else who is playing along is as creatively tired as I am.  I don't think I have ever created this many projects in one week.  33 challenges total and I have 5 to go by friday.  I saved the 2 hardest / altered pieces for last, but I will probably enjoy those the most. I know exactly what I'm going to do and what stamps sets I'm working with.  So I'm actually excited about getting a few of the others knocked out and moving on to these.
Thanks to all of you who have been so kind in leaving me comments.  I truely appreciate them and feel so very bad that I haven't made it to your blogs.  With all this creating the last 6 weeks, it's been difficult to keep up with everything.  But I'm hoping things will be calming down after I complete my 2 Guest DT's at the end of the month, and these 33 challenges. 

************************************************

You can view more of my Scrapbook Layouts HERE.
You can view more of my Faith Art HERE.

Wednesday, July 14, 2010

Layers of Color Scrapbooking!

Double post today, because I am double blessed!!  I'm am blessed to be on both the Layers of Color and Mark's Finest Papers' this month.

Today I am sharing projects I created using 2 of Layers of Color stamps sets.

This 12x12 Layout features "Joyful Noise" .   As soon as I saw this set I fell in love and new I would be able to use it for more than just card making, since my daughter plays the violin.  I used the butterfly, treble clef, and musical flourishes.  But there are 2 other stamps in the set, so take a peak at the link above.
I wish you could see it up close.  I used old music paper and distressed it to create the border along the side.  And the background DP is so cool.  All the flourishes are velvety feeling.


Frame Tutorial
I started by drawing the outlines of a rectangular frame on cardstock.  The outside measurement was 4 3/4" x 5 3/4"  and the inside was 3/4".  You want your pencils lines light enough to go back and erase later.  Then I stamped and embossed the musical flourish around the inside of the frame, allowing some parts to extend outside the lines of the frame.  I decided which parts of the flourishes that extended outside of the frame I wanted to keep.  I used an Exacto Knife and metal ruler to begin trimming along the pencil lines, making sure not to cut off the part of the flourishes I wanted to keep.  Then I used sissors to trim around the the parts that extended outside the frame.  The I adhered this peice to the brown paper and began trimming to create a mat.


Flower Tutorial
I made my own paper flower on this one.  Very simple to do.  I cut multiple sizes using my Spellbinders Scalloped Circles dies from old book paper.  Before cutting, I had colorized the paper using some pigment ink.  I simple folded over and layered the different scalloped circles until I got a shabby look.


The card below features "Royal Birds" and "Touch of Elegance".  These images are just a sneak peak of the whole sets, so make sure you click the links about and check them out!


Frame Tutorial using Spellbinders
Begin by tracing around the edges of a Spellbinders die - Classic Frames on patterned paper or cardstock using a marker to create the frame.  Then stamp the decorative swirlies at the top and bottom.  Trim around the inside and outside of the frame.  


I have had so much fun designing with these stamps, they are just gorgeous!!

Thanks for stopping by!

Wednesday, March 17, 2010

Creative Belli Challenge #87


It's time for another Creative Belli Challenge!
And this week the Belli girls want you dig into your stash and use some of those clips we all have.  Dig deep, I know you have some!  This is Creative Belli's first sketch challenge as well.  So to play along, hop over to the Creative Belli Blog. 

My clip was given to me as part of a blog candy package!  Since the paperclip ends extend from the sides, I couldn't  help but use my clip in another way! 

Don't you love this bird house image???  I fell in love with it the minute I seen it!  It's one of the new digital images from FireCracker Designs by Pamela.  Check them out HERE.  I colored it with my Copics, inked the edges and added some pearls.  Friday there will be a Design Team Blog Hop showcasing some of FCD's digital images.  Don't miss it!  And you can get a freebie HERE.

Saturday, January 2, 2010

FCD A Little Birdie Told Me Birthday Card


Happy New Year!!
It seems like it  has been forever since I posted.  I've been busy purging and cleaning my house for the new year.  Getting a few things organized, like my birthday list.  I have vowed to send more cards out this year, instead of hoarding them.  So I have generated a birthday list to keep me on track.  I have tons of birthday cards to make. How do you like the one above?  I'm still trying to get used to using the copics.  Man those things are addicting.  A friend and I found an awesome deal ($4 each for sketch) and we just ordered a few more.  I told DH this could be my wedding anniversary gift.  Yes, most women want diamonds, flowers, candy ...  I want markers, teehee.  I know you girls get it. 

Well as I mentioned above, I've been purging, organizing closets, cleaning the grout (yuck).  I don't know what it is about the new year that makes me want to do this, but I do.  How about you?
I've missed being crafty, playing along with challenges and blog hopping the last couple of weeks.  But now with the holidays wrapping up, I'm ready to GO!!  Time to get my priorities straight, teehee!

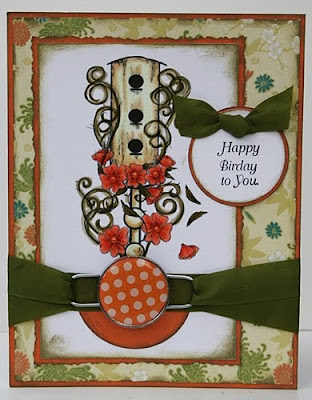
This week for my FCD post I'm sharing with you this cute little "Happy Birday" set!!
You can check out the "A Little Birdie Told Me" set at the FCD store HERE.
Paper : My Minds Eye 8x8 Paperpad (1/2 price from Hobby Lobby)  I love the colors of this pad (brown, yellow, aqua, very light lime green)
Ink : Brilliance Pearlescent Chocolate (my most used ink pad after Palette Noir and Burnt Umber)
Thick and juicy pigment ink with a slight shimmer ( I sound like I'm at a wine tasting, teehee)
Takes forever to dry though.
Ribbon : my stash
Faux stitching : Close To My Heart stamp from years ago.
Tag punch : Paper Shapers
Spellbinders Labels 1 die set (I am getting ALOT of use out of this one)

That's all for now!  I hope you weekend is a great one!

Monday, July 6, 2009

Cornish Heritage Farms Summer Stamp Star Contest

Cornish Heritage Farm is hosting a "Summer Stamp Star" Contest with weekly challenges. This is my project for Challenge #1 Color It !! They are awarding weekly winners and then 1 Over-all Winner. So there is still time for you to qualify to enter one of the weekly Catagories.

I used Single Blackeyed Susan stamp and one of my favorite colorization techniques - H2O Watercolors.
Cornish Heritage Farms has an AWESOME BACKGROUND COLLECTION. I used Polkadots. I love polkadots and new this one would be a good investment, something I would use over and over. They also have a great sentiment collection under MONA LISA. I found a beautiful set of friendship sentiments.

Corner Punch is by EK Success. I also used Spellbinders Label and Bird Dies. I added the eye and wing to the bird. I'm not sure who the button and ribbon are. I got it from my huge stash. Patterned paper is by Basic Grey. I used Pearlescent Chocolate Ink to stamp polkadots / sentiment and Palette Noir to stamp image. Micron 005 Black Pen to accent doodle.

Helpful Links :
Twinkling H2O's

You can see more of my projects using Spellbinders Dies HERE.


Sunday, May 11, 2008

Altered Bird House - Spring


I'm out of my rut! I had so much fun last month creating some spring decor to display in my diningroom. I bought wooden bird houses and paper mache eggs at a local craft store and altered them. I used pp, paint, stamps, and ink. I hope you like them!


You can view all of my Altered Projects HERE
View all my Altered Bird Houses HERE.
Related Posts Plugin for WordPress, Blogger...