Showing posts with label Theme - Baby. Show all posts

Wednesday, September 22, 2010

Baby Diaper Shower Invite / Baby Shoes Favor


Hello Paper crafters!  Today I am sharing projects that are just perfect for a baby shower / gift!
I went a little shabby with this ensemble.  Aren't these so cute!!  I used the Diaper Card with Pin, the Baby Shoes, and A7 Fancy Frame Window with Clear and Simple's "Little One" stamp set.  And I just hopped over and found another baby set called "Rock-a-Bye".  It has the cutest little rocking horse!


This "Diaper Card" die comes in 2 pieces, pre-cut and pre-scored, the actual diaper and the diaper pin.  When you order make sure you note that you get to select different colors for each one.  It does not come with the inside card.  I decided to make mine a mock baby shower invite.  I covered it with old book paper and inked it up with some brown ink.  I love the lace along the legs.  The button is part of the Clear and Simple "Little One" stamp set.


This is the A7 Fancy Frame Window Card.  It's so much fun to design the inside of the card creatively as well with just a little part peeking through the window.
I used one of the words from the "Little Ones" stamp set to create my background border.  I used the old book paper again.  I fan folded it to create the border.  The buttons are from the stamp set and I colored them with chalk.  The paper for the buttons is Jenni Bowlin. 


See the little heart.  You can't tell from the photo, but it is made of velvet paper!!  Yes, Creative Cuts and More sells velvet paper.  It's so cool.  I just used my Spellbinders die to cut it out and inked the edges.


And here's the inside.


Tutorial for Shoes
They come in your choice of card stock and color.
I guess you can see, that I like running mine through the Big Shot with my polka dot embossing folder.  Here are some photo's of how to do that.


Then you just turn the die around in the folder.  Here is the tricky part.  There is about a 1/4" area along the end of the folder that doesn't emboss.  When you emboss the 2nd half of the shoe, that strip will flatten out a few of your dots on the other end.  So, try to roll the foler through up to that point and then bring it back out. *** Do not roll it all the way through.***  I didn't know this when I made the first pair, so I used my stylus to re-indent the dots that were flattened when I did the second half.

Next I add a little ink around the edges and lightly over the shoe.


Wrap the shoe around as shown and adhere.  I highly recommend the Killer Red Tacky Tape for this project.  Next I bend the little tabs at the score line so that they are ready to be adhered.  There are some longer ones and I cut them into 3 tabs.  The kit comes with outer and inner soles.  Lay the top of the shoe on top of the outer sole as best you can.  I'm sure there are some people who can do this perfectly.  I'm not one of them, teehee.  If there is and sole extending from the shoe I just trim it off.  Now if I had adhered the shoe top to the outer sole perfectly, then I'm sure the inner sole would have fit perfectly.  But mine didn't.  So I turned the shoe over to look at the shape and trimmed my inner sole to fit just inside the shoe.  When I go to insert it, I pinch it up a little (squeeze the sides of the inner sole to make it concave a little).   This makes it easier to slide it into the shoe. 

You can check out more of my baby creations HERE.

Wednesday, August 11, 2010

Mini Album #2 : Baby Albums

Good Morning stampers!  This morning I am thrilled to be a part of the Creative Cuts and More Baby and Bridal Blog Hop! 

This is a circular blog hop, so if you arrived from Kayla's blog, then you are right on track.  If you didn't, then please hop over to the Die Cut Diva Blog HERE.  There you will find information of how you can win a prize!!  The prize this month is a 2-Tier Cake of your choice of a smooth or textured cardstock!!  So hop over to the Die Cut Diva Blog right away!  If one of the links in the hop is broken, no worries, head back to the Die Cut Diva Blog for a complete list of participates.

Our assignment was to create a Baby or Wedding ensemble.  What a great idea.  It seems like someone in my family or at work is either having a baby or getting married.  How about you?  So hop through and see all the great ways that Creative Cuts and More can help make your gift giving a little more creative.

I decided to go with a mini-album and card.  I just love mini-albums.  And so do new mothers and grandmothers!  Nothing better than having a little brag book tucked away in your purse to whip out at anytime to show off that new baby.  It couldn't be easier to put one of these together as a gift using CCM products. 


There are several options.  You can build your own album!  For mine I purchased 2 chipboard covers and baby blue pages for the inside.  You decide what colors you want when you order.  I actually ordered enough cardstock pages to glue 2 pages together at a time to make mine even sturder on the inside.  The holes are already punched and pages already scored.  Check out all of the 4 x 4" album options HERE.  However if you like a larger album, you can check out all the album options HERE.

Here is a Baby Girl version:


My second project was created using the A7 Scallop Star Window Card.  I just love all the window card options.  I started out with a peice of DP the size of the front of my card.  I placed it inside the card and traced the star shape on it.  I used the pencil lines as my guidelines and trimmed the star shape out a little larger.  I trimed it down to a 2.5" strip to create the border on the front of my card.  Next ink up all the edges with brown ink.  I tied the ribbon around as shown, punched out my brown scalloped border and adhered all of this to the front of the card using my t-square to keep it all lined up.   I stamped the inside of the card with my sentiment and the smaller stars as shown below.


And to finish it off, I secured a little charm (Making Memories) with a tiny saftey pin and stamped the sentiment to the front.


The next stop in this hop is


Thanks for stopping by!

Tuesday, March 9, 2010

Scor-Pal Tutorial


I wanted to try a creative use for my scor-pal, so I created scored lines diagonally and then sewed on seed beads at the intersection. What a fun tool!
Stamp set : Wee Ones from The Angel Company!

Scor-pal Tutorial
Today I decided I would focus on showing you how to create a criss-cross pattern using your Scor-pal and then re-post a couple of projects. Start with a square piece of cardstock (mine is 8"x8"). Lay your cardstock on your Scor-pal with each of two corners along the 6" line as shown below.


Now score lines 1/2" apart. Turn the cardstock so that the other 2 corners line up on the 6" line and score lines at 1/2" intervals. The result will be a criss-cross pattern on your 8" x 8" piece of cardstock. You can now cut this into smaller squares to use as you like.

On this sample I layered 3 different color inks to create this mosaic look. I just brusted the ink pads over the panel and then used a brayer to help blend the colors.


This one is an example of the same technique but the pattern is a grid instead of a criss-cross.

Also consider using your Scor-pal to create a simple border.


Hope this simple tutorial inspires you to use your Scor-pal for more than just creating a simple fold for your cards !

Wednesday, February 3, 2010

Creative Belli Challenge #84 - Ribbon


Good Morning!  Today is Creative Belli Challenge Day and I am excited to be joining the very talented DT over there as a Guest DT Member today!  Creative Belli is all about using up some of those embellishments you have lying around.  You know, the ones we hoard.  Yep, we all do it.  A couple of years ago there was a phrase spreading around that said "She who dies, with the most supplies, WINS!!  I think we all took that a little too seriously, teehee.  We would love to have you join us as we encourage you to use up some of your stash and also offer up a little give-away as well!  So hop on over, check out all the inspirational projects by the DT, and play along!
Creative Belli Challenge Blog 
The challenge today is "Ribbon".  Who doesn't have ribbon!  So no reason for you to not to play along!
I created a layout for this challenge.  No patterned paper here.  And look at all the ribbon I used out of my stash!  I wanted to do something a little different to inspire you so I used some fishing "thingy's".  You know, the kind you find in DH's tackle box.  They may be a little difficult to see, but they are the small black links connecting the ends of the ribbon (third from the top and fourth from the bottom).  Since the colors were black and pink I thought they worked out great.  Another great embellishment to use like this would be bracelet links or charms.  I hope you are insprired to think about a fun or unusual way to use ribbon today!
And in case you are wondering, that photo is from a VERY long time ago, 20 years.  This is my daughter and I.  She has become a fine young women who I am so proud of.  Thanks for letting me ramble!
I'll be back tomorrow!

Monday, October 26, 2009

Crafty Secrets Baby Girl Card and Layout

Hi ladies.  Today I'm posting a  Layout I created using one of my Crafty Secrets Stamp Sets - Baby Girl Clear Art Stamp Set.  Check out the actually stamp set at the bottom of the post, so you can see how I used it.


Frame and Masking Tutorial
I began with my photo and matted it.  Next I had to determine the width of the frame around the photo.  The sides had to match the width of a series of the scallops if I wanted to finish the corners nicely.  If you take a look at the photo of the stamps for this set, you will see that the scalloped image as 6 scallops.  I stamped the image twice on a piece of scrap paper, end to end to help figure the measurements of the frame. 


I liked 7 scallops across by 10 scallops vertically.  So I measured across from edge to edge for 7 scallops, that equaled just short of 4", and again from edge to edge for 10 scallops - 5 5/8".  So now I had my measurement for my guidelines of the frame.  I cut a piece of white cardstock 6" x 7.5"  and penciled in my guidelines, creating a 4 x 5 5/8" rectangle (I used a pen on mine so it would show up for the photo).  You want the pencil lines light enough so that you can go back later and erase it.  When I am drawing squares or rectangles I use a tool called a t-square.  It is a drafting tool that allows you to have perfectly aligned edges.  And you can read more about how to use it HERE


So now I'm ready to stamp the scalloped border. 
In order to stamp the image along the penciled line, you need to mount your stamp on an acrylic block with lines on it.


You will line the white line on the block with the penciled line on the paper.  You might want to practice a couple of times before stamping on your project.  Practice by drawing a pencil line on a scrap piece of paper and see if you can stamp your image along that line.  Standing up over the stamp/block, helps you to be able to line it up.  Once you are confident you have that skill down, you are ready to stamp around your guidelines. Start in the left lower corner and stamp the first 6 scallops. 


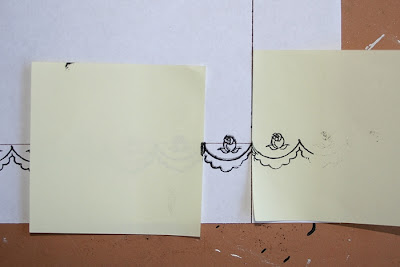
In order to stamp just one more scallop, you have to mask off the 2 ends as shown below.  I know mines a little messy, but I was in a hurry to finish these tutorial photo's.


Take the post-it note mask off and stamp up the right side 6 more scallops.


Mask off 2 ends so that you can stamp 4 scallops to equal 10 up the right side.


Remove the mask and stamp 6 scallops along the top.


You will continue masking and stamping around the frame until you finish down the left side.

Here are some more details.  I love using stamped images to create my own little embellishments!


Patterned Paper : Crafty Secrets, Daisy D, Flower Bazzill
Ribbon Hobby Lobby, Spellbinders scalloped dies, Deckeled sissors

Related Posts Plugin for WordPress, Blogger...