Showing posts with label Style - Vintage/Shabby. Show all posts

Wednesday, January 25, 2012

Shabby Chic Altered Cigar Box


Hello paper crafters!  Today I am sharing an altered cigar box.  I like this one much more than my last one because it's not so dark.  I guess you can tell I'm in love with the Shabby Chic style.  I have someone in my card swap group who is going to get me more of these to alter.


I did use some stamps that are REALLY old, but will list the supplies that are current below.  The base was covered with My Mind's Eye patterned paper.  The same paper pad I have mentioned before that I found at Hobby Lobby.  This paper was really thin, so I had to be careful with Modge Podge and make sure I didn't get it to wet. 


I got so excited when I found the feet and knob on top. Hobby Lobby has a section with drawer pulls and there were only a few of this style. They come with a really long metal "whatchma call it" come off the back. It's the part that you push through the hole on the drawer and then secure with a bolt. These were even way to long for a drawer though. So I had to get my sweetie to cut off a portion of that part. 


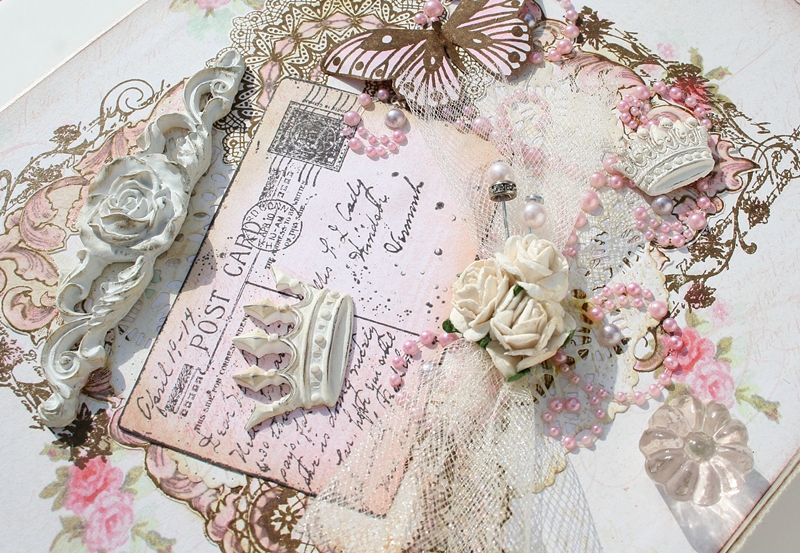
I wish I could tell you who made my postcard stamp.  I'm LOVIN' it.  I am usually great at documenting stamps in my catalog for future reference.  But ... you can find them in rubber or digital. 
River City Rubber Works  (This one comes as a digi or rubber)
Expressions In Ink  (rubber)
I love this one by Unity (rubber)
I Brake for Stamps

Butterfly image - Layers of Color
Doily stamps - My Minds Eye Gertie Collection
Pearls - Prima
Paper Roses - Wild Orchids
White Resisn crowns and other decorative element - Melissa Frances
Hat Pin - Jenni Bowlin

You can view my other altered cigar boxes HERE
You can view all of my altered projects HERE

thanks for stopping by!
Melisa

***********************************************************

Challenges

Creative Inspiration Paint - Pink
Sisterhood Sundays - photo inspiration
Creative Belli - fancy frame - mine is the fancy scroll frame stamped image under all the embellishments
Truly Scrumptious - the postcard, scroll frame and corner images are all REALLY old stamps
Allsorts - stick pins
Craft Your Days Away - distressing


**************************************************************

Link Parties
Nifty Thrifty Sunday @ Nifty Thrifty Things
Sundae Scoop @ A Time To Create
Sister Sunday Link Party at Sister of the Wild West
The Sunday Showcase @ Under the Table and Dreaming
Make Monday Marvelous @ C.R.A.F.T.
Made by You Mondays @ Skip to my Lou
Inspire Me Monday @ Singing Three Little Birds
Uncommonly Yours @ Uncommon Designs Online
Whatever You Want Wednesday @ Free Pretty Things
WOW Me Wednesday @ Gingersnaps Crafts
A Crafty Soiree @ Katie's Nesting Spot
Watcha Got Weekend @ Lolly Jane Boutique
Show and Tell Friday @ My Romantic Home
Feathered Nest Friday @ French Country Cottage
Strut Your Stuff Saturday @ Six Sister' Stuff
Check Me Out Saturday @ A Vision to Remember

This project was featured at  Passionatelly Artistic


Sunday, January 22, 2012

Valentine Printer's Tray


Hello paper crafters.   I have a corner in my studio that I would like to decorate with seasonal projects.  I've been working of Valentine projects.  Tonight I"m sharing a printer's tray designed with photo's of my sweetie and I from 2006.   This printer's tray was purchased at Hobby Lobby for $9.99, I think.  It's similar to the one made by 7 Gypsies, except the window's are in the opposite direction and it runs $19.99.  Each window is 4 x 6.  I have been collecting Valentine products for a long time, so it was really nice to use some of my stash on this one.  All of the patterned paper used is by Making Memories "Je t" adore".  I LOVED this release last year and stocked up on some of the paper and embellishments.

Window #1


Window #2


Window #3

Window #4


Window #5


Window #6

You can view all of my VALENTINE projects HERE.
Thanks for stopping by today!
Melisa


You can view all of my Altered Projects HERE

********************************************************

Project Details
Patterned Paper - Making Memories "Je t' adore"
Roses - Wild Orchids Crafts
Ink - Ranger Distress Ink - Vintage Photo (used around edges of patterned paper and embellishments to distress)
Distress tool
Deckled Scissors
Golden Glaze "Fresco Cream"  (brushed on paper doily's)
Heart and round paper doilies from Michaels
All the rub-ons are really old - Creative Imaginations Marah Johnson Swatch Book Impress-ons Bliss Designs except for the "If I live to be 100 ..." and "I love the way you love me" in window 6. It is Cloud Nine Designs. 
Window #1
Angel cut-out - K&Company Valentine Emphemera by Kelly Panacci
Spellbinders "Fancy Tags 1"
Stamped doily with "love text" from "Love Struck" stamp set by Tim Holtz

Window #2
Chipboard heart and key / lock charms unknown.  I coated them with gesso and then painted them with cream acrylic paint.  Then applied the distress ink with a eye shadow applicator.
Cupid in background is from "Love Struck" stamp set by Tim Holtz

Window #3
Heart resin embellishment is Melissa Frances "With All My Heart"
Angel Digital image / cut-out - Lisa's Altered Arts

Window #4
Digital image / cut-out - Etsy Digitalimage4You
Chipboard - Maya Road

Window #5
Digital image / cut-out - Etsy Cottonfield Farms sheet #101

Window #6
Postcard - unknown
Angel - K&Company Valentine Ephemera by Kelly Panacci
"love" chipboard Fancy Pants
***************************************************************

Challenges
Flourishes - Anything but a card
JUGS - red / pink / white
Sugar Creek Hollow - go girly / shabby chic
Dancing in Pajama's - color challenge
My Time to Craft - favorite embellishement
Papertake Weekly - Buttons, bows, bling, or blooms
Crafty Emma's Store - Anything but a card
The Crop Stop - distressing, vintage, shabby

*************************************************************
Link Parties
Nifty Thrifty Sunday @ Nifty Thrifty Things
Sundae Scoop @ A Time To Create
Sister Sunday Link Party at Sister of the Wild West
The Sunday Showcase @ Under the Table and Dreaming
Make Monday Marvelous @ C.R.A.F.T.
Made by You Mondays @ Skip to my Lou
Inspire Me Monday @ Singing Three Little Birds
Uncommonly Yours @ Uncommon Designs Online
Whatever You Want Wednesday @ Free Pretty Things
WOW Me Wednesday @ Gingersnaps Crafts
A Crafty Soiree @ Katie's Nesting Spot
Watcha Got Weekend @ Lolly Jane Boutique
Show and Tell Friday @ My Romantic Home
Feathered Nest Friday @ French Country Cottage
Strut Your Stuff Saturday @ Six Sister' Stuff
Check Me Out Saturday @ A Vision to Remember

Monday, January 9, 2012

My first VIDEO TUTORIAL!


Hello everyone. Today I want to share a tutorial on how to create this shabby chic treat basket designed using a couple of basic Spellbinder's dies. I made mine for Valentine's Day, but the basket is something that could be used for weddings, baby showers, birthdays and other holidays as well.
For this project I created my first video tutorial. You are invited to watch it over on my You-tube channel : PaperliciousDesigns .... but no laughing, teehee. Ok .... you can laugh, because I"m laughing along as well. I can tell you it's wasn't as easy as I thought it would be and I certainly hope I improve.

You can check out the video HERE

thanks for stopping by!
Melisa

You can view all of my Valentine projects HERE.
You can view more of my projects that I have used Spellbinders Dies on HERE.
You can view all of my Shabby Chic projects HERE.
You can view all of my Treat Boxes / Bags HERE.
You can view all of my project that have a You Tube Video as well HERE.

***************************************************************************

PROJECT DETAILS 

Supply List :

Spellbinders Dies Nestibilities and Grand Calibur: Classic Hearts Classic Scalloped Heart (second from the smallest) Classic ScallopedSquares LG (second from the largest)Classic ScallopedRectangles LG (largest)
Vintage Digital Images – Digitalimage4You shop on Etsy.com. The image I used is from an 8 ½” x 11” sheetthat included 9 backgrounds, called “Greetings and Kisses Vintage Backgrounds
Pink Cardstock
Patterned Paper – My Minds Eye 6x6 paper pad – Lost & Found MadisonAvenue
White streamer paper
White 3/8” ribbon
White rose –
Wild Orchid Crafts
White heart hat pins – Maya Road
White Enamel Accents – Ranger
Glitter Glue – Stickles Frosted Lace
Scalloped and Deckled Scissors – Fiskars
Wire Cutters
Aleene’s Tachy Glue

Templates / Cutting and Scoring Measurements


*************************************************************

 Link Parties

Nifty Thrifty Sunday @ Nifty Thrifty Things
Sundae Scoop @ A Time To Create
Sister Sunday Link Party at Sister of the Wild West
The Sunday Showcase @ Under the Table and Dreaming
Make Monday Marvelous @ C.R.A.F.T.
Made by You Mondays @ Skip to my Lou
Inspire Me Monday @ Singing Three Little Birds
Uncommonly Yours @ Uncommon Designs Online
Whatever You Want Wednesday @ Free Pretty Things
WOW Me Wednesday @ Gingersnaps Crafts
A Crafty Soiree @ Katie's Nesting Spot
Watcha Got Weekend @ Lolly Jane Boutique
Show and Tell Friday @ My Romantic Home
Feathered Nest Friday @ French Country Cottage
Strut Your Stuff Saturday @ Six Sister' Stuff
Check Me Out Saturday @ A Vision to Remember

This project is featured at Passionatelly Artistic


Thursday, January 5, 2012

Shabby Chic Valentines


Good Morning!  I am back today with some shabbalicious cards created using some digital images I purchased from Cottonfield Farm!  Lots of vintage valentines to check out.  And you can't beat the prices!  I paid 1.99 and got 8 images.  These images are from a set called "Cupids and Fairies 2".  I'm not sure if there is a way to resize them.  I just printed the whole sheet and trimmed.  Service was very fast.  She sent me the jpeg of the entire sheet (8.5 x 11), I saved them, and printed them.

And ...  I have to share about the roses.  Aren't they beautiful.  Last month I made my first purchase from Wild Orchids.  I don't usually order from over sea's but the prices are awesome compared to Prima (sorry Prima ) and the service was great.  I was surprised at how quickly they arrived.  If you can find a better price on them, please let me know. 


I kept these pretty simple, so there isn't a whole lot of explanation needed.  I will say the I just brushed acrylic paint over a white paper doily for card #1.  Hope this puts you in a shabby mood!
Have a blessed day!
hugs, Melisa

You can view all of my VALENTINE projects HERE.
You can view more of my Shabby Chic projedts HERE.
You can view more of my projects using Digital Images / Stamps HERE.

**********************************************************

Project Details

Vintage Valentines images : Cottonfield Farm
Roses and lace : Wild Orchids
Patterned paper : Card #1 Glitz "Beautiful Dreamer"  (LOVE their supplies!)
Card #2 My Mind's Eye 12x12 Paper pad from Hobby Lobby.  The paper is really thin, but you get sooo much in the paper pad, and then with a 40% off sale  ....  It's a steal!
Pink Ribbon : Offray

***********************************************************

LINK PARTIES

Nifty Thrifty Sunday @ Nifty Thrifty Things
Sundae Scoop @ A Time To Create
Sister Sunday Link Party at Sister of the Wild West
The Sunday Showcase @ Under the Table and Dreaming
Make Monday Marvelous @ C.R.A.F.T.
Made by You Mondays @ Skip to my Lou
Inspire Me Monday @ Singing Three Little Birds
Uncommonly Yours @ Uncommon Designs Online
Whatever You Want Wednesday @ Free Pretty Things
WOW Me Wednesday @ Gingersnaps Crafts
A Crafty Soiree @ Katie's Nesting Spot
Watcha Got Weekend @ Lolly Jane Boutique
Show and Tell Friday @ My Romantic Home
Feathered Nest Friday @ French Country Cottage
Strut Your Stuff Saturday @ Six Sister' Stuff
Check Me Out Saturday @ A Vision to Remember

Tuesday, December 27, 2011

Shabby Chic Winter card


Hello Papercrafters!  I hope you all enjoyed your Christmas.  We had a wonderful Christmas.  Tried some new recipes.  Any time we cook ...  there are always mistakes and lots of laughs.  My tree's are still up.  I haven't recovered enough to tackle the chore of taking down all the decorations yet.  I"m trying to get back into a routine of crafting and blogging.  I actually have lots of projects I made before the holiday, but just have to write the post.  Today I"m sharing a card designed using "Peaceful Nuthatch" by Mark's Finest Papers.  The challenge this week over at Speedy TV is winter or blue.  We hope you will join us.  You can check out all the Speedy TV challenges on the MAIN PAGE.  Then go to the FOSTV Challenges button and select the challenge from the drop down menu.


Thanks for stopping by!
hugs, Melisa

You can view more of my projects that I have used Spellbinders Dies on HERE.
You can view more of my Mark's Finest Papers projects HERE.
You can view more of my projects using Bird images HERE.
You can view all of my Shabby Chic projects HERE.
You can view more of my Winter projects HERE.
You can view more of my projects that list the Copic colors listed HERE.

***************************************************

Project Details

Patterned Paper : Webster's Pages Your Life. Beautiful. from 2009
Copic Markers : Pinecones (E43, E29), Pine Needles (E81, YG95), Bird (C1, C3, E31, E33)
Chalk : Pebbles Inc.
Snowflake Punches : Martha Stewert
Distress Ink :  Vintage Photo
Glaze : Fresco Cream Golden
Deckled Scissors : Fiskars
Die : Spellbinders "Standard Circles" with the Grand Calibur

I do want to share that I made my white paper doily cream using the Fresco Cream Glaze by Golden.  You might be able to get the same effect by watering down some cream acrylic paint.  Then I grunged it up with the Vintage Photo Distress Ink.  I dapped it on here and there and used my finger to smear it around.


Monday, December 5, 2011

Let's swap Christmas cards!


Hello Paper Crafters!  I'm back today with a birthday card I think would be nice for a guy.  Designed using "A Trip to Lancaster" by Mark's Finest Papers.  I designed it for this week's challenge over at SpeedyTV to use Silhouettes.  Hop on over and join us this week.  You can find all of the challenges on the main page HERE.  Just toggle the mouse over "Friends of SpeedyTV" button in the upper left corner.  You should get a drop down menu and then select the challenge your interested in.  Let me know if you play along, I don't want to miss your entry!

So I'm off to the post office today to send out my first round of Christmas cards.  I would love to swap Christmas cards with you.  Just email me your address to luv_2_stamp@yahoo.com
have a great week!
Melisa

*********************************************************

Project Details

Stamps : A Trip to Lancaster by Mark's Finest Papers
Patterned Paper : My Mind's Eye 6 x 6 paper pad "Portabello Rd"
Cut-out - really old from my stash.  Daisy D
Corner die : Sizzix Architectural Accent #4
Ribbon : Offray
Lace : Hobby Lobby

Sunday, December 4, 2011

Funny Card


I'm easily amused ...  but this sentiment just cracks me up!  teehee.  Not so funny for my husband though!  Now if I'd only had a stamp of a Yorkie, it would have been even better.  This image and sentiment is by B-Line Designs.  I LOVE their stamps, but they are not so easy to find.  They don't have their own online store, so you have to either google, or ask your local stamp store to order them for you.  My local stamp store in Jacksonville use to carry B-Line Designs.  Oh how I miss "A Small Cleverness".  

I did google and found an online store that you can buy them from "Stamp Diva", but I have never ordered from them.  If you hop over, take a minute to check out Charlotte Ryan!  Just scroll down.  She is soooo cute.  I have her and a little tricycle.  I hope to use them very soon.

Here is a blog post that has several other cute idea's for using this little guy HERE.

I designed this one to swap with my local card swap group "SASSSC" (Sassy) and decided to go with a shabby look.  I recently ordered the lace and rose from "Wild Orchid Crafts".  The prices for their paper roses are so low, so I stocked up on lots of colors.  You can never have too many roses, if you like shabby chic. 

Have a great week!
Melisa

*************************************************************
Project Details
Stamps : B-Line Designs from their "Pick Me Up" catalogue "Rover, BB508D" and "Ruff Quartet BB512E"  this one comes with 4 different sentiments -  "I ruff you", "Having a ruff day?", "I plant the garden, my dog digs the holes" and the one I used on the card.

Paper Flower and lace : The Wild Orchid
Black ribbon : Offray
black streamer
deckeled scissors

I actually sewed the party streamer to create a ruffle.  The rest is pretty self-explanatory.


Saturday, December 3, 2011

Shabbalicious!


Good Morning!  Today I have some Shabby Chic inspiration for you using some of my favorite things, glitter, lace and doily's.  By the way ...  I have to mention my new doily die ...  it is AMAZING!  And now I can cut doily's any color I want!  I have't had time to use it yet.  It's by Cheery Lynn and you can check it out HERE.    Ordered mine from Frantic Stamper.  Their store is not easy to navigate, but she has sooooo much stuff.  I was having a problem finding somewhere that carried ink pad refills, copic refills, stamp storage sheets all at the same store.  So when I need basics like that it's easier to order from one place and I usually throw in a couple of extra's, like this die as well.  There is no online ordering.  I email mine, but calling is an option as well.  You can give them your payment info over the phone or have them send you the bill via paypal.


Ok, back to the projects.  This is a matching set (obviously).  But the one above is a tag with one of those glassine bags glued to the front.  And there is another little tag that pulls out of it.  I think is perfect for a gift card holder.  I really love the Vintage Postcard using on the card.  Even though it has christmas themed script on it, you can easily use it for other themes as well!


Sorry I didn't have time to share step by step instructions this time.  But here is a supply list and I think it's self explanatory on how I assembled it.

Have a blessed day!
hugs, Melisa

****************************************************

Layers of Color "Sentimental Banners", "Royal Birds",  and "Vintage Roses"  art stamp sets and Vintage Postcard cling art stamp
Spellbinders : "Ribbon Banners"
Ribbon : Hobby Lobby
Glitter : Martha Stewart
Border Punch : Fiskars

Saturday, November 19, 2011

Teacup Card


Hello Paper Crafters.  I hope you are having a beautiful Saturday.  Is everyone ready to prepare their Thanksgiving feast??  I usually wait til the last minute to run to the grocery store and get everything I need.  I still have to dig out my recipes and see what ingredients I need to purchase.  I'm sad that I will not be spending it with my daughter this year .... but happy my son will be here.  Unfortunately, I can never get him or my husband to join me in the sing-a-long.  I love to start playing my Christmas music on Thanksgiving day while cooking.  Get's me in the mood for putting up the Christmas decorations. 

Since it's just the 3 of us, I know we will have lots of left over turkey.  Any idea's / recipes for how to repurpose it??  I do have one recipe a co-worker passed out from Women's Day.  It's "turkey and potato hand pies".  I may just give it a try.
 Today's card was created using the cutest teacup set!  "Floral Tea" .  I think pearls and lace are the perfect embellishements for a card like this.  I have to say, I'm out of the pearl strand and you would think it would be easy to find at one of the local craft stores.  All I can find are the larger pearls.  Hopefully someone will get some in eventually.  The lace is from Hobby Lobby.  I love getting my lace from Hobby Lobby.  I don't have to pay shipping and it's easy to get when I run out.  And of course it's even better when I get it on sale!

Just want to give you a quick reminder about the Challenges over at SpeedyTV!  Every Monday a new challenge is posted.  To find them ...  hop over to the home page HERE.  Then toggle over the Friends of Speedy button at the top.  The drop down menu list all the challenges.

I got some new MFP stamps and will be sharing some projects with you for some of the upcoming challenges.  I have to say it truely will be challenge for me, because they are all "scenery" sets.  I don't know if you have ever noticed, but I have never done "scenes".  Who knows what I will come up with!  All of MFP's new releases are next Mon-Wed.  The Design Team will be sharing lots of inspiration with you during their 3-Day blog hop!  Check out the MFP blog HERE.

I look forward to receiving the flood of emails with address for those Christmas cards!
hugs,
Melisa
You can view all of my Tea / Teacup related projects HERE

Saturday, October 1, 2011

Nature's Postage


Happy Saturday!  And it is a very happy one for me.  I'm waiting on my friend Deb to arrive and off we will go on our trip to 2 local scrapbook stores. 

But, it's also a happy day because I get to share with you that I have been selected as a "Friends of Speedy TV" design team member!  Speedy TV was started recently by Faith Hofrichter.  She is also the owner of Mark's Finest Papers.  Speedy TV is named after Mark's Finest Papers official mascot "Speedy the Cat".   It is a Ning site and I would like to invite you to join us!  We would love to have you join us for weekly challenges every Monday.   This monday kicks off the first challenge.

I need friends ... so don't forget to put in a friend request on my page HERE.
And to kick things off ....  I'm going to do a drawing and give away a prize to one of my lucky friends!

There are 10 other Friends of Speedy TV DT members excited today as well, and if you get a chance, stop by and say hello to Debbie (our fearless leader), Bonnie, Brenda, Fran, DJ, Janine, Karen B., Karen W., Kitty, and Toni.

Today's project was designed using a really cute set called "Nature's Postage".  The image was colored with Lyra Watercolor Crayons.  I have 3 other cards I designed using watercolors and I will be sharing step by step photo tutorials starting this Sunday and for the next 2 Sundays.
Thanks so much for stopping by, and don't forget to hop over to Speedy TV and put in your friend request on my page!
Hugs,
Melisa

**********************************************

Project Details
Stamps : Mark's Finest Papers Nature's Postage
Patterned Paper : My Mind's Eye
Lyra Watercolor Crayons
Ribbon : Creative Impressions

Trim cream cardstock 4 ¼” x 5 ½” Trim patterned paper (My Mind’s Eye) slightly smaller than card front and adhere to cream panel. Adhere cream lace and wrap with cream ribbon (Creative Impressions) / tie bow. Adhere panel to card front. Stamp sentiment on cream cardstock and trim as shown. Adhere to card front and embellish with button. Stamp image (Mark’s Finest Papers “Nature’s Postage“) on watercolor paper (Strathmore 140#) with water proof ink (Palette Noir). Color with water color crayons (Lyra Watercolor Crayons), trim and adhere to card front with pop dots.


Wednesday, September 28, 2011

Sweet Baby Girl Layout

9x9 Layout

Good Morning Paper Crafters!  I bet you are wondering who this little cutie patootie is??  It's my neice 21 years ago.  What a sweet little face.  So I needed a sweet little layout to go with it. 
I wanted to use my "Baby Clothesline" set by Pink Persimmon, so I headed out to Archivers in search of the perfect patterened paper to create my layout with.  As soon as I seen this patterned paper I grabbed it.  I knew it would make a great shabby layout.  It's part of the My Mind's Eye "Blush" line.  It came in a 6x6 paper pad as well so I grabbed one, knowing the small patterns would be perfect for paper peicing the little clothes.  This set comes with the cutest little clothes pins so that you can create a little clothesline, adorable boy and girl clothes, and some cute little toys as well.  LOVE it!


I wanted to use my "Small Banner" set with the "Small Carnival Alpha" set though,  so I opted to layout the clothes randomly.  The Small Banner set comes with 6 different little patterns that you can choose to stamp your banner in.  You stamp the inside first, then the outside in black.  Then stamp your letters on each banner.  I colored the inside of the letters with a Copic marker R85.

I paper peiced the dress and bloomers.  I stamped the sweater, booties, and bunny on pink cardstock and then added shawdowing with my Copic Markers.  I used RV0000 with R85, tip to tip.  R85 would have been to dark to apply directly to paper.  I created a great shading by picking up a little R85 on the tip of my RV0000 markers.  I shaded the birds with N00.

It's hard to see in the photo, but I added glitter to the stripes in the dress, around the edges of the banners, over the birds, and over the swirly. 
I wanted to create a shabby mat so I layered 3 peices of pink.  I distressed the edges of layer one using a distressing tool.  I used my deckled scissors on layer 2.  I inked all the edges with Pearlescent Chocolate ink.   
To help create an interesting border along the side of the mat, I layered eyelet lace with white party streamer that I had gathered into a ruffle.  I needed more white on the layout so the clothes would show up, so I added some wide lace. 

I hope you are inspired to create a sweet little baby boy or girl layout of your own!
hugs,
Melisa

Check out Pink Persimmon stamps HERE.

You can view all of BABY themed projects HERE.


**************************************

Supplies
Stamps : Baby Clothesline, Small Banner and Small Carnival Alpha sets by Pink Persimmon
Patterned Paper :  My Mind's Eye "Blush" line
Ink : Brilliance Pearlescent Chocolate, and Momento Onyx Black
Glitter : Stampendous
Small Roses : $1 aisle at Micheals SCORE!!
Wide Lace in background : I just bought it at Hobby Lobby
White party streamer, buttons, small eyelet lace, and chipboard : my stash
Distressing tool :  My favorite is by Making Memories.  But I also use the one by Tim Holtz.

Wednesday, September 14, 2011

Sneak Peek #3


Good Morning Paper Crafters!  Check out the "Vintage Postcard" image.  I love it!  
Please join us for the complete new release of fabulous Christmas images on Sept. 19th!  I don't have the details yet, but I know Laura will be giving away stamps as she always does.
We will be having a Christmas Ornament Blog Hop on Oct. 26th.

Thanks for stopping by!


**************************************************
Project Details
Stamps : Layers of Color "Reindeer Waltz" and "Vintage Postcard"
Patterned Paper : Little Yellow Bicycle (2008)
Chipboard : Maya Road
Stick Pins : Jennie Bowlin
Tuelle : Bazzill
Roses : Recollections (Michaels)

Thursday, August 18, 2011

The future is bright ...

Hello Paper Crafters!  Is anyone going to be stamping today??  If you are, what will you be working on??  I created this one using one of Layers of Color's new releases "Encouragement" art stamp set.  Nina Brackett has a designed this set with some beautiful sentiments and verses in it, 8 total.  I was going for a shabby / vintage feel with this one.  The patterned paper and "Victorian Frame" reminded me of something you might have seen on a wall many years ago.  I added the little flower from my "Merci Bouquet" set. I used  the last piece of one of my most favorite lace on this one.  I had found it in an antique store.  It probably wasn't antique, who knows, but it was definitely unique.  Time to hit the anitque stores for some more rare finds.
Patterned Paper : The Girls Paperie "Kitch"
The next 2 were designed for Take Ten.  The cards are only supposed to take 10 minutes to create, so I had to keep them fairly clean and simple.  I have mailed them in and hope to see them in a future publication!

Supplies:
Stamps : Layers of Color “Pansy Corner” cling stamp set, “Flutterescent” and “Encouragement” art stamp sets
Copic Markers
Spellbinders Labels Eight and Grand Calibur
Stamp images on white cardstock. Trim sentiment using Spellbinders Labels Eight die with Grand Calibur. Ink edges. Color butterfly and pansy’s with markers and trim. Adhere all pieces to front of card. Ink edges.


Stamps : Layers of Color “RoseBlossom Frame” cling art stamp (compatible with Spellbinders Labels 16)  I did not use the Labels 16 die on this project.
and “Honey Sweet” art stamp set
Ink : Momento
Copic Markers
Ribbon unknown

Stamp rose frame on front of A2 card and color. Stamp sentiment. Stamp bee’s on separate white cardstock, color, and trim. Adhere to front of card. Tie bow and adhere.


Thanks for stopping by and I hope you have a fabulous weekend!
I am really excited to be meeting up with some new friends for a card swap tomorrow morning.
big hugs,
Melisa
**********************************************************

Challenges
Sentimental Sundays - flowers and a sentiment (little flower at the bottom of the frame and on the dp)
Tuesday Taggers - anything goes
Truly Scrumptious (wed) - lace
Mark's Finest Papers - distressing (lots of brown ink and frayed edges)

*********************************************************

You can view more of my Layers of Color projects HERE.
Related Posts Plugin for WordPress, Blogger...