Showing posts with label Project - Faith Art. Show all posts

Sunday, April 1, 2012

Crafty Secrets - Sweet Blessings

Another Easter card for you today.  This one was really easy to create using one of Crafty Secrets paper cut-outs.  Aren't those bunnies too cute!!  I stamped on the ribbon.  Are you making Easter cards this year??  I'd love to check yours out as well.  Just link me up in the comments section.
Have a great day!
Melisa
UPDATE
I'm so excited that this card was a winner over at the For Fun Challenge Blog!!  I won $15 worth of digital stamps from Clear Dollar Stamps!  Thank you!
  
For Fun Challenges


*************************************
Challenges
Sundays with Chrissy (sun)
Cupcake Craft (mon) - inspired by a song (here comes peter cottontail)
For Fun (wed)
Paper and Such ( tues)

Friday, March 30, 2012

What does Easter mean to you?


I love cute little bunnies, chicks and butterflies, everything that says "spring" and celebrates new life.  But I have to share with you that we never did the "Easter Bunny" thing with our kids.  Actually we never did any of the make believe icons like the tooth fairy or Santa Claus either.  However we did let your children know that other families did like to play these make believe games with their children and did teach them they should have respect and not spoil that for other children, if that's what their family chose to do.  We don't judge others for making that decision.  I think sometimes people are just raised a certain way and generation to generation pass down the traditions without even considering there may be another option. 

So today I'm sharing with you, not because I judge you or how you choose to raise your children, but becuase I want you to know there are other options.  When I have shared this with other's over the years, I know some of them didn't get that.  But I grew up in a home that did have Santa Claus, the Easter Bunny, and the tooth fairy.  And never once did my mother share with me the real reason these holidays are celebrated.  After I was saved, I actually regretted that she had not.  She grew up in a Christian home, so she knew.  And as an adult, I can't acutally remember a time when I really believed in any of them.  So was it really worth it??  My husband and I decided it was not.  We celebrated the holidays, but we chose to tell our children the real reason we did so.  We did fun acivities as well, so they had just as much fun as the other kids.  My children don't feel like they missed out on anything. 
Easter is a holiday that we celebrate because our Lord and Savior, Jesus died on the cross, that we might be saved, reconcilled with God, so that we can spend eternity with Him.  So as Easter approaches, I am so thankful for a holiday that reminds us that we have so much to be thankful for, but nothing greater than this.
Have a very blessed day!!
Melisa


***************************************************

Project Details

Stamps : discontinued set by Mark's Finest Papers,  but there are lots of floral options that would work.  Robyn's Fetish has a Lily digital stamp that would work great and is marked down HERE
 And here is a link to some of her other Easter digi's HERE.  The bible with the Lily is very pretty. 
Here is my card using that image


For the Lily's on the top card, I highlighted area's with a yellow Copic, I think Y11, and they added adhesive using by 2-Way glue pen and sprinkled with clear glitter.
Lace : Hobby Lobby
************************************************
Challenges
Cardabilities (sunday) - sketch (card #1)
Paper Sundaes (sunday) - spring flowers
Craft Your Passion (monday) - monochromatic
The Pink Elephant (monday) - butterflies (card #1)
You can check out my huge list of daily challenges by clicking on the "Challenges" tab at the top of my blog. Let me know if I have missed any!
Fan Badge
Grab yourself a badge for your  blog.
Add our banner to your blog

Tuesday, March 27, 2012

Artist Trading Card / Faith Art

Artist Trading Card 2.5" x 3.5"

Good morning Paper Crafters!  Today I am sharing an Artist Trading Card (2.5" x 3.5") designed for the "Word Art Wednesday" challenge HERE.  Word Art Wednesday is a weekly challenge where Cass provides a free "word / phrase" art for your use in a project.   I used Impression Obsession clear stamp set "Home Sweet Nest".  Have you seen Impressions Obsession's new online store??  so much better than their old one! 

I created the background a while back ( I have a pile of them ready to go for ATC's).  But I think I used a spray ink and then lightly pounced on brown ink using a stencil brush.  Then distressed the edges with brown ink as well.  I stamped the nest directly on the background and then layered Copic colors (E23, E25, E59, and then E49).  I colored the eggs with watered down blue acrylic paint.  I stamped the bird on watercolor paper and colored with NeoColor Watercolor Crayons (brown #59 and blue #180).  I printed the word art and used chalk around the words, then inked the edges with brown ink.  I adhered both the word art and ATC to blue cardstock and trimed around the edges with deckled scissors.

Have a great day!
Melisa

**********************************************

Challenges

Word Art Wednesday - word art
Splitcoast Stampers - color challenge
Stampin' for the Weekend - anything goes

If you would like to play along with challenges, you can check out my list of links by clicking on the "Challenges" button along the top of my blog.

You can view all of my ATC's HERE
You can view more of my Faith Art HERE.

Friday, November 25, 2011

Artist Trading Card / Faith Art

(artist trading card 2.5" x 3.5")

Good morning paper crafters.  I hope you had a wonderful Thanksgiving day and are not too stuffed.  We had a wonderful day and I had fun trying some new recipes this year.  Today I will be relaxing and putting up some christmas decorations.  No black friday shopping for me.  I don't like crowds and univited people in my personal space.  Thus I avoid fairs, concerts, and Walmart for the entire month of december, teehee.

Today I am doing the Faith Art Friday post over on the Layers of Color blog.  I hope that you will check it out every friday.  Here's my post :

"Isn’t it wonderful how we can see and experience God all around us!  The last few months  have been heartbreaking for me because someone who is dear to me, and had been a follower of Christ, shared that he no longer believed there was a God.   This person is very scientific and believes that there is no evidence that there is a God and that He created this wonderful world that we live in.  I was deeply saddened knowing the consequences of our unbelief.  It’s difficult for me to understand how some people can NOT see the evidence, it’s all around us. 
The whole earth is full of His glory!  Isaiah 6:3

I am so thankful that I can see, and for all the beauty that God surrounds us with.  I am so thankful for a loving God who gave so much for me that I might have eternal life.  It’s a free gift to anyone who wants to receive it, to anyone who can see the evidence of God all around them"
If you would like to know more about what I am talking about, just email me at luv_2_stamp@yahoo.com

Hugs, Melisa

***************************************************

Project Details
Stamps : Touch of Elegance, and Dotted Peonies art stamp sets.
Copic Markers : RV10, RV34, RV19, YG61, G21, G24
Spellbinders : Nestibilities Labels Two and the Grand Calibur

The background was created using the circular image from the "Touch of Elegance" art stamp set. It's difficult to see. But I stamped the image with VersaMark ink and then embossed with white embossing powder on 140# cold press water color paper. This works as a resist. Next I rub the orange paint over the entire card, let is set for a minute and then used a damp paper towel to rub some of the paint off, exposing the embossed images. It gives you this cool distressed look. Next I rubbed hot pink paint around the edges to distress it even more. 

Gotta share!!!  I'm so excited ...  I just figured out how to find the code for the font color I want online and then change it in the HTML here!!!  Whoowhoo!  I like to make my links a different color but I want it to match my art.  I have no idea why Blogger doesn't offer more colors for us computer illiterit folks.  My children will be so proud of me.


You can view all of my ATC's HERE
You can view more of my Faith Art HERE.

Thursday, September 29, 2011

Layers of Color Bookmarks


Good Morning.  Today I have 2 bookmarks to share with you designed using Layers of Color stamps (Artful EndearmentsEncouragement and Merci Bouquet).  I was so tempted to add glitter and embellishments, but I wanted them to be as flat as possible since they are bookmarks.  Today is Faith Art Friday over on the Layers of Color blog and I know they will have something special to share and encourage you!

What are you working on this week??  I had a lot of fun designing a watercolor class this week.  I will be sharing one of the cards with you on Sunday, with a step by step photo tutorial.  Each card has soooo many photo's I figured it would be better to share them one at a time.  Have you ever worked with watercolors?

I am looking forward to this saturday, because I'm spending the day with one of my SASSSC (Sassy) Sisters, Deb!  We are going on a trip to 2 of our local scrapbook stores, and then coming back to my house to get crafty.  I hope you are able to find time for some crafty fun this weekend!

And .....  I will be making a big announcement on Saturday!

If you have not done so .... please "like" the Layers of Color Company FB page.  When it hits the 300 mark, Laura is giving away a free stamp set!

Happy Friday!
Melisa

Friday, September 23, 2011

Artist Trading Card / Faith Art

Artist Trading Card 2 1/2" x 3 1/2" 

Good morning Paper Crafters!  Today I'm sharing a project I created for today's Faith Art Friday over on the Layers of Color blog.  Every friday a member from the Layers of Color design team shares a faith art project.  We would love to have you check in and be blessed each week.  My project is an Artist Trading Card (2 1/2" x 3 1/2") I have added to my Faith Art ATC Revolving Holder

I hope that you will be blessed by this beautiful poem I found from : Scripture Worship

O come let us worship and bow down
Let us kneel before the Lord our maker
Offering the praise He deserves
For He is our God, our creator
We are the people of His pasture
And we are the sheep of His hand
So we shall offer with thanksgiving
Praises to the great "I Am"
Today if you would hear His voice
Don't let your hearts grow hard
As they had done so long ago
In the wilderness at Meribah
So come let us sing to the Lord
Make a joyful noise to our rock
With songs of praise and worship
To the King above all 'gods'.
Psalm 95: 1-3; 6-8


I love to sing praises to God and I'm so thankful for those He has blessed with wonderful creative talents that allow those of us who aren't so musically talented to sing along. I would like to share one of my favorite worship songs I listen to all the time. Check it out and join me in praising our great God!

Thanks so much for stopping by and I hope you have a beautiful weekend!
hugs, Melisa


You can view all of my ATC's HERE
You can view more of my Faith Art HERE.


***********************************************


Project Details

Stamps : Layers of Color Merci Bouquet art stamp set
Stencil : Layers of Color "Belle Brocade" art stencil
I wish I could share with you how I created the background, but I did it a while back.  Every now and then I like to sit down with paint, ink, ink sprays and play.  I know I layed out water color paper and just kept combing paints and inks until I got the look I liked, then cut the sheets down to ATC size backgrounds.  Now I have a pile of them that I can grab and finish embellishing for a quick ATC.  The stenciled pattern was created using Tsukineko Pearlescent Brown ink.  I stamped my images and cut them down to inchies.  I have a pile of those as well, ready to go when I need a quick card or ATC.  I do know that a book that has inspired me in the past is "Artist Trading Card Workshop".  It's loaded with background techniques and what better way to practice than on mini pieces of art like ATC's.  So get you some watercolor paper and start playing with color!  I will share that one of my favorite brushes I use to add just a little color is a fan brush .  I will try to create some background tutorails soon.  I miss doing them!

Friday, August 26, 2011

Artist Trading Card / Faith Art

Artist Trading Card 2.5" x 3.5"

Good Morning Paper Crafters.  I am the hostess this morning for Faith Art Friday over on the Layers of Color blog and I wanted to share with you as well.  


Would you like to have the joy, peace, and happiness that only comes from God?? Sounds like a no brainer, right??   We all want joy, peace, and happiness, right??
As my children were growing up, one of the foundational principles that I reminded them of was that we were created by God to have a relationship with Him. I told them that if that relationship was good, then all of our other relationships would be as well. What a basic principle that if followed through on, all of us would have a more abundant life. But, we are humans, with faults. Some of us weaker than others. Some of us stumbling more than others. So I would like to take a moment today to remind all of us again of this basic principle which should govern our lives.


“Be joyful always; pray continually, give thanks in all circumstances, for this is God’s will for you in Christ Jesus” 1 Thessalonians 5:16-18


The basic foundation of our relationship with God comes first through our accepting the salvation that He has offered us through Jesus. After we have established that relationship, then the key to a successful walk with Him comes through bible study and prayer.
So basic, yet many of us stumble. I know many times in my life I have become distracted and allowed myself to stray from regular bible study and prayer. And I know there are others who have done so as well. So please be reminded and encouraged today … to pray without ceasing.


“Do not be anxious about anything, but in everything, by prayer and petition, with thanksgiving, present your request to God” Phillipians 4:6


Pray regularly. Have a routine of daily prayer and bible study. But beyond that, be willing to engage in prayer anytime during the day. As soon as you are convicted of some sin, or feel the smallest amount of anxiety over a problem in your life. Pray prayers of thankfulness all day long, acknowledging all that is good in your life, and it will change your life! God wants us to be continually dependent on Him. Don’t save it up till your regular prayer time. Stop where ever you are, acknowledge Him, and pray. I have to tell you that I am a forgetful person, so if I didn’t stop and pray as things come to my mind, then there would be so many things I would miss praying about. I have even prayed walking through the parking lot of Wal-Mart before, after seeing a mother verbally abusing her child. Or driving down the road seeing someone that looks so unfortunate. I pray for my co-workers and for the supervisors that God has put over me. We shouldn’t save our prayers up for the bad times in our lives, but pray continually, including God in all aspects of our lives.


“And pray in the Spirit on all occasions with all kinds of prayers and request …” Ephesians 6:18


I prayed before writing this to you. I know that there may be many of you that know this principle and have a wonderful prayer life. But for that one person out there who needs a reminder, I’m praying for you right now.
We would love to invite you to check out Faith Art Friday every week on the Layers of Color blog.
thanks for stopping by today and letting me share my heart with you!

Melisa
********************************************

Project Details
Stamps : Layers of Color "Gift's of Love"
I am working on a series of Artist Trading Cards that are what I like to call Faith Art.  And this is one of them.  The backgound was created with crackle paste and brown ink.  I stamped the image, colored with Copics and trimmed.  I popped it up off the background and added my verse. 

You can view my other Faith Art projects HERE.

You can view all of my ATC's HERE.
You can view all of my Layers of Color projects HERE.

*********************************************

You can view all of my ATC's HERE
You can view more of my Faith Art HERE.

Thursday, August 18, 2011

The future is bright ...

Hello Paper Crafters!  Is anyone going to be stamping today??  If you are, what will you be working on??  I created this one using one of Layers of Color's new releases "Encouragement" art stamp set.  Nina Brackett has a designed this set with some beautiful sentiments and verses in it, 8 total.  I was going for a shabby / vintage feel with this one.  The patterned paper and "Victorian Frame" reminded me of something you might have seen on a wall many years ago.  I added the little flower from my "Merci Bouquet" set. I used  the last piece of one of my most favorite lace on this one.  I had found it in an antique store.  It probably wasn't antique, who knows, but it was definitely unique.  Time to hit the anitque stores for some more rare finds.
Patterned Paper : The Girls Paperie "Kitch"
The next 2 were designed for Take Ten.  The cards are only supposed to take 10 minutes to create, so I had to keep them fairly clean and simple.  I have mailed them in and hope to see them in a future publication!

Supplies:
Stamps : Layers of Color “Pansy Corner” cling stamp set, “Flutterescent” and “Encouragement” art stamp sets
Copic Markers
Spellbinders Labels Eight and Grand Calibur
Stamp images on white cardstock. Trim sentiment using Spellbinders Labels Eight die with Grand Calibur. Ink edges. Color butterfly and pansy’s with markers and trim. Adhere all pieces to front of card. Ink edges.


Stamps : Layers of Color “RoseBlossom Frame” cling art stamp (compatible with Spellbinders Labels 16)  I did not use the Labels 16 die on this project.
and “Honey Sweet” art stamp set
Ink : Momento
Copic Markers
Ribbon unknown

Stamp rose frame on front of A2 card and color. Stamp sentiment. Stamp bee’s on separate white cardstock, color, and trim. Adhere to front of card. Tie bow and adhere.


Thanks for stopping by and I hope you have a fabulous weekend!
I am really excited to be meeting up with some new friends for a card swap tomorrow morning.
big hugs,
Melisa
**********************************************************

Challenges
Sentimental Sundays - flowers and a sentiment (little flower at the bottom of the frame and on the dp)
Tuesday Taggers - anything goes
Truly Scrumptious (wed) - lace
Mark's Finest Papers - distressing (lots of brown ink and frayed edges)

*********************************************************

You can view more of my Layers of Color projects HERE.

Sunday, April 24, 2011

He is Risen!


He is risen!  Hallelujah!
Oh what a wonderful feeling it is to know that I am free, because of what Christ did for me.  I still marvel, after all these years, that He died FOR ME.  It feels so personal and brings me a hint of sadness thinking of His suffering, knowing that I did not, nor will I ever deserve this kind of love.  A love that is so great that He suffered on the cross, was buried and rose again, FOR ME ...  so that my sins could be forgiven and I could be reconciled with God  ...  so that I could live a life of peace and joy in knowing that when I die, I will spend eternity with God.  What a wonderful feeling that I do not have to earn it.  The price has been paid.  If you would like more information on how you can have this kind of peace and joy, this assurance, this kind of love, then please feel free to email me - melisa.waldorf@yahoo.com.

"For God so loved the world that He gave His only begotten Son, that whosoever believeth in Him shall not perish but have everlasting life" John 3:16
Hallelujah!

If you missed the wonderful Easter post over on the Layers of Color blog this week, please take a moment to check it out HERE.

**************************************************

Project Description

Trim patterned paper 3 1/8” x 4 ¼” Trim white card stock 2 ½” x 4 ¼” and emboss with Cuttlebug embossing folder. Distress with yellow ink.  Ink edges of both panels with black ink. Adhere white panel first then patterned paper panel over lapping to front of card. Adhere lace as shown. I use white wet glue along edges of lace/card and let dry before trimming. It prevents fraying once you cut it. Stamp sentiment on front of card. Stamp base of cross on yellow cardstock and front on white cardstock with black ink and trim. Trim / emboss white cardstock with Labels Eight Nestibilities  using Grand Calibur. Distress edges with yellow ink. Adhere to front of card as shown and add cross images. Embellish with yellow pearls.

Stamps : Layers of Color Gothic Crosses, sentiment Impression Obssession
Ink : Tsukineko VersaMagic Thatched Straw and VersaFine Onyx Black
Patterned paper : Lilybee Designs “This and That” 6x6 paper pad
Embossing Folder : Cuttlebug
Spellbinders Labels Eight Nestibilities and Grand Calibur
Lace : local craft store

Saturday, March 5, 2011

MIXED MEDIA / ART JOURNAL PROJECT

Hello Papercrafters!  I am very excited this week, because I started a 3 week Mixed Media Class taught by Christy Tomlinson and it is based on her "SHE Art" series.  While the inspiration is Christy's "she art", the fundamentals/techniques being taught on how to build a mixed media background with lots of layers and texture are the real lesson here.  And I think my first project based on this weeks video lessons is different from anything I have ever created.  Christy will be offering this class again in the future :  http://www.christytomlinson.typepad.com/
I decided to practice these techniques on canvas paper, before trying to create an acutal canvas for the wall.  I'm not new to using textured mediums like pumus, tissue paper, modeling paste, crackle paste, etc or paint, ink and stamps. But I have never brought them together in this way, with so many layers!  I did hold my breathe a couple of times when adding more stamped images. After I got to a certain point and had invested so much into it, I was afraid I was going to mess it up.  Our "SHE Art" Flickr group HERE.
And I chose a verse that I was reminded of over on the LOC blog for Faith Art Friday.  When I was reading it, I immediately remembered a song that used to me a favorite of mine years ago, by Steven Curtis Chapman called Free.  Please stop by and check out a new Faith Art Friday project each week HERE.
FREE by Steven Curtis Chapman
I get so caught up in my daily life, that is so easy to forget those years so long ago when I was not free.  My life in comparison is so different now and I am so thankful for my Saviour who set me free.  If you have never experienced the freedom that comes through salvation, then this may be a foreign concept to you and may not make sense at all.  But believe me, once you have experienced it, you know how real it is.  As always I welcome your emails if you have questions regarding this spiritual topic!

I hope you weekend is a beautiful one!
hugs,
Melisa

****************************************
You can view my other Faith Art projects HERE.

See all my MIXED MEDIA TUTORIALS HERE
See all my MIXED MEDIA / COLLAGE PROJECTS HERE
See all my ART JOURNAL PROJECTS HERE

Friday, February 25, 2011

Faith Art Friday

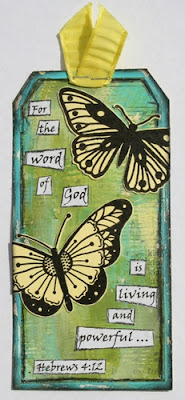
Hello Papercrafters.  Today I am sharing my Faith Art Friday project created for the Layers of Color blog.  I decided to turn tags into bookmarks and share a poem.


Our God does not faint

Nor grows weary each day
There's no searching His understanding
Or knowing His infinite ways
He gives power to the faint
Increasing their strength and might
For even the young lie exhausted
And grow weary in their lives
But those that wait upon the Lord
He shall strengthen and renew
They shall mount up close to God
And soar as eagles do
They shall run and not be weary
They shall walk and not grow weak
They shall be changed and renewed
As their God they humbly seek
© By M.S.Lowndes

I don't know what some of you may be going through today.  I hope that if you are struggling, you will be encouraged by God's word and know that no matter what you are going through, He is there for you and will sustain His children.
And I can not leave you without sharing the inspiration for these book marks.  I follow a mixed media blog called "Paper and Gluestix" by Amy Nieman.  And each time I open her post in my email, I can't help but smile.  I especially love here "pet" ATC's that she creates with her own little pup.  I recently got the opportunity to swap with her, and the ATC's below are what I recieved!  They were the inspiration for my bookmarks.  Amy also has a Flickr gallery as well HERE.  


I'm am off to try and pick out more paint and move some things to the new house!  I hope you all have a blessed weekend.
hug,
Melisa

********************************************

You can view my other Faith Art projects HERE.
You can view more of my Collage / Mixed Media projects HERE.

Friday, January 28, 2011

Be still and know that I am God

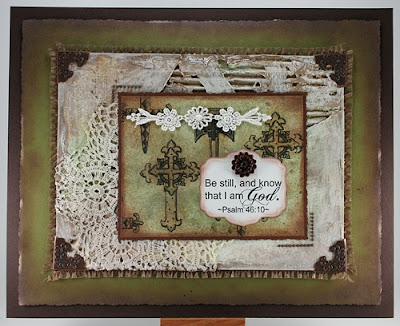
Hello Papercrafters.  Recently I had the pleasure of creating a project for Faith Art Friday over at the Layers of Color blog.  The verse I selected to focus on is "Be still, and know that I am God" Psalm 46:10.
I wrote this over  a week or so ago, and had no idea how quickly my life would change and how I would need to be reminded of this as well.  We have had some family issues that have been very upsetting this week.   So after a momentary emotional break down, I drew near to God, knowing that it was the only way I could have peace regarding this problem.  Believing that my God loves me and will be with me no matter how difficult life becomes.  I hope that this is a verse that you can fall back on as well when times of trouble come in your life.  If you are in the mist of troubled times as we speak, please email me,  I would love to pray for you.

While this verse was written in reference to a time of war as the Kingdom of David was being established, it is applicable to our everyday lives as well. To “be still” means to cause yourself to let go or become weak. So that He can work. In the face of life problems, how many of us try to “fix it” ourselves, without taking the time to go to God in prayer first. I know that I have. Many of us want to be in control of our lives and work hard at manipulating things to obtain the outcomes we desire. But by doing so, we prevent God from working in our lives, and receiving the honor and glory He desires.
Have you ever wondered how you would respond in the face of tragedy as a Christian? I have. In my life I have not had to deal with the fear, loss, pain and suffering that many have … and I wonder if my response would be one that would bring honor and glory to my God. Events of this past month around the world have broken my heart to hear about, and made me pause and wonder how I would have responded in these circumstances.
Sometimes we need to get out of Gods’ way. Let Him work. How do we do this? By knowing who He is. How do we reach a point in our spiritual growth that we can “be still” in the face of tragedy? By knowing who He is. How do we deal with the grief of loosing a child or loved one? By knowing who He is. How do we obtain peace in a time where others are falling apart? By knowing who He is.
How do we know who He is?? By knowing His history, His word, His promises. This knowledge gives us everything we need to face what life will bring us and an assurance that our God is in control, and if we get out of His way, He will do the work.  Then what will be left for us to do??   … the easy part … singing His praises!
**************************************************************

Project Details
This one is another piece of corrugated cardboard art.  I really LOVE working with this stuff.  The idea for this one was to create a project large enough to have framed and hang on a wall.  This project is 9 1/2" x 12"  and doesn't look so dark in real life.
My bedroom is in green and brown so this will be perfect to frame and hang in there.  Thankfully DH gave me the thumbs up!  He doesn't usually ooh and ahhh over my projects, but he did on this one.


I already had the center panel completed.  This is a result of sitting down one day and spraying Glimmer Mist and adding ink to a pile of panels for future use.  I used Gothic Crosses from Layers of Colors.  I LOVE this set!  I used Eclipse Masking Tape to layer the images.  If you are not familiar with masking then scroll down to the bottom of post for instructions.  The verse is a digital image by Nina Brackett from SquiggleflySpellbinders die - Labels Five
 I began with my corrugated cardboard, tearing away pieces of the top layer to expose the ripples underneath.  I layed the right lower corner and left upper corner torn patterned paper and center panel over it to help me decide where to tear and balance it.  I never know which direction I will go and just continue to add and layer things until I get a look I like.  Don't be afraid to just start slapping it on.  It's just a peice of cardboard, and it is so easy to start all over again if you don't like it.  Usually there is some type of patterned paper barely peeking through, because my original intention is to have it on the project, but by the time I'm done, it has been mostly covered.  Take a look at the left upper corner and you can see some music notes peeking through.

After tearing away some of the top layer, I add acrylic pain
t.  Usually 2-3 colors.  I already had the brown to accentuate the inside of the ripples, so I mostly added white and a tan colors along the top, as well as some green Glimmer Mist here and there.  Next I added white crackle paste with a palette knife. Not as much as usual, but you can see it allong the edges.  Remember the thicker the crackle paste, the larger the cracks.  I found a new crackle paste because those little bottles by Ranger can get pricey, and I wanted something more readily available since I love using it.  Mine is by DecoArt and can be found at Micheals.  It comes is a 10oz container versus the little 1oz by Ranger. 


I wanted to add more texture and I had picked up some doilies at a local antique store recently.  I LOVE lace, so what better way to enjoy it than to include it on a wall project!   The rest is pretty easy to create looking at the photo's.


I hope this little tutorial inspires you to create some of your own backgrounds.  If you do, shoot me an email.  I would love to check it out.
I hope you have a crafty day!
Melisa


See to other Masking Tutorials I have done HERE.

You can view more of my Cardboard Art HERE.
You can view my other Faith Art projects HERE.
You can view more of my Collage / Mixed Media projects HERE.


*************************************************

Masking Tutorial

If you are new to stamping, you may not know what masking is.  It is simple the covering up of an area the you want to stamp over, but only want the image to appear around the masked image.  So in this case I stamped the center portion of the cross first onto my project.  Then stamping it again onto another piece of paper.  Cut the second one out creating a mask to cover up the image on your project.  I use Eclipse Masking tape because it is lightly sticky (like a post it note) on the back.  Sometimes Post-it notes will work.  But only a small portion is sticky.  Post-it notes are pretty expensive, to I looked at the Eclipse tape as an investment long term.  It has lasted me a long time and I love that it stays put while I"m stamping over it with the second image.


Lay your mask over the same image on your project.  Now stamp the background image over it.


And that's how you get that great layered look!

This is just one technique for masking.  It is used with brayering as well.  And I'm sure other ways I am not even aware of.  I have tried masking fluid and didn't like it.

************************************************


Sunday, October 17, 2010

Altered Bird Cage Home Decor


Good Morning Papercrafters.  Today I am thrilled to have participated in the Stampin' Sisters for Christ Challenge.  I just love this challenge blog and wish I had time to play along more often.  These ladies are so very special in what they do on their challenge blog.  Each Sunday they provide a bible verse to inspire us!  In addition they have wonderful sponsors each week and this week the sponsor is Layers of Color!
Today's verse is ...
Matthew 6: 9-13 "This, then, is how you should pray: 'Our Father in heaven, hallowed be your name, your kingdom come, your will be done on earth as it is in heaven. Give us today our daily bread. Forgive us our debts, as we also have forgiven our debtors. And lead us not into temptation, but deliver us from the evil one."
And the challenge is ...
Make a card/project that features prayer; either someone praying, or a verse about prayer, or a greeting that lets someone know you are praying for them.
I had so much fun with this project.  My guest bedroom (when we get our new house in the spring, is going to be shabby chic).  I have already bought the bed linens and I want to fill the room with shabby pieces of art.  So here is another project for that room ...


I had so much fun creating this one.


1. Spray metal birdcage with white spray paint.  After this is dry, apply crackle paint.
2. Embellish with pearl trim (Hobby Lobby).
3. Add a branch (purchased in the floral department at Hobby Lobby) to the inside of the cage.  To make it look more realistic paint it brown and add brown crackle paint.
4. Add floral embellishment to outside of cage (Prima).
5. Stamp butterfly images, color, and trim. Apply black glitter with a glue pen.
6. Adhere to outside of cage.
7. Type bible verse and print.  Trim to a banner.


Aren't these butterfly images gorgeous??  They are from a Layers of Color set called "Flutterescent"!

You can view all of my Altered Projects HERE


Don't forget to hop over and play along with Stampin' Sisters for Christ this week!!

Have a blessed Sunday!

Friday, September 10, 2010

Artist Trading Cards

Artist Trading Cards, like inchies are little miniture pieces of art.  But you can pack a lot of on these 2.5" x 3.5" cards.  I love that they are a quick easy creative fix.  Like inchies, sometimes they are created to swap with other artist.   Last year I purchased a couple of the 7 Gypsies Revolving ATC Holders to store them on.


Aren't these cool!
This week I created 3 ATC's.  I was totally inspired by a book I purchased a while back.  "Artist Trading Card Workshop". 

Not only was I inspired by the artistry / design of so many of the cards, but the book shares lots of background techniques as well. 
I spend alot of time listening to and singing along with Contemporary Christian / Praise and Worship music in my car and while I"m creating.  My heart fills with joy as I sing songs of praise to my Saviour.  I love finding music and lyrics that express exactly what my heart wants to say.  So what better inspiration for a new series of ATC's than my love for God!  So here is what I created.


I created this one using Layers of Color stamp sets "Royal Birds" and "Regal Wings" (crown in background).  The background is created using paper towels.  I dampened the paper towel and layed it out on wax paper.  Then I applied watered down acrylic paints.  After it was dry I lightened some of the area's by rubbing on some white pigment ink.  Then I stamped the crowns with black pigment ink.  The paper towel gives you this cool textured background.


I designed this one using "Gothic Crosses" and " "Acanthus Leaves".  I started with thick watercolor paper.  I brushed on watered down acrylic paint in two colors, purple and green.  After it's dry I stamped the swirlies with VersaMagic Ink, sprinkled clear embossing powder and heat embossed.  Next I brushed on brown ink here and there.  Don't worry about covering the embossed area's.  After it is dry, place it on an ironing board, cover it with 1 piece of printer paper.  Iron over it with a very hot iron (no steam).  Mine was so hot, I only had to move it over the piece for about 3 seconds.  I could see the paint bleeding onto the the paper.  As you peel it off, and it removes some of the paint creating a distressed look.  Then I sanded some more of the brown off as well, exposing the paint below, until I got the distressed look I wanted.  I LOVE this technique!! 


This is another version of the paper towel technique above.  I actually colored several paper towels with different color variations, so I have lots more left over to use in the future.  For this one, I used "Joyful Noise".
What do you think??  Are you ready to create and maybe even swap some ATC's??
There are alot of options for displaying your ATC's on the revolving holder.  The plain paper ones can sag a little.  I actually glue together when using them.  7 Gypsies sells alot of accessories which can be found at Your ATC Store.  I like the thicker chipboard refills best.  I don't have one of these yet, but may check them out - 7 Gypsies 2-ringed Chipboard Album.  Here is my idea for this cute little album:  Use it as a circle album.  Years ago "circle journals"  were the fad.  You joined a group of willing participates, purchased a small album, like a 6 x 6" and then mailed it around to one another.  You decided the theme of your album, and each participated created a page to go along with your theme.  Your album progressed through the group and eventually made it back to you (thus the circle).  It was so much fun to see all the wonderful art of the ladies in front of you as they mailed the albums to you one at a time.  It's one thing to see art online, but really wonderful to veiw it in person.  But it was even more fun when yours arrived back to you.   So contact some girlfriends and start your own Circle ATC Album Group today! 
I hope you were inspired to pull out those old acrylic paints and get messy with some background techniques.  If you have any questions, just email me!
May God bless you with a joy and peace that only He can give!
hugs,
Melisa

**************************************

You can view my other Artist Trading Cards  HERE.
You can view my other Faith Art projects HERE.
You can view more of my Collage / Mixed Media projects HERE.
Related Posts Plugin for WordPress, Blogger...