Showing posts with label Project - Artist Trading Cards. Show all posts

Tuesday, March 27, 2012

Artist Trading Card / Faith Art

Artist Trading Card 2.5" x 3.5"

Good morning Paper Crafters!  Today I am sharing an Artist Trading Card (2.5" x 3.5") designed for the "Word Art Wednesday" challenge HERE.  Word Art Wednesday is a weekly challenge where Cass provides a free "word / phrase" art for your use in a project.   I used Impression Obsession clear stamp set "Home Sweet Nest".  Have you seen Impressions Obsession's new online store??  so much better than their old one! 

I created the background a while back ( I have a pile of them ready to go for ATC's).  But I think I used a spray ink and then lightly pounced on brown ink using a stencil brush.  Then distressed the edges with brown ink as well.  I stamped the nest directly on the background and then layered Copic colors (E23, E25, E59, and then E49).  I colored the eggs with watered down blue acrylic paint.  I stamped the bird on watercolor paper and colored with NeoColor Watercolor Crayons (brown #59 and blue #180).  I printed the word art and used chalk around the words, then inked the edges with brown ink.  I adhered both the word art and ATC to blue cardstock and trimed around the edges with deckled scissors.

Have a great day!
Melisa

**********************************************

Challenges

Word Art Wednesday - word art
Splitcoast Stampers - color challenge
Stampin' for the Weekend - anything goes

If you would like to play along with challenges, you can check out my list of links by clicking on the "Challenges" button along the top of my blog.

You can view all of my ATC's HERE
You can view more of my Faith Art HERE.

Saturday, March 10, 2012

Artist Trading Card / Mark's Finest Papers

Artist Trading Card 2.5" x 3.5"

Ok, I have to admit, I'm not crazy about this one.  Not sure why.  I tried collaging different elements made by different companies.  The butterfly is by K&Company (from one of their emphemera packs) and the torn ticket across the bottom is really old by Daisy D.  The brown florals are a piece of patterned paper.   I really am in awe of people who do collage so well.  I do not claim to be one of them, teehee.    This one was designed using an image from "Black Eyed Susan's for Encouragement" by Mark's Finest Papers.  Mark's Finest Paper's host challenges every week on their company blog HERE and at StampTV every monday, HERE.  You can locate the challenges at StampTV if you check out the buttons along the top of the page.  Toggle the mouse over "FOSTV Challenges" to see the drop down menu of challenges.  I hope you will get a chance to join in sometime!

hugs,
Melisa

You can view all of my ATC's HERE

Thursday, March 8, 2012

Mixed Media Tutorial / Artist Trading Card / Pink Persimmon

Artist Trading Card 2.5" x 3'5"

My weekend begins tomorrow and I'm looking forward to it. I was able to get off tomorrow and will be going to the community "Scrapsisters" get together tomorrow, and then 3 of my very good friends, Deb, Robin, and Melayne are joining me to stamp away the morning Saturday. And then, to top it all off, my sweet girl is flying in from Florida!!! I know we will be sharing some crafty time together as well!    I hope all of you are blessed to be surrounded by crafty friends as well!
 I am also excited about Pink Persimmon's newest release!  I enjoy creating ATC's and this set is PERFECT for those.  And of course they can be used for other projects as well.  So today I want to share an ATC that I created using background stamps from 2 of the sets, "Fairy Tale Patterns" and "Spring Time Patterns" and the girl from "Hello Vintage Girl".  

I don't participate in gossip, but I couldn't resist the phrase, "No! She didn't".  I imagined her on the phone with one of her crafty friends, and the friend is telling her something VERY important, like, "You will never believe what Susan did the other night at the crop.  She used  a hammer instead of a Crop-a-dile", teehee.   Women can be so funny! 

I also have a card to share using another set, "School Uniform".   I am also sharing a step by step tutorial on how to create the background and the paper pieced girl.  

For beginners, let me explain that Artist Trading Cards are little 2.5" x 3" pieces of art that you can swap with friends or collect for yourself.  If you are not familiar with Artist Trading Cards then you may want to take a moment to check out this post HERE.

Are you ready to get messy???  I hope you didn't just get your nails done.   Let's get started!
1.  Begin with a piece of watercolor paper.  I used Canson 140lb.  Trim to 2.5" x 3.5".  Spray with Glimmer Mist Black Cherry.   Dry with your heat gun.  I'm hoping this step will help to heat set the spray ink, so it doesn't bleed so much later.

2. After it is dried, stamp with the polka dot pattern from "Spring Time Patterns" and VersaMark Ink. Sprinkle with clear embossing powder and heat emboss.


3. Coat with white acrylic paint. I used a soft bodied paint by Liquitex. It's thicker than cheaper paint. But by all means use the cheaper brands. You just may have to apply several coats. After dry, use a lightly damp paper towel and begin wiping it across the card. Most of the paint should come off of the polka dots because the embossing powder resist the paint. Some of the paint on the background may come off as well. All to dry and repeat process as many times as needed to get the distressed look below (I did it twice).


4. Use the script background from "Fairy Tale Patterns" with black Staz-on ink. Staz-on is an ink that adhere's to non-pourous surfaces like the embossed polka dots. It may be possible to use another type ink.  I didn't experiment. You are going for a distressed look, so practice on a piece of paper first to figure out where you want to apply pressure so that the whole image does not get stamped.


All the mess is over with.  Now we are going to paper piece our "Hello Vintage Girl image" .  It's time to get out those cuticle scissors or some other type percission scissors that allow you to cut details.


5. Stamp your Vintage Girl 3 times as shown below.


6. Color the area's shown below. Notice I didn't worry about being super neat because I knew I was going to cut her out.


7. Trim all the pieces as shown below. 


8. Stamp Vintage Girl on the card front with Staz-on ink. This serves as a template for where to put your pieces as well as add the area's you are not piecing, the phone cord.


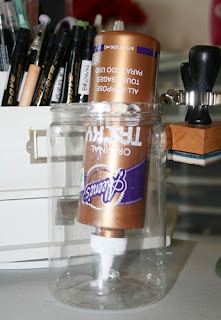
9. Adhere her blouse and skirt as shown below. I use Aleene's Tacky Glue ($1.47 at Walmart). This is my favorite adhesive and I use it 95% of the time. I like the control I have and that I'm able to fully adhere my pieces. Here's a tip : It's thick so I like it ready to go. I store it upside down in a peanut butter jar that has a little dimple in the bottom. It's a wet glue, so it can warp your paper if you use too much and if the paper is supper thin.  A dab will do.


10. Adhere the rest of the peices as shown below.


11.  Trim the card down a little so that it will still be 2.5" x 3.5" after you add the deckled background (3/16").  Adhere to black cardstock and trim with deckled scissors.  Create words on computer, trim and adhere.


I hope you enjoyed today's tutorial!
big hugs,
Melisa

Check out Pink Persimmon stamps HERE.

You can view all of my ATC's HERE


See all my MIXED MEDIA TUTORIALS HERE
See all my MIXED MEDIA / COLLAGE PROJECTS HERE
See all my ART JOURNAL PROJECTS HERE


This card uses "Scottie Dogs",  "Vintage Greetings", one of the backgrounds from the "School Uniform".  The background die is by Spellbinders, "Labels 21"

Thursday, February 23, 2012

Artist Trading Card / Mark's Finest Papers

2.5" x 3.5" Artist Trading Card

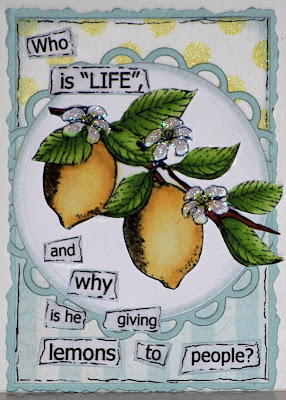
I'm back today using "Pucker Up".  This time I created an ATC.  I also used one of my new stencils by Crafter's Workshop "Mini Swiss Stamps".  I sprayed some "Daffodil" Glimmer Mist over it onto water color paper.   This is a FUN set!
I hope you haven't had any lemons thrown your way this week!
Melisa

*************************************************

Project Details
Stamps : Mark's Finest Papers "Pucker Up"
Spellbinders : "Standard Circles", and "Lacey Circles"


You can view all of my ATC's HERE


Thursday, December 8, 2011

3 Mixed Media Background Tutorials / Artist Trading Card

Artist Trading Card 2.5" x 3.5"

I have to tell you that the best part of these 3 ATC's for me was creating the backgrounds!  Back in Oct, my friend Deb and I got together for a mixed media day and experimented with some different techniques.  I have a really great book, "Surface Treatment Workshop" and it has some fun techniques in it.  Most of the technique's I have either tried or seen before, but all the projects using the techniques in the book were very inspiring.  In addition, it's nice to have 1 book with so many techniques.  I tend to forget things, so even though I've done something before, looking through the book reminds me / inspires me to do it again.  Artist Trading Cards are great size for just practicing since they are only 2.5" x 3.5" and fast to create.  If you are new to Artist Trading Cards, then you can take a look at a basic article I wrote way back in 2010 HERE.  And view all of my other ATC's HERE.

The first one was a "rinse aid resist" technique.  It's the rinse aid that is found on the dish washing liquid aisle at the grocery store.  Mine doesn't look as good as the projects in the book, but I still like how it turned out.  I used 3 different color acrylic paints and 140lb water color paper.  hmmmm .... I knew you were going to ask me what colors, teehee.  I only wrote I used 3 colors, but not the colors, teehee.  Well obviously pink and yellow. 
1.  Apply coat of paint and while it is still wet, let the rinse aid drip down the card from top to bottom. 
2. Let the paint dry and then wipe off the rinse aid.  Mine didn't resist so well, so I definitely want to try this one again.  So I added more paint and rinse aid, dried and wiped again.  I can only assume at this point I did the process again with a 3rd color since I wrote I used three colors, but I can't remember.  My background is the result of a technique gone bad, teehee.  So I just kept trying it with a different color and this is what I ended up with.
3. Stamp it with a script image and with orange ink.  My girl with wings and the words are from Lisa's Altered Arts.  The image is kinda fuzzy, if that makes sense.  I don't know if they are intended to look that way or if it's my printer.  My printer doesn't work that well at times.  I guess I"m just used to clean crisp images.
4.  Trim words (Lisa's Altered Arts).  You can create your own with your computer.
5.  Doodle around work blocks and edges.
6.  Add button.

Artist Trading Card 2.5" x 3.5"

I have been using paste for a couple of years. After seeing a project in the book that had raised circles using the paste and the colors aqua / red, I was inspired to create this background.  Paste are found in the artist section at your local craft stores.  I've used Aquitex and Golden and both work fine for me.  It comes in white.  You can add acrylic paint to it.  Or spread it on and after it dry's add paint over it.  It's fun to use with stencils.  I punched circles in heavy cardstock to use as a stencil.  You can get lots of fun stencils from Layer's of Color and from Crafter's Workshop

1. Spread modeling paste over the entire background with a palette knife (also found in the artist section of local craft store).  
2.  After dried I used my self-made circle stencil and applied more paste. 
3.  Apply paint (red, aqua, and a dab of white) until you get the distressed look you want.  I often use fan brush to add little wisp of color here and there. 
4. Distress using a script stamp.  The one I used was already distressed (Prima).  It's a 2 1/4" x 2 3/4" clear stamp.  I swiped ink over parts of the stamp and added small parts of the image hear and there.  see below.


5.  Hand cut grass, flower, and banner from patterned paper, then doodle around the edges.

Another great book with fun background idea's and great ATC inspiration is "Artist Trading Cards Workshop" .

Artist Trading Card 2.5" x 3.5"

The above background was created using a paper towel.  I've read can also use a baby wipe, I've just never done it.  Paper towels are more readily available at my house, thank goodness, teehee.

1. Wet  paper towel and lay over some watercolor paper.
2.  Add watered down acrylic paint.  Just enough so it is thin enough to be absorbed easily.  The paint bleeds together a little. 
3. Pick up your paper towel and lay it down somewhere to dry.  I use wax paper.
The paint will bleed through on to the watercolor paper and you can use this for the base of backgrounds as well.
 4.  Lightly swipe more paint here and there if needed to get the distressed look you want.  Whenever I do this, I use a fan brush. 
5. Trim down to slightly smaller than ATC.  Stamp randomly with a script image and black ink.  Adhere to black cardstock.
6.  Tear and add a patterned paper. 
7.  Add cut-out butterfly's and words.
8.  Doodle around the edges of word blocks and patterned paper.  I just realized I forgot to doodle around the sides, so I will be going back and adding that.

I hope you are inspired to experiment with some new background techniques!
I would love to see ATC's you create using these techniques.  Email my a link when you have posted yours.

hugs,
Melisa

You can view more of my Artist Trading Cards HERE.
You can view more of my Mixed Media projects HERE.
You can view more of my projects using Modeling Paste HERE.
You can view more of my tutorials HERE.


***********************************************

Modeling paste

Palette Knife

This is a fancy set.  I just own one ... the first one on the left.  You can buy just the one at local craft store

Friday, November 25, 2011

Artist Trading Card / Faith Art

(artist trading card 2.5" x 3.5")

Good morning paper crafters.  I hope you had a wonderful Thanksgiving day and are not too stuffed.  We had a wonderful day and I had fun trying some new recipes this year.  Today I will be relaxing and putting up some christmas decorations.  No black friday shopping for me.  I don't like crowds and univited people in my personal space.  Thus I avoid fairs, concerts, and Walmart for the entire month of december, teehee.

Today I am doing the Faith Art Friday post over on the Layers of Color blog.  I hope that you will check it out every friday.  Here's my post :

"Isn’t it wonderful how we can see and experience God all around us!  The last few months  have been heartbreaking for me because someone who is dear to me, and had been a follower of Christ, shared that he no longer believed there was a God.   This person is very scientific and believes that there is no evidence that there is a God and that He created this wonderful world that we live in.  I was deeply saddened knowing the consequences of our unbelief.  It’s difficult for me to understand how some people can NOT see the evidence, it’s all around us. 
The whole earth is full of His glory!  Isaiah 6:3

I am so thankful that I can see, and for all the beauty that God surrounds us with.  I am so thankful for a loving God who gave so much for me that I might have eternal life.  It’s a free gift to anyone who wants to receive it, to anyone who can see the evidence of God all around them"
If you would like to know more about what I am talking about, just email me at luv_2_stamp@yahoo.com

Hugs, Melisa

***************************************************

Project Details
Stamps : Touch of Elegance, and Dotted Peonies art stamp sets.
Copic Markers : RV10, RV34, RV19, YG61, G21, G24
Spellbinders : Nestibilities Labels Two and the Grand Calibur

The background was created using the circular image from the "Touch of Elegance" art stamp set. It's difficult to see. But I stamped the image with VersaMark ink and then embossed with white embossing powder on 140# cold press water color paper. This works as a resist. Next I rub the orange paint over the entire card, let is set for a minute and then used a damp paper towel to rub some of the paint off, exposing the embossed images. It gives you this cool distressed look. Next I rubbed hot pink paint around the edges to distress it even more. 

Gotta share!!!  I'm so excited ...  I just figured out how to find the code for the font color I want online and then change it in the HTML here!!!  Whoowhoo!  I like to make my links a different color but I want it to match my art.  I have no idea why Blogger doesn't offer more colors for us computer illiterit folks.  My children will be so proud of me.


You can view all of my ATC's HERE
You can view more of my Faith Art HERE.

Monday, November 14, 2011

Artist Trading Card / Layers of Color

Artist Trading Card 2.5" x 3.5"

Hello Paper Crafters.  I hope you enjoyed the Gingerbread House Mini-Album Blog Hop last week.  This week I hope you will join us for the New Release Blog Hop on Wednesday.  Nina Brackett has designed some fabulous images for you to play with!   I haven't heard yet, but I'm sure there will be stamps to win as well.  The above is an artist trading card (2.5" x 3") sneak peak.  Isn't this a fabulous image!

********************************************************

I want to take a moment to introduce you to a new challenge blog that a friend of mine is starting.   I know there are lots of challenge lover's out there.   It's called "Word Art Wednesday" and I hope you will take a moment to check it out.

Word Art Wednesday

hugs, Melisa


You can view all of my ATC's HERE

Friday, September 23, 2011

Artist Trading Card / Faith Art

Artist Trading Card 2 1/2" x 3 1/2" 

Good morning Paper Crafters!  Today I'm sharing a project I created for today's Faith Art Friday over on the Layers of Color blog.  Every friday a member from the Layers of Color design team shares a faith art project.  We would love to have you check in and be blessed each week.  My project is an Artist Trading Card (2 1/2" x 3 1/2") I have added to my Faith Art ATC Revolving Holder

I hope that you will be blessed by this beautiful poem I found from : Scripture Worship

O come let us worship and bow down
Let us kneel before the Lord our maker
Offering the praise He deserves
For He is our God, our creator
We are the people of His pasture
And we are the sheep of His hand
So we shall offer with thanksgiving
Praises to the great "I Am"
Today if you would hear His voice
Don't let your hearts grow hard
As they had done so long ago
In the wilderness at Meribah
So come let us sing to the Lord
Make a joyful noise to our rock
With songs of praise and worship
To the King above all 'gods'.
Psalm 95: 1-3; 6-8


I love to sing praises to God and I'm so thankful for those He has blessed with wonderful creative talents that allow those of us who aren't so musically talented to sing along. I would like to share one of my favorite worship songs I listen to all the time. Check it out and join me in praising our great God!

Thanks so much for stopping by and I hope you have a beautiful weekend!
hugs, Melisa


You can view all of my ATC's HERE
You can view more of my Faith Art HERE.


***********************************************


Project Details

Stamps : Layers of Color Merci Bouquet art stamp set
Stencil : Layers of Color "Belle Brocade" art stencil
I wish I could share with you how I created the background, but I did it a while back.  Every now and then I like to sit down with paint, ink, ink sprays and play.  I know I layed out water color paper and just kept combing paints and inks until I got the look I liked, then cut the sheets down to ATC size backgrounds.  Now I have a pile of them that I can grab and finish embellishing for a quick ATC.  The stenciled pattern was created using Tsukineko Pearlescent Brown ink.  I stamped my images and cut them down to inchies.  I have a pile of those as well, ready to go when I need a quick card or ATC.  I do know that a book that has inspired me in the past is "Artist Trading Card Workshop".  It's loaded with background techniques and what better way to practice than on mini pieces of art like ATC's.  So get you some watercolor paper and start playing with color!  I will share that one of my favorite brushes I use to add just a little color is a fan brush .  I will try to create some background tutorails soon.  I miss doing them!

Friday, August 26, 2011

Artist Trading Card / Faith Art

Artist Trading Card 2.5" x 3.5"

Good Morning Paper Crafters.  I am the hostess this morning for Faith Art Friday over on the Layers of Color blog and I wanted to share with you as well.  


Would you like to have the joy, peace, and happiness that only comes from God?? Sounds like a no brainer, right??   We all want joy, peace, and happiness, right??
As my children were growing up, one of the foundational principles that I reminded them of was that we were created by God to have a relationship with Him. I told them that if that relationship was good, then all of our other relationships would be as well. What a basic principle that if followed through on, all of us would have a more abundant life. But, we are humans, with faults. Some of us weaker than others. Some of us stumbling more than others. So I would like to take a moment today to remind all of us again of this basic principle which should govern our lives.


“Be joyful always; pray continually, give thanks in all circumstances, for this is God’s will for you in Christ Jesus” 1 Thessalonians 5:16-18


The basic foundation of our relationship with God comes first through our accepting the salvation that He has offered us through Jesus. After we have established that relationship, then the key to a successful walk with Him comes through bible study and prayer.
So basic, yet many of us stumble. I know many times in my life I have become distracted and allowed myself to stray from regular bible study and prayer. And I know there are others who have done so as well. So please be reminded and encouraged today … to pray without ceasing.


“Do not be anxious about anything, but in everything, by prayer and petition, with thanksgiving, present your request to God” Phillipians 4:6


Pray regularly. Have a routine of daily prayer and bible study. But beyond that, be willing to engage in prayer anytime during the day. As soon as you are convicted of some sin, or feel the smallest amount of anxiety over a problem in your life. Pray prayers of thankfulness all day long, acknowledging all that is good in your life, and it will change your life! God wants us to be continually dependent on Him. Don’t save it up till your regular prayer time. Stop where ever you are, acknowledge Him, and pray. I have to tell you that I am a forgetful person, so if I didn’t stop and pray as things come to my mind, then there would be so many things I would miss praying about. I have even prayed walking through the parking lot of Wal-Mart before, after seeing a mother verbally abusing her child. Or driving down the road seeing someone that looks so unfortunate. I pray for my co-workers and for the supervisors that God has put over me. We shouldn’t save our prayers up for the bad times in our lives, but pray continually, including God in all aspects of our lives.


“And pray in the Spirit on all occasions with all kinds of prayers and request …” Ephesians 6:18


I prayed before writing this to you. I know that there may be many of you that know this principle and have a wonderful prayer life. But for that one person out there who needs a reminder, I’m praying for you right now.
We would love to invite you to check out Faith Art Friday every week on the Layers of Color blog.
thanks for stopping by today and letting me share my heart with you!

Melisa
********************************************

Project Details
Stamps : Layers of Color "Gift's of Love"
I am working on a series of Artist Trading Cards that are what I like to call Faith Art.  And this is one of them.  The backgound was created with crackle paste and brown ink.  I stamped the image, colored with Copics and trimmed.  I popped it up off the background and added my verse. 

You can view my other Faith Art projects HERE.

You can view all of my ATC's HERE.
You can view all of my Layers of Color projects HERE.

*********************************************

You can view all of my ATC's HERE
You can view more of my Faith Art HERE.

Friday, July 22, 2011

Artist Trading Card / Pink Persimmon

I've been busy making ATC's again. Ready to trade??  Artist Trading Cards are fun to make and at 2.5" x 3.5", don't require a lot of resources or time.  If you are new to Artist Trading Cards, you can learn more about them and see a list of resources on one of my older post HERE


I used images from 2 Pink Persimmon stamp sets to create these little works of art. 
"Tea and Cake"  is so sweet, and girly, and vintage!  I LOVE it.  It comes with 2 different tea pots, tea cups, and a cake stand.  I used the tea cup images and stacked them on ATC #1.  My daughter had a tea party as a child for one of her birthdays, so I'm thinking this set would be just perfect for a future layout as well.


"Singing Birds"  comes with an arch / frame image and of course, some singing birds.  Oh the possibilities for adding things in the center  ...  big bird's nest,  a tree.  I thought there should be a little bird house dangling from the center so  I created my own for ATC #2.  What would you embellish or add to this image to finish it off ??

*************************************************

Project Details
Stamp Sets : Pink Persimmon "Tea and Cake" and "Singing Birds"
Copic Markers
Spray Ink : Tattered Angels Pink Taffy
 
Trim black cardstock 2.5" x 3.5" twice.  Trim lined pattern paper slightly smaller.

ATC #1 - Adhere lined paper to black card base.  Spritz doily with pink spray ink, adhere to front of card and trim along edges.  Tie green seam binding and tie bow.  Doodle around edges.  Stamp bottom tea cup on white cardstock.  Stamp tea cup on Eclipse Masking Tape and trim.  Lay tea cup mask over bottom tea cup and stamp tea cup #2 with the bottom of the cup over lapping the top of the bottom tea cup, giving the appearence that is is sitting down in the bottom tea cup.  Remove mask from bottom tea cup and cover tea cup #2.  Stamp tea cup #3 the same way, creating a stack of tea cups.  Remove tea cup mask and color.  Trim image and use raffia to build a little nest by adhering it to the back of the top cup.  Stamp a singing bird, color, and trim.  Adhere tea cup stack and singing bird to front of card.  Print this phrase or one of your own, trim, adhere and doodle around edges.

ATC #2 - Stamp part of the tree frame on the lined paper and color with markers.  Adhere to front of card.  Tie ribbon around bottom border and tie a bow.  Create you own bird house by cutting a square and triangle and adhere to front of card as if it is dangling from a hook in the center.  Doodle around the edges and embellish with rub-ons.  Stamp tea cup and singing bird on white cardstock and color with markers.  Adhere raffia to back of cup to create a nest, then adhere to front of card.  Print this phrase or one of your own, trim, adhere, and doodle around the edges.

****************************************************

You can view all of my Tea / Teacup related projects HERE

You can view more of my Artist Trading Cards HERE.
You can view more of my Pink Persimmon projects HERE.

Monday, June 13, 2011

Artist Trading Card / Pink Persimmon


I have to say that I had sooooo much fun making these!!  I was definitely in my happy place and now everytime I look at them they make me smile.  I was totally inspired by some "pet"  ATC's I had seen.  There are people who take photo's of their pets and then use them on their ATC's.   Here are a few links to :
this first link is to Paper and Gluestix blog - Amy.  She is one of my FAVORITE mixed media / ATC card makers.  Her cards are amazing and she seems to always come up with something different.  I have seen some very talented people, but their projectst tend to look very similar.  I love that Amy's are soooo fun and that she comes up with so many ways to express herself on just 2.5" x 3.5".
And this is Amy's Flickr album "Paper and Gluestix", with more ATC's using Harley her dog.
I've seen other's do this.  Amy was just the easiest for my to find and link to.

  I would love to trade these for some of your ATC's.   And if you would like to make some just like these, then check out the step by step project instructions below.  I'm excited to share that these are featured on the Pink Persimmon blog today as well!  Thanks Darcy and Judy!

******************************************

Project Details

Stamps : Pink Persimmon "Scottie Dogs"
Patterned Paper : Cosmo Cricket (green floral on ATC #2) and Jilibean Soup (green collage on ATC #2) 6x6 paper pads
Digital Images : Digital Collage Sheets (the numbered strip and butterfly on ATC #1 and the flower stamp and small ticket in front of the cup on ATC #2 are from their "Color Collection" series. 
and
Lisa's Altered Arts (the bottom 1/2 of the house on ATC #1 and the tea cup and butterfly wings on ATC #2 are from the "$1 sheet" section.
(for more detailed info about using these digital files and for finding pre-printed ones to order, scroll all the way to bottom of post)
Old music paper or patterned paper
Aqua and yellow acrylic paint
Bubble wrap
Black Pigma Micron 02 pen by Sakura (Michaels)

Trim heavy cardstock or watercolor paper 2 1/2" x 3 1/2" to create a sturdy card base.  Thin down aqua acrylic paint with water or glazing medium (golden or liquitex).  Apply over music paper and set aside to dry.  You should be able to see the music paper through the paint.  After dry, trim to 2 1/2" x 3 1/2" and adhere to front of card base.  Apply yellow acrylic paint to bubble wrap and apply to front of card randomly.  Trim and tear green patterned paper for both cards as shown and adhere to front of cards.  Print and cut digital images : number strip, butterfly, and house base for ATC #1, cup, wings, ticket and flower stamp for ATC #2.  Type and print words for the quotes in a document and trim.  Trim roof top from orange patterned paper or cardstock.  Stamp Scotties and trim.  Assemble all pieces.  Use black pen to outline as shown.

I would LOVE to see your collages ATC's!  Email me or link me in a comment.
hugs,
Melisa


You can view all of my ATC's HERE


*******************************************************

Details for Working with Digital Images

These are digital image sheets that are sold by the sheet.  So once you order, they send you and email with the attached file for you to print.  I save all my digital images under "downloads".  Then I create a file for "digital stamps and images".  Then I create files for each manufacturer as well as by theme and save it twice.  So the Digital Collage Sheet page is saved under "Digital Collage Sheets" and "Yellow Images".  The Lisa's Altered Arts sheet is saved under "Lisa's Altered Arts" and "Yellow Images".  To open / print your files later, just go to that file in your downloads section, right click, and click print to print the whole page.  Or to save on ink, right click and open with whatever program you use.   Now you can crop and print the individual images. 

To crop and print and individual image in Adobe Paint:
1. Open in Paint, it will open as a very large document, so decrease the size so that the images are easier to crop.  Click "Image" and then "Resize / Skew" from the drop down box.  Decrease size from 100% to 50%.  This doesn't change the size of your file, just your viewing size.
Use the the slide bar along the right side to scroll up and down the page.

2. Use the "select tool" to draw a box around the image you want.  Click "Image" and then "crop" from the drop down box.

3.  Click "File" and then "save as" from the drop down box.  Make sure you do not click "save"!!  You don't want to loose your original file.  Save the cropped image in the same folder with a new name.

Once you have saved it you can print it.  I don't like to print from Paint because it's a pain in the patootie.  I'm not going to even go into what settings you have to change to get it to print right.  Too confusing.  So what I do is open a document, Microsoft Works, Word or whatever you use and I insert the image into a document.  I don't want to waste cardstock, so I usually fill up a page with image or digital stamps and print a full sheet at a time.

Clear a mud???  I'm sure there are other ways to do this.  If you have questions, please email me and I can hopefully help you, if you are a newbie to all of this.  It's so much fun to play with and collage image, so it is certainly worth learning how to do so you can print and cut your own images. 

There are companies who sell printed collage sheets to mail to as well, so you don't have to worry about printing your own.  Here is a list that I am aware of :


I'm sure there are more.  I am not sure of the quality of these, so I'm not responsible if you hate them, ha!


Thursday, April 28, 2011

Fabric Artist Trading Cards

Good Morning paper crafters!  I love trying new things, and a couple of months ago I came across a yahoo group that creates Fabric Artist Trading Cards ( 2 1/2" x 3 1/2").  I had never heard of such a thing, so I joined the group just to see what it was all about, because I like making trading cards.  And oh what fun I have had learning to work with fabric to create art. 

The group has a monthly theme for their swap.  Once you have made your card, you upload it to that months "album" and then at the end of the month, we swap.


I was told that a true fabric trading card is fabric from front to back.  All of mine but the last one have paper on the back.  I picked up a couple of embroidery books and as you can see, I am still learning.
The theme for this one was "April Showers Bring May Flowers" and it could be anything spring-like.  So I decided a potted plant would be fun to attempt, and easy for me to cut the pot shape.  This was the first time I had ever done the applique stitch.  It's a little rough, hopefully I will get better.  And the flowers and leaves are a very simple detached chain stitch.  I wanted a more decorated border, so I decided to try the Pekinese stitch on this one.  I really like how this one turned out, and I'm not sure if I'm going to trade it or not.


This is the one I have up for trade this month.  I figured the easiest way to create these would probably be to find fabric with a cute design and embellish it, since I'm new to this.  I used several different stitches on this one as well.  Did you know there is an Embroidery Stitch Bible book.  Yep, and I figured if it was the bible for stitching then that was the one I needed!  Ha.  Over 200 stitches in this book.  Ok, I will probably never use more than the 10 simplest, teehee.  The border on this one almost drove me crazy!  But once I got in a grove, I picked up pace.  It's called a "crossed sloping blanket stitch".  I think it finished the edges nicely.


This was the first one I created, for March's "Green" challenge.  And it is still up for trade if anyone is interested.  I stamped the flower images on felt, which did not stamp very well, but there was enough of an image to use as guidelines.  I used simple outline stitching and french knots, and then embellished with glitter glue.  I used a simple blanket stictch around the edges. 


And this is the one I traded for March's "Green" challenge.  I actually used the sewing machine on this one!  I would use that thing more, but I HATE changing the thread colors out.  I started with a piece of decorative fabric on this one.  I cut the fabric butterflies out and stiffened them with white glue so I could pop them up and shape the wings.  I stitched a piece of matching ribbon down the side and added a flower button.

So what do think about my latest creative outlet???  I love to try new things, so who knows how long I will create these.  But I figure I could handle at least 1 a month for the swap.

Wanna join me???  The group has a huge membership, but not very many participating.  We would love to have you join us if you like working with fabric and want to give it a try!


If you need more info on Artisted Trading Cards and a list of resources, then check out this post from last year:

You can view all of my ATC's HERE

Check out the Fabric Artist Trading Card group HERE.  PLEASE join me!

Have a great day!
Melisa
Related Posts Plugin for WordPress, Blogger...