Showing posts with label Medium - Tissue Paper. Show all posts

Monday, January 23, 2012

Altered Metal Tin Tutorial


Today I want to share with you a tutorial on how I altered this little Valentine gift tin. 
  I purchased this $1 gift card tin from Michaels.  They come in a large variety of colors / patterns on the lids. 

Did you know you can stamp and emboss on tissue paper?  Thought I'd give it a try, and it worked!!! 
I started by stamping the word "love" and embossing it, then mask it off.  Next I stamped the heart and embossed.  The butterfly and birds were stamped and embossed on tissue paper as well.  Begin by trimming around the images with scissors but not too close because you want a more distressed look so we will be tearing it as well.  Then use water on a paint brush and apply the water around the edge of the image.  This will allow the tissue paper to tear easily.  DON'T get it too close to your image or it will tear as well.  If you do apply the water to close to the image, let it dry and try again. 


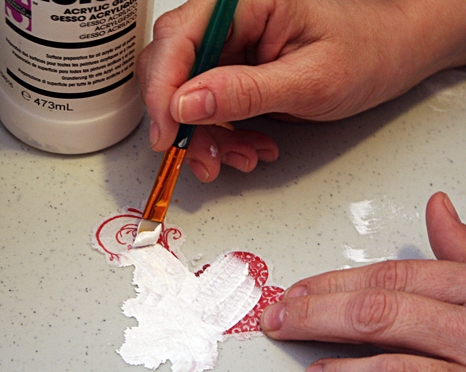
I used the gesso to adhere the tissue images to the top of the tin. 


Then applied more gesso around the images and over the rest of the tin.  It toned down the pattern on the lid.
  I stamped around the edges with a swirl using red pigment ink. The other qoutes and cupid are rub-ons and the glittery heart is a brad I cut the prongs off of.

You can view all of my VALENTINE projects HERE.
You can view all of my Altered Projects HERE

thanks for stopping by!
Melisa
****************************************

LINK PARTIES


Nifty Thrifty Sunday @ Nifty Thrifty Things

Sundae Scoop @ A Time To Create

Sister Sunday Link Party at Sister of the Wild West

The Sunday Showcase @ Under the Table and Dreaming


Make Monday Marvelous @ C.R.A.F.T.

Made by You Mondays @ Skip to my Lou

Inspire Me Monday @ Singing Three Little Birds


Uncommonly Yours @ Uncommon Designs Online


Whatever You Want Wednesday @ Free Pretty Things

WOW Me Wednesday @ Gingersnaps Crafts

A Crafty Soiree @ Katie's Nesting Spot

Watcha Got Weekend @ Lolly Jane Boutique

Show and Tell Friday @ My Romantic Home

Feathered Nest Friday @ French Country Cottage

Strut Your Stuff Saturday @ Six Sister' Stuff

Check Me Out Saturday @ A Vision to Remember

Monday, February 14, 2011

Altered Paper Mache Heart Ornaments

Good Morning Papercrafters.  Today I am sharing 3 paper mache Valentine Ornaments I created.  I started with 3 pre-made paper mache heart ornaments from a local craft store.


This is the first time trying a project like this, so I think it will look much better the next time.  Since the ornaments were round, I needed to stamp on something that I would mold around the ornament.  So I used tissue paper.  The only problem was that I was determined I wanted the base color in beige, not white.  Well I didn't have beige tissue paper.  You would think I would have given up and just went with white ...  but no  .. .  that would have been too easy, teehee.  I decided I could color the tissue paper with ink, or paint.  And that's great, except he tissue paper color doesn't match my crackle paint color, so it doesn't blend well with the background. 


Now that I'm told you everything I don't like about it ...  let me tell you that the over all plan was a really good one that worked great and I will definitely try it again now that I have lived and learned!


Project Details

Stamps : The Love Chapter art stamp set by Nina Brackett for Layers of Color
Renaissance Hearts (marked down to $10.95), Royal Birds, and Regal Wings art stamp sets by Layers of Color. 
Paper Mache Ornaments pre-made, local craft store.

1. Coat each ornament with crackle paint and set aside to dry.
2. Stamp images on tissue paper ( I used pigment ink, Tsukineko VersaFine Onyx Black).
3. After the ink is dry, spread a few drops of water around the edge of the image.  The water allows you to tear the tissue paper easily.  Just make sure you don't get to close to the image and rip into it.  If you do get the water too close to the image, let it dry and start all over.  Better to do that, then tear into your image by accident.  When tearing, I keep 1 finger along the inside of edge of where I want to tear.  This also helps keep you from tearing to far in.  I like the torn look better than just cutting it with scissors.
4. After dry, use modge podge to apply image onto ornament, smoothing edges around curved area's.

At this point it's looking a little boring and definitely needs some red to spice it up.

5. Stamp bird, wings, hearts, and "L" onto beige cardstock with Momento Tuxedo Black and color with Copic marker.  Trim around the edges of each image and adhere to ornaments as shown. 
6.  Embellish with red rub-ons (I added the little swirly things).

The ornaments come with a gold cord coming out of the top.  I wanted red!
7. Tie red seam binding around gold cord at the top of the ornament.  Now pull the gold cord back and secure with a piece of tape/glue.  Ok there is probably a better way to do this, but I was in a hurry!  You could probably create a knot and then glue that to the top of the heart, and just cut the gold cord off.
8.  Embellish with little red roses (  I got mine at Michaels).


Thanks for stopping by!
hugs,
Melisa

You can view all of my VALENTINE projects HERE.
You can view all of my Altered Projects HERE

Tuesday, October 19, 2010

MIXED MEDIA / ART JOURNAL PROJECT

Look what I whipped up last night!  I have to tell you that I am having the best time playing with canvas and background techniques!! I have been watching some of the background techniques that Donna Downey teaches over on her blog. She does weekly video's in her Inspiration Art Journal. I had been looking for some raw canvas to work on, but I'm wasn't sure where to find it. I just happened to be looking around in the artist section of Michaels and found this "Medium Texture Real Artist Canvas" by Fredrix in a pad format and decided to give it a try. I knew I needed something that would hold up against lost of wetness, me spraying it with water. AND IT WORKED!! I'm so excited.  I will say that I have also created a panel with a heavy watercolor paper and it works as well.  You can check out Donna's art journal pages HERE.  And her "Inspiration Wednesday" video's HERE.  Now some weeks may not be your style or you may not like them at all, but take away the technique and create your own version.  That's what I did with this one.  This doesn't look anything like what Donna would create!


Donna used a "journal" to explore techniques. But I don't have one. So I decided to finally use that 7 Gypsies Photo Stand I've had forever. I'm going to hang each panel on it, so I can flip through my pages. I trimmed the sheets down to 6 x 8".


 LOVE mixed media, but really don't have any skills in that area. So this will truely be an artistic journey for me. You should have seen me staring at the blank canvas when I first started this one.  It took me forever to get me background done.  If you are interested in this kind of art / growing as an artist, then I encourage you to check out Donna's Blog! I also found some downloadable Mixed Media Video's over at Cloth Paper Scissors. Here is a link to some FREEBIES.  And here is a link to some you can purchase for 14.95 (scroll down the page to see them) : HERE.

I got a chance to ask Donna about here journal in a video chat the other night.  They are handmade using a very heavy cardstock.  You can check them out HERE.  Or be a rebel and do your own thing, like me! 


Since it's Fall it just seemed like the logical direction to go in for this panel.  And when I think of fall, I think of rich colors and texture.  I started with some acrylic paints then started layering old book paper and some tissue paper, then more paint and Glimmer Mist - Harvest Orange.  The 2 large dies are from Creative Cuts and More - HERE.   Mine started out a bright orange.  I ran it through the Big Shot with an embossing folder and layered on some acrylic paint and Glimmer Mist - Harvest Orange.  I used some really old "Provo Craft" dies to create the smaller leaves.  Again adding acrylic paint.  Adhered to front of panel and traced around the edges of the leaves and edges of panel using a charcoal pencil (you can get these in the artist section at local craft store).


Next I opened up my Fall embellishment drawer and found these old rub-ons.  I did a google search and found this great quote.  I typed it up (leaving lots of space between the sections of words and printed.  But I didn't want the background to be white, so I cut some thin cardstock chalked up the paper, lightly adhered it over the words on the computer paper and then ran that same sheet through the printer again.  Now the words printed on my chalked paper.  I sprayed the paper with "Fixative" spray, tore close to the words around each one, and inked up the edges.
BTW the creamy chalks are the best.  I used my Craft T Products set for this project.


The other chalks I like to use are the Pearlescent ones from Pebbles Inc.  I think you can get them at Hobby Lobby.


Thanks for letting me ramble along again!  Hope you were inspired to create something fun and make sure and email me if you have any questions!

See all my MIXED MEDIA TUTORIALS HERE
See all my MIXED MEDIA / COLLAGE PROJECTS HERE
See all my ART JOURNAL PROJECTS HERE
I'm linking this one to the following inspiration challenge blogs!
The Shabby Tea Room posted a gorgeous fall colored cake to inspire us.
and The Pink Elephant challenged us to use orange and brown!
Don't forget to hop over and join us for the Creative Cuts and More blog hop tomorrow.  Lots of holiday idea's!!

Wednesday, July 28, 2010

Another Layout with Layers of Color

Good Morning.  This is week #4 of my Layers of Color Guest DT gig.  I have had sooooo much fun using their images.  And I want to say thank you so very much to Laura, the owner and her wonderful DT.  These ladies are so gracious, kind, supportive and it has been wonderful to be a part of their team this month.

Today I want to share with you another layout and the story behind it.  This is my daughter many years ago being baptized.  I was blessed to lead both of my children to salvation.  And I remember the joy that I felt as a parent watching my little one being baptized and giving her heart to our Lord and Saviour.  So many people think that young children don't really know what they are doing when they make professions of faith.  But I'm here to tell you that this little one did, and she has never waivered. 


I designed this layout using "Gothic Crosses" and "Royal Birds".  I created the paper flowers using punches.  That really cool molding in the corner at at the top is by Pink Paislee.  This stuff is soooo cool.  It comes white and you can ink it or paint it to match you project.  I used the tissue paper and a Spellbinders die to create the dollie.


Once I looked at this close-up, I realized that it needed something more.  So I added a stick pin.  But I was toooo tired to go back and shoot more photo's.  So you will just have to use your imagination, teehee.


Challenges :
The Studio Challenges   is a scrapbook challenge blog that I found recently.  I really want to get more scrapbooking in this year and I think Scrapbook Challenge Blogs can inspire me to do just that.  This challenge was to use "old and new stash".  This paper is probably greater than 5yrs old.  The corner punch is pretty old too, probably about the same amount of time.  Something new ...  Pink Paislee created these really cool 3-D rubbery feeling embellishments that you can paint or ink.  You can see them in the bottom left corner of my layout and behind the cross.  I just love them.  And my Layers of Color Royal Bird Stamp set is still pretty new as well.


Here is another card using "Vintage Roses".  I created this one for a couple of the Dare to Get Dirty Challenges.  One of the challenges over there was posted by my buddy Joan Ervin.  She wanted us to create a project that was mostly orange.  I would have NEVER came up with this without that challenge.  Thanks Joan for making me stretch my creative muscles!

I started with a peice of DP that was mostly orange (background) and the backside was orange, so that was great.  I created a second pattern on the solid orange using a "tone on tone" technique.  I used Apricot Appeal (SU) ink and stamped some of the smaller images in the set.  And then to tie it in better, I used the DP again for the vase.  The white Spellbinders and background circle were too stark when I layered them.  So to soften it up, I added white VersaMagic ink around the edges of the orange circle and orange chalk (Pebbles, Inc) aroung the edges of the Spellbinder's die.  If you decide to give this a try, get the pearlescent chalks, they blend on better and go on smoother.  Doing this brought it all together.

I'm just wondering if anyone else who is playing along is as creatively tired as I am.  I don't think I have ever created this many projects in one week.  33 challenges total and I have 5 to go by friday.  I saved the 2 hardest / altered pieces for last, but I will probably enjoy those the most. I know exactly what I'm going to do and what stamps sets I'm working with.  So I'm actually excited about getting a few of the others knocked out and moving on to these.
Thanks to all of you who have been so kind in leaving me comments.  I truely appreciate them and feel so very bad that I haven't made it to your blogs.  With all this creating the last 6 weeks, it's been difficult to keep up with everything.  But I'm hoping things will be calming down after I complete my 2 Guest DT's at the end of the month, and these 33 challenges. 

************************************************

You can view more of my Scrapbook Layouts HERE.
You can view more of my Faith Art HERE.

Friday, February 12, 2010

Altered Metal Tin


Tip / Technique : Stamping on Tissue Paper

I had so much fun making this!  I purchased one of those $1 tims from Michaels that already had the black and off white florish design you see in the background.  Did you know you can stamp and emboss on tissue paper.  Thought I'd give it a try, and it worked!!!  I painted a light layer of gesso over the top of the tin.  I stamped the heart, "love", birds, and butterly on tissue paper with pigment ink, and embossed.  I actually stamped the "love" first and then mask it off, stamped the heard and "forever" on the same peice of tissue.  I cut the tissue paper around the images but not close, because I wanted to tear it.  I painted water around the endges so that the tissue would tear and leave a distressed edge.  I used the gesso to adhere the tissue images and repeated the same steps with the birds and butterfly.  I stamped around the edges with a swirl and red pigment ink.  The other qoutes and cupid are rub-ons and the glittery heart is a brad I cut the prongs off of!
Stamps : The Angel Company
I think the rub-ons are Basic Grey, but the package is long gone, these are really old.

thanks for stopping by !
Melisa

You can view all of my VALENTINE projects HERE.


You can view all of my altered projects HERE


Thursday, June 18, 2009

Artist Trading Cards / Impression Obsession


The Impression Obsession DT has hosted a challenge to create a project using NO Patterned Paper. That's usually a tough on for me. Here is an ATC I designed last summer that qualifies. Yes I hand cut all of those little pieces - cuticle sissors was the only way to go! I used pumus for the sand and tissue paper/modge podge for the water.

My challenge to you is to not only leave off the patterned paper, but to add some texture in some way as well!
I will be pulling out more of my Impression Obsession stamps this weekend to try and create a new project for this challenge as well!

You can view all my Artist Trading Cards HERE.
Related Posts Plugin for WordPress, Blogger...