Showing posts with label Manuf - Mark's Finest Papers'. Show all posts

Tuesday, October 25, 2011

Mark's Finest Papers Ornament Blog Hop


Good Morning Paper Crafters.  I just wanted to pop in and let you know that tomorrow's "12 Days of Christmas" Blog Hop with Mark's Finest Papers is all about ornaments!!  The "12 Days of Christmas" Blog Hop acutally started Oct 17th.  Each day had a different theme and you can go back and check out all the wonderful projects by starting on the Mark's Finest Papers Blog HERE.


Tomorrow I will be sharing my projects for the Layers of Color Ornament Blog Hop.  I hope you will join us!
Melisa


*****************************************

Project Details

Stamps : Mark's Finest Papers "Seasonal Poinsettia's"

I started with a paper mache ornament you can pick up at a local craft store, and altered it.  I painted the sides and back a gold color.  Glued the front of the ornament to a larger peice of patterned paper.  After the glue was dry, I trimmed around the edges with an Exacto knife.  I used my Basic Grey File Set to smooth out the edges.  The edges were then distressed with ink.  I embellished the top and bottom point with gold paper.  Stamp the poinsettia image x 4 on white cardstock, color with Copics, and trim.  I trimed out some of the center petals from 2 of the images so that I could layer and pop them up.  Adhere to front of ornament.  Stamp sentiment.


Wednesday, October 19, 2011

I'm Nuts About You

Good Afternoon.   Today I'm sharing a fun little gift idea.  I think this set is sooo cute combined with one of Creative Cuts and More's gift boxes.  I used "Autumn Fun" by Mark's Finest Papers.


This weeks challenge over at Speedy TV is "Sweetest Day".  You can check it out HERE.  We hope you will join us and play along.  You can check out all of the Speedy TV challenges at anytime by going to the main page, float your mouse over the "Friends of Speedy TV" button along the top.  You will see a drop down menu. Then click on which ever week you would like to view.


And I have to take a moment to let you know about the Mark's Finest Papers "12 Days of Christmas" blog hop. It started Monday. Each day, the MFP design team will be posting projects for a paricular theme! I'm sure there are lots of idea's.


Monday's theme was "Bind it All"
Tuesday's theme was "Coasters"
and today's theme is "Decorated Jars".

Have a great day!
Melisa

Monday, October 10, 2011

Find out how to qualify for a free gift ...


Good Morning.  Today I am sharing a card created for Speedy TV's weekly challenge.  The challenge was to create an anniversary card.  You can check out this challenge HERE.  To find the challenges in the future ...  hold your mouse over the "Friends of Speedy TV" button along the top of the page.  You will see a drop down menu with all the challenges.
Stamps : Mark's Finest Papers "Black Eyed Susan's for Encouragement"
Patterned Paper : Lost and Found "Union Square" (music) and "Rosey II
Copic Markers : R20, R22, R05, YG61, YG17
Here are a couple of recent Tutorial video's you may want to check out!  Both are perfect for fall projects.

 
And don't forget ....  I'm looking for friends over at Speedy TV
I will be drawing 3 names from my friends list (excluding DT members) from my friends list over at Speedy TV on Oct 25th.  All you have to do is sign up for the site and then send me a friend request.  You can check out my page HERE.

Have a great day!

Thursday, October 6, 2011

NEW Challenges over at SpeedyTV


Hello Paper Crafters. Today I'm sharing a card that is a gift card holder as well. Hopefully you can see the pocket I created.  I used a credit card as a guide to create the area that is cut in.  This one was created for the very first SpeedyTV challenge!  There will be weekly challenges (monday) and we would love to have you join us.  The theme this week is masculine, and you can check it out HERE.


And if you haven't done so, don't forget to friend me HERE.
I'm drawing 3 names for all my new friends to receive gifts on Oct. 25th!
You can check out my page HERE.

********************************************

Project Details

Stamps : Mark's Finest Papers "Here Comes the Grad"
Patterned Paper : My Mind's Eye "Lush"
Ribbon : Offray
Copic Markers : E23, E35, E37, E99, Y06, B97, B99, N1

Sunday, October 2, 2011

Watercolor Tutorial #1


Good morning Paper Crafters!  I'm here today with a watercolor tutorial.  This is the first in a series of 3.  For this tutorial I using the image from  Nature's Postage by Mark's Finest Papers you seen on the card I created yesterday.  I used 
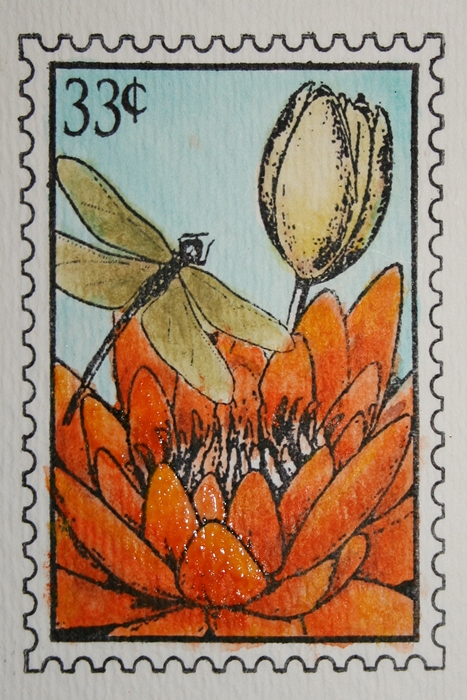
Lyra Watercolor Crayons (12 set), Ranger Distress Ink - Tumbled Glass, and Derwent Watercolor Pencil #51 Olive Green.  I got my watercolor crayons a few years back at a local craft store with a 40% off at a Joann's.  I'm don't know who carries them these days, but what I have noticed online is that they have  24 set now.  I had so much fun doing these that I'm considering finding a good deal on the larger set. 

In general I brush on water to the area I'm going to be adding color, before adding the color, except for the pencil.  Wetting the paper first helps the color flow.  So I want continue to mention that, but make sure you do it.  The crayon color are very concentrated, so a little goes a long way.  You can always add more.  I leave the crayons sitting in the tray they come in, wet my brush and then pick up a little color by brushing over the crayon.  Keep a paper towel or napkin handy so you can remove unwanted color..  Just re-wet the area if needed, and blot if off with a paper towel.  A couple of times I ventured outside the lines and was able to clean it up a little blotting the color off.  Each crayon has a ID # on it.  I used green (67), yellow (07), orange (13), and brown (99).  Let's get started.


Dragonfly wings : Scribble on a little color using Derwent watercolor pencil #51.  Add the color near the body outward so that it will be darker at the body.  The color will spread, so no need to cover the entire wing.  You can always add more.  Wet brush and begin brushing from the body to the wing tip.  Brush on a little water if dry.  Then add a little brown near the body lightly brushing out to add some shadow.  The color is very concentrated on the crayons.  I am using a very small brush, wetting it and just lightly brushing over the area near the body outward.  If you add too much, wet it a little with a clean brush and blot it off.  As with anything, you will have to practice to you get the feel for how much water to add and color to pick up.  Go back and add a little move green over the wing again, til you get a look like the wings below.


Tulip :  Brush on water over tulip.  Wet brush and pick up a very small amount of yellow #07.  Brush from base upward.  I actually put on a little too much color, add some water by brushing outward back toward the base a little and blotted some off.  Wet brush pick up a very small amount of brown and brush on as shown above. 


Then go back and add a little more yellow til it looks like the one above.  You can go ahead and color your stem now if you want as well with the green pencil, I just forgot.


Sky : Brush water on the sky area. Apply a little Tumbled Glass Distress ink to a plastic surface or acylic block. Wet brush and begin picking up the blue and painting your sky.  The distress ink is not as concentrated.  I tried to make it a little darker around the edges / corner.


Flower : Brush water over petals.  Wet brush and pick up orange #13.  I start out light, adding color from base outward keeping some area's darker as shown above, but I did go back a second time and add more concentrated orange to create shadows.


To create move depth, I added some brown as I had on the wings and tulip.  I think you can see the difference in the previous photo and this one and tell where I added it.  I didn't worry about trying to blended it, because I knew I was going over it again with orange.


Add more orange to get the look you want.  But the other thing I did that you can really see in this photo is pick up some concentrated yellow and added it from the tips inward to blend with the orange.  That really highlighted some area's and made it pop.  I added some brown to the flower center. 
I hope you enjoyed this tutorial and are encouraged to try coloring some of your images with watercolors.  I have 2 more tutorials coming up in the future.  Using the other 2 images from this set. 

And if you missed my post yesterday ....  I have been added to the Speedy TV DT and I'm so excited.  So you will be seeing more Mark's Finest Papers projects on my blog.  Speedy TV is a NING site and because I'm new over their, I don't have a lot of friends.  So .....  I'm making a somewhat desperate plea, teehee, by asking you to hop over, join the site and friend me.  To encourage you, I'm doing a give-away.  I will be giving away 3 gifts on October 25th to 3 of my new friends (MFP DT excluded).  Sorry I don't have photo's yet.  It's been a busy week.  But I will be posting photo's of the prizes later this week.


THANK YOU!!  for all your encouraging comments and support!
hugs,
Melisa

Saturday, October 1, 2011

Nature's Postage


Happy Saturday!  And it is a very happy one for me.  I'm waiting on my friend Deb to arrive and off we will go on our trip to 2 local scrapbook stores. 

But, it's also a happy day because I get to share with you that I have been selected as a "Friends of Speedy TV" design team member!  Speedy TV was started recently by Faith Hofrichter.  She is also the owner of Mark's Finest Papers.  Speedy TV is named after Mark's Finest Papers official mascot "Speedy the Cat".   It is a Ning site and I would like to invite you to join us!  We would love to have you join us for weekly challenges every Monday.   This monday kicks off the first challenge.

I need friends ... so don't forget to put in a friend request on my page HERE.
And to kick things off ....  I'm going to do a drawing and give away a prize to one of my lucky friends!

There are 10 other Friends of Speedy TV DT members excited today as well, and if you get a chance, stop by and say hello to Debbie (our fearless leader), Bonnie, Brenda, Fran, DJ, Janine, Karen B., Karen W., Kitty, and Toni.

Today's project was designed using a really cute set called "Nature's Postage".  The image was colored with Lyra Watercolor Crayons.  I have 3 other cards I designed using watercolors and I will be sharing step by step photo tutorials starting this Sunday and for the next 2 Sundays.
Thanks so much for stopping by, and don't forget to hop over to Speedy TV and put in your friend request on my page!
Hugs,
Melisa

**********************************************

Project Details
Stamps : Mark's Finest Papers Nature's Postage
Patterned Paper : My Mind's Eye
Lyra Watercolor Crayons
Ribbon : Creative Impressions

Trim cream cardstock 4 ¼” x 5 ½” Trim patterned paper (My Mind’s Eye) slightly smaller than card front and adhere to cream panel. Adhere cream lace and wrap with cream ribbon (Creative Impressions) / tie bow. Adhere panel to card front. Stamp sentiment on cream cardstock and trim as shown. Adhere to card front and embellish with button. Stamp image (Mark’s Finest Papers “Nature’s Postage“) on watercolor paper (Strathmore 140#) with water proof ink (Palette Noir). Color with water color crayons (Lyra Watercolor Crayons), trim and adhere to card front with pop dots.


Saturday, July 31, 2010

Mark's Finest Papers' Get Well Soon!

This is my last week with Mark's Finest Papers' as well.  The owner, Faith, is very generous and supportive and I have really enjoyed working with her and MFP's this month.  If you haven't yet, I hope you will hop over to her store and just take a peak.  Faith has designed her own line of stamps, but sells other manuf. stamps as well, including Flourishes.  She carries everything needed to create beautiful cards. Her store is a great one stop shop!  And if you love challenges, then check out their blog.  Every saturday a new challenge is posted.

Today I have used another one of the charms she sells.  She carries ALOT, so I know that she has something to fit your theme and they are so inexpensive and add alot to your project. This dragonfly was gold and I colored it with my Copic Markers.  I used 2 of her stamp sets on this one, "Flourishes and Frames" and "Apples and Camelia".


Stamps : Marks Finest Papers
Ink : Palette L'Amour Red, VersaFine Onyx Black
Memento Tuxedo Black (flower for Copics)
DP : Bo-Bunny Press
Cardstock : Marks Finest Papers
Charm : Marks Finest Papers
Ribbon : Making Memories
Bingo Card : B-Line Designs
Dies : Spellbinders Fancy Tags
Copics : R35, R27, R29


Tips / Techniques
Customize your metal charms with Copics.
Bingo cards are so much fun and trendy.  Did you know you can by them in stamp form, pre-printed paper form or as a digital image.  They even make them with cute words across the top and in great colors.  Here are a few links to you can check some out and figure out which form works best for you.

Paper
Jenni Bowlin!!  just scroll down on this link.  She has tons of them in different colors/themes.
I'm sure there are more.  Etsy has tons.

Stamp
The one I used today is from B-Line Desings Winter 2010 Collection - Tattered Damask
I couldn't find a link, but I bet more online stores will be adding this one soon.  I got mine at my local stamp store.
Maya Road makes one that allow you to switch the label at the top.  The choices are "love", "faith" and "dream"
And of course Tim Holtz has one.  "Games Collage"

Digital
Just go to Etsy's main page and search for digital bingo cards

Lots of options!

Monday, July 26, 2010

May Your Day Be Filled with Joy

What a beautiful sentiment.  I have 2 samples to share with you today using this sentiment.  It's from the Flourishes and Frame set from Mark's Finest Papers'
The flourish down the edge is from that set as well.  This one is clean and simple, not my usual style, but it's growing on me.  You could truely put this card together is minutes.  I mask off 2/3 of the card and stamped my flourish down the edge.  Then I stamped my sentiments and adhered the pearls.

I thought this sentiment would be perfect for a wedding card as well. 

Label : Martha Stewart
Sticker embellishments : Jolee's Boutique
Spellbinders Die and Cuttlebug embossing folder

Thanks for stopping by and I hope YOUR day is filled with much joy!

Thursday, July 15, 2010

DAY 3 - Mark's Finest Papers' Blog Hop

Good Morning!  It's Day #3 of the Mark's Finest Papers' Blog Hop and we are sharing projects with a stamp set called "Flourishes and Frame".  This one is loaded with beautiful sentiments and a wonderful set to add to your collection.

There are prizes to be won!!!  So make sure you scroll down to see all the details!

I put together a a birthday card and a little gift box.  This little matchbox is by Creative Cuts and More.  I love all the great 3-D items you can get from them.  Lots of gift containers already cut and scored.  All you have to do is fold and adhere.

Did you know that MFP carries cardstock, ribbon, and other embellishments to put the final touches on your projects!


If you like Spellbinder's then you will want to pick up a new set when you order your stamps.  Mark's Finest Papers' has 10 pages of them, so lots to choose from!


See ya tomorrow with more MFP!

Wednesday, July 14, 2010

DAY 2 - Mark's Finest Papers' Blog Hop

Double post today because I am blessed x2.  Today I am posting projects for both of my Guest DT gigs.  To check out Layers of Colors, please scroll down!

We are back again today to share with you another fun stamp set from Mark's Finest Papers' and more opportunities to win!!  All the details for the prizes are at the bottom of the post!  The set we are showcasing today is called "Southwest Cowboy".  I decided to showcase the images on 2 12x12 Layouts and a mini-album.


This mini-album is from a kit by Cosmo Cricket way back when.  It was easy to put together, you just punched out the pages and folded as directed.  Can you see the little cactus charm??  It's from MFP as well.  I colored it with my copics.
Faith has 10 pages of charms to choose from over in the store!


See ya tomorrow with more of MFP!

Monday, July 5, 2010

Back to School ...

Back to school is right around the corner for some of you.  But I'm done with all that, woooowhoooo!!  When my children were in school I did my best to always support and let there teachers know how much we appreciated them, especially my son, teehee. (ADHD, need I say more).  He put many a grey hair hairs in some heads.  I keep telling him "I can't wait til YOU have children!".

This set is perfect for letting those teachers know how much you appreciate them.  And you can start with a "Welcome Back" card.  Send it in with the LONG list of class supplies, you know, the kleenex, pencils, paper, I'm surprised they don't just put toilet paper on the list, teehee.

This one is from another new release from Mark's Finest Papers.  You can check this one out on 7/16.  There will be a blog hop with lots more idea's from their fabulous DT on this day!
Have I mentioned that they host fun challenges as well every Saturday HERE.


Stamp Set : Mark's Finest Papers  Apples and Camellia
Ink : VersaFine Onyx Black
Clear embossing powder on the title
DP : it's ancient, possible 10 years old, I love it when I use something from my stash!
Cardstock probably Bazzill
Die : Spellbinders Circle and Scalloped Circles  SA114/SA124
Cuttlebug embossing folder
Border Punch : Fiskars Treading Waters
Buttons : Unknown
Ribbon : Mark's Finest Papers
Charm : Mark's Finest Papers

Technique / Tip
My apple charm came gold.  You can customize it to match your card colors with your Copic Markers.  I used R29 and YG03 on my little apple charm.

You can view more of my Back to School / Teacher Appreciation projects HERE.

Sunday, July 4, 2010


Here's is another one designed using Mark's Finest Papers - Flourishs and Frame.  Are you see a pattern yet??  This one is LOADED with awesome sentiments!  I can't wait for you to see it.  Remember the Blog Hop for the July releases begins July 13 and wraps up July 16.  We will be revealing 1 of 4 stamp sets each day.

DP - My Mind's Eye 6x6 paper pad "Home"
Border Punch - Martha Stewart

Saturday, July 3, 2010

Guest Designer for Mark's Finest Papers!

Good Morning.  Today I am sharing with you a sneak peak of 1 of 4 new stamp sets being released by Mark's Finest Papers this month.  I am thrilled to be the guest designer for them this month.  Never heard of Mark's Finest Papers??  Well maybe you have heard of the owner, Faith Hofrichter.  She is a very talented stamper and long time member over at Splitcoast Stampers.  You may know her better as "markie's mom".  Not only does she create the most beautiful cards, but now she has ventured out and developed her own online Stamp Store and line of "Speedy the Cat" stamps.  Their store is loaded with lots of other products as well.  You can hop over and check out the store HERE.  And you will want to check out their blog as well.  They post challenges every saturday.  BLOG HERE.  I will be sharing projects using all 4 of their new releases for July!!  You can view and purchase these stamp sets during the release party,  July 13-16. 


Stamp Set : Flourishes and Frame by Mark's Finest Papers
Flowers : Prima
Spellbinders Die : Labels One
.
Thanks so much for stopping by!

Monday, March 22, 2010

Spring Themed Blog Hop!


Aren't these little chicks so cute!  I couldn't help but add some yellow Fun Flock.  They are from a stamp set designed by Faith Hofrichter, aka markie's mom over at SCS.  Faith and her husband started their own online store, Mark's Finest Papers.  Faith calls her line "Speed the Cat Designer Collection".  If you get a chance check out some of her stamp designs and the other wonderful stamp companies she has in stock (Flourishes and Tattered Angels).

Related Posts Plugin for WordPress, Blogger...