Showing posts with label Manuf - Layers of Color. Show all posts

Monday, November 14, 2011

Artist Trading Card / Layers of Color

Artist Trading Card 2.5" x 3.5"

Hello Paper Crafters.  I hope you enjoyed the Gingerbread House Mini-Album Blog Hop last week.  This week I hope you will join us for the New Release Blog Hop on Wednesday.  Nina Brackett has designed some fabulous images for you to play with!   I haven't heard yet, but I'm sure there will be stamps to win as well.  The above is an artist trading card (2.5" x 3") sneak peak.  Isn't this a fabulous image!

********************************************************

I want to take a moment to introduce you to a new challenge blog that a friend of mine is starting.   I know there are lots of challenge lover's out there.   It's called "Word Art Wednesday" and I hope you will take a moment to check it out.

Word Art Wednesday

hugs, Melisa


You can view all of my ATC's HERE

Wednesday, October 26, 2011

Noel Christmas Ornament

Ornament #1

Today I'm sharing some handmade ornaments!  I hope you are inspired to create some of your own.

You can find more of my handmade ornaments, including my "5 Star / 1 Cut Ornament" tutorial  HERE

I would love to see your handmade ornaments if you post them.  Just email me, or leave me a comment on my blog when you are finished!
Hugs, Melisa
**************************************************

Project Details

My first ornament is pretty easy to create.  I cut 2 1 1/2" strips from cream patterned paper.  I scored every 1/2" to create pleats.  Before folding back and forth to create pleats, embellish edges with gold glitter glue. Punch a 2" circle to use as a base to stabalize the pleated base.  Glue the ends of the strips together at the ends.  Then glue the entire pleated background to the 2" circle.  Created the red ruffled piece from crepe paper.  It's the kind you get in the party section at local craft store.  I used thread and a needle to gather the edge of the crepe paper strip.  Adhere to center of pleated base.  Cut scalloped circle from cream cardstock using Spellbinders Classic Scalloped Circles and the Grand Calibur. Adhere to front of ornament.  Embellish edges with gold glitter glue.  Stamp "Noel" from Layers of Color art stamp set "Christmas Verses" onto cream cardstock and trim.  Adhere to front of ornament and embellish with glitter glue.  Stamp dove (from "Angelic" art stamp set) on cream cardstock, trim, adhere, and embellish with glitter glue. 

 
Ornament #2

To create this ornament, begin with the one of the decorative dies from  the "Fluer de Lis" die set by Spellbinders.  Cut 3 from cream cardstock.  Score down the center of each one.  Then use the "Classic Scalloped Circles" die set and cut 3 scalloped circles from cream cardstock.   Score down the center.  Stamp decorative image from Layers of Color "Touch of Elegance" art stamp set with VersaMark ink and emboss with gold embossing powder.  Then you can use glitter glue around the edges.  I did not do it that way, but it would be easier for you if you have embossing powder and glitter glue that coordinate.  I wanted the stamped image and glitter around the edges to match, so I stamped the image with a Glue Pad and sprinkled with gold glitter.  Then I added glue with a glue pen around the edges and sprinkled with glitter.  This is a more difficult way to do it, because the glue pad did not completely hold the glitter and it was easy to knock off.  So then I sprayed over it with several coats of Fixative Spray.  After dried, fold along score lines of both the scalloped circles and the decorative die shapes.  Adhere each scalloped circle to the front of the decorative die shape.  You now have 3 sides.  Adhere 1/2 of #1 to 1/2 of #2.  I use Aleene's Tachy Glue.  Adhere 1/2 of #2 to 1/2 of #3.  Before you adhere 1/2 of #3 to 1/2 of #1, you need to set your gold cord down the middle of the ornament.  Cut the gold cord long enough to form a loop at the top with the end being adhered inside the ornament.  Leave a long piece of the other end hanging out the bottom so you can embellish with beads and an images.  Do not leave both ends extending from the bottom of the ornament unless you know for sure that your beads will fit on 2 pieces.  The inside of my beads were so small, that I could not feed 2 pieces of the cord through them.   I secured the cord inside the ornament using Aleene's Tachy Glue.  After the glue is dry and cord secured, adhere 1/2 of #3 to 1/2 of #1.


Finish your ornament by adding a bead cap and several beads.  Tie a knot at the end of the last bead, but leave a tail hanging do you can add your image.  Color image and embellish with gold glitter.  Trim and adhere to end of cord.

Sunday, October 23, 2011

Reindeer Waltz Christmas Projects


Good Morning!  Today I am sharing a bunch of "Reindeer Waltz" projects I have designed.  I love that set!!  This particular project was published in Stamper's Sampler recently.

But before we go any further, I want to remind you of the upcoming Layers of Color "Ornament Blog Hop".  I have two ornaments to share with you and I just know the rest of the team will have some very creative ornament projects to share with you.  We have a lot of special guest joining us on this hop as well!!  So you don't want to miss it!

Layers of Color – Join our Ornament Blog Hop on October 26th!


Card #1


Tag Set #1

Card #2


Tag Set #2
I was thrilled to have this set published on the cover of Scrap N Stamp recently!


*********************************************

Project Details

Home Decor

Stamps : Layers of Color “Reindeer Waltz”
Spellbinders Fluer de Lis Doily die, Lotus Pendants, and In Spades Pendant
Ink : Ranger Adirondack Cranberry, Palette Giverny Green
Patterned Paper : SEI
Wooden Spools : Hobby Lobby and antique store
Fiber : Hobby Lobby, Buttons : Dress It Up
Modeling Paste
Glitter : Stampendous
Snowflake Punch : EK Success
Wooden floral picks
Zig 2-Way Glue pen

Card #1

Stamps : "Reindeer Waltz" and "Happy Wishes"
Kraft and red cardstock
Border Punch : Fiskars
Corner Rounder : EK Sucess
 
Tag Set #1

Stamps : Layers of Color “Reindeer Waltz”, Ink : Ranger
Adirondack Cranberry, Patterned Paper : SEI,
Glitter : Stampendous, Snowflake Punch : EK Success,
Zig 2-Way Glue pen , Fiber : Hobby Lobby

Add patterned paper as shown. Stamp large reindeer
on white cardstock and trim. Adhere to front of tag.
Stamp smaller reindeer on the other two tags.
Stamp the 2 reindeer that overlap the patterned
paper on white cardstock and trim around reindeer
body, excluding antlers. Adhere
over the same stamped reindeer on front of tags.
Add fiber. Punch snowflakes, add glue with glue
pen and sprinkle with glitter. Stamp the reindeer
3 reindeer that over lap patterned paper on white
cardstock in red ink and trim.


Card #2

Stamps : Layers of Color “Reindeer Waltz” and GinaK (sentiment)
Border Punch : Fiskars
Ribbon and button : Unknown


Tag Set #2

Stamps : Layers of Color "Reindeer Waltz"
Rub-on sentiments : Making Memories
Border Punch : Fiskars

Sunday, October 9, 2011

NR #4 Glad Tindings


Good Morning Paper Crafters.  I hope you have had a great weekend so far.  I had a wondeful Saturday.  I cleaned house, climbed up in the attic to get down all my fall decor and got most of it up, then spent the afternoon, night with my friend Deb.  We had so much fun playing around with mixed media techniques / images and created ATC's.   I will have to post all of your mixed media creations soon. 

Today I'm sharing another Christmas card using Layers of Color "Glad Tidings" art stamp set.  There is a little mini Copic tutorial at the end.  Don't laugh, teehee, there may be a beginner out there who may find it helpful.  I used glitter on the dove's as well as Stickles on the wreath.  Hard to see, but definitely a dramatic effect.

Have you started your Christmas cards yet??


**************************************************
Project Details 
Stamps : Glad Tidings art stamp set
Copics : YG61, YG17
Spellbinders : Classic Circles,   Classic Scalloped Circles,  Fluer de Lis
Grand Calibur
Deckled Scissors - Fiskars
Glitter Glue : Stickles Lime

************************************************
Tutorial

YG61

YG17


Blend with YG61

Monday, October 3, 2011

Layers of Color Vintage Moth


Happy Monday!  I'm back today with a Silk Moth card I created a while back.  This one was really easy to put together because I stamped the image on patterned paper.
I hope you have a fabulous day!
hugs,
Melisa

******************************************************
Project Details
Stamps : Layers of Color "Silk Moth" cling art stamp and "Sent With Love" art stamp set. 
Patterned Paper : unknown
Copic Markers
Buttons : unknown
Flowers : Bazzill
Ribbon : Hobby Lobby
Trim patterned paper and adhere to front of A2 card.  Adhere ribbon, flowers and buttons.  Stamp sentiment.  Stamp image on patterned paper, trim, and adhere to front of card.  Highlight image with Copic markers.

Thursday, September 29, 2011

Layers of Color Bookmarks


Good Morning.  Today I have 2 bookmarks to share with you designed using Layers of Color stamps (Artful EndearmentsEncouragement and Merci Bouquet).  I was so tempted to add glitter and embellishments, but I wanted them to be as flat as possible since they are bookmarks.  Today is Faith Art Friday over on the Layers of Color blog and I know they will have something special to share and encourage you!

What are you working on this week??  I had a lot of fun designing a watercolor class this week.  I will be sharing one of the cards with you on Sunday, with a step by step photo tutorial.  Each card has soooo many photo's I figured it would be better to share them one at a time.  Have you ever worked with watercolors?

I am looking forward to this saturday, because I'm spending the day with one of my SASSSC (Sassy) Sisters, Deb!  We are going on a trip to 2 of our local scrapbook stores, and then coming back to my house to get crafty.  I hope you are able to find time for some crafty fun this weekend!

And .....  I will be making a big announcement on Saturday!

If you have not done so .... please "like" the Layers of Color Company FB page.  When it hits the 300 mark, Laura is giving away a free stamp set!

Happy Friday!
Melisa

Sunday, September 25, 2011

Christmas Stocking Gift Card Holder Tutorial


Hello!  I hope you have had a great weekend.  Today I'm sharing a tutorial on how to create this Christmas Stocking Gift Card Holder.  The cute little image is from "Angelic" art stamp set from Layers of Color.  If you love all things Christmas, then I know you will want to join us in October for our handmade ornament blog hop ( I will have another fun tutorial for you), and in November LOC blog hop for Christmas gift bags / tags inspiration.


I started with this free template from Waltzing Mouse. 


I changed it up a little bit though.  The template they have requires you to cut the front and back of the stocking seperately.  I KNEW there was now way I could hand cut the back and front seperately and then get them to line up.  So here is my idea.  Cut off the top 1/2 of the stocking fur.  See in the photo above it says trim here.  Just cut it off and toss it.


Start with a red card 5" x 5 1/2".  Now line the pattern up along the fold line as shown above.  Trim the stocking.  Now you should have a stocking shaped card that is folded acorss the top and opens from the bottom.


Draw a light pencil line from side to side defining the fur top and cut along this line, as shown above.  Now you have 2 pieces as shown below.  And the front and back will match perfectly since you cut them out at the same time.


Run the the stocking front through the Big Shot using the "Musical Flourish" embossing folder.


Next we need to add the fur.  I used a piece of white velvet paper.  I glued the top onto the back of a larger piece as shown below and then trimmed.


Use a gift card or credit card to draw out the boundaries for your gift card pocket.


Add white glue as shown, avoiding the inside of the pocket and the stocking top (fur area).  I use Aleene's Tacky glue (1.47 at Walmart for a large bottle).  Secure the embossed front of the stocking to the back.
 

And you have a cute little gift card holder!
I hope you enjoyed this tutorial.  If you decided to create one, I would love to see how you embellish yours.  Just email me a link or leave me a comment here.

Have a great day!
Melisa

Friday, September 23, 2011

Artist Trading Card / Faith Art

Artist Trading Card 2 1/2" x 3 1/2" 

Good morning Paper Crafters!  Today I'm sharing a project I created for today's Faith Art Friday over on the Layers of Color blog.  Every friday a member from the Layers of Color design team shares a faith art project.  We would love to have you check in and be blessed each week.  My project is an Artist Trading Card (2 1/2" x 3 1/2") I have added to my Faith Art ATC Revolving Holder

I hope that you will be blessed by this beautiful poem I found from : Scripture Worship

O come let us worship and bow down
Let us kneel before the Lord our maker
Offering the praise He deserves
For He is our God, our creator
We are the people of His pasture
And we are the sheep of His hand
So we shall offer with thanksgiving
Praises to the great "I Am"
Today if you would hear His voice
Don't let your hearts grow hard
As they had done so long ago
In the wilderness at Meribah
So come let us sing to the Lord
Make a joyful noise to our rock
With songs of praise and worship
To the King above all 'gods'.
Psalm 95: 1-3; 6-8


I love to sing praises to God and I'm so thankful for those He has blessed with wonderful creative talents that allow those of us who aren't so musically talented to sing along. I would like to share one of my favorite worship songs I listen to all the time. Check it out and join me in praising our great God!

Thanks so much for stopping by and I hope you have a beautiful weekend!
hugs, Melisa


You can view all of my ATC's HERE
You can view more of my Faith Art HERE.


***********************************************


Project Details

Stamps : Layers of Color Merci Bouquet art stamp set
Stencil : Layers of Color "Belle Brocade" art stencil
I wish I could share with you how I created the background, but I did it a while back.  Every now and then I like to sit down with paint, ink, ink sprays and play.  I know I layed out water color paper and just kept combing paints and inks until I got the look I liked, then cut the sheets down to ATC size backgrounds.  Now I have a pile of them that I can grab and finish embellishing for a quick ATC.  The stenciled pattern was created using Tsukineko Pearlescent Brown ink.  I stamped my images and cut them down to inchies.  I have a pile of those as well, ready to go when I need a quick card or ATC.  I do know that a book that has inspired me in the past is "Artist Trading Card Workshop".  It's loaded with background techniques and what better way to practice than on mini pieces of art like ATC's.  So get you some watercolor paper and start playing with color!  I will share that one of my favorite brushes I use to add just a little color is a fan brush .  I will try to create some background tutorails soon.  I miss doing them!

Monday, September 19, 2011

Layers of Color New Release Blog Hop!


Good morning Paper Crafters and welcome to the new release blog hop of the Layers of Color Christmas Collection designed by Nina Brackett and Laura Kirste Campbell!
These special designs were created from the artist's hearts in celebration of Christ's birth.  You will find a few of the images coordinate with Spellbinders's dies (Joy & Peace - Labels 18 and Sentimental Banners with Ribbon Banners)! 
But if you have started at my blog, you will want to start at the Layers of Color blog and then hop around so that you can make sure you are entered into the Grand Prize Drawing!   Laura will give you full instructions on how to qualify on her blog.
If you have arrived from Linda's blog, then you are in the right place and keep scrolling to read how you can win a free stamp from me!
  I have created a Christmas Ornament using one of the decorative elements from "Touch of Elegance" and the dove from one of the new release sets "Glad Tidings".    You can check out all the details on how to create this one at the very bottom of my post.


I actually have 2 more Christmas ornament post coming up in the future. You can subscribe to my blog post via email if you like, so you don't miss a thing. Just check out the side bar gadget.  No worries, if you get sick of me, I promise I want be offended if you unsubscribe later.
One of the ornaments / tutorials will be posted on Wed. Oct 26th during the Layers of Color Christmas Ornament Blog Hop! 


I also have a Five Star 3-D (4 folds / 1 cut ) ornament tutorial I posted recently and after the hop I would love to invite you back to check it out HERE.
My Prize
Today I'm giving away "Holly Angel" cling art stamp (sample - meaning it's not packaged)!  All you have to do is leave me a comment.  You have until 12 noon EST to leave me a comment.  I will do a random drawing and post a winner as soon as I get off work Tuesday (late afternoon).  The winner will have til Wednesday 10am EST to contact me at luv_2_stamp@yahoo.com to claim your prize.
and here is a card I created using Holly Angel


The next stop in this hop is the very talented

Good luck in the drawings!

****************************************
Project Details Ornament

Stamps : Layers of Color "Touch of Elegance" and "Glad Tidings"
Cream Cardstock
Gold cord and beads
Stickles Champagne and Recollections Gold Glitter from Michaels
Tsukineko Glue Pad
2-Way Glue Pen
Krylon Matte Finish Clear Spray
Scor-pal
Aleene's Tachy Glue ($1.47 at Walmart.  I LOVE this stuff, use it all the time, and store it upside down in an empty peanut butter jar to keep it ready to go all the time.  The jar I use is actually plastic and it has a little dimple in the bottom)
I used a glue pad and gold glitter - not a great choice.  I recommend VersaMark and gold embossing powder.  I just didn't have an embossing powder that was gold or glittery enough to match my beads and I'm a little picky, teehee.
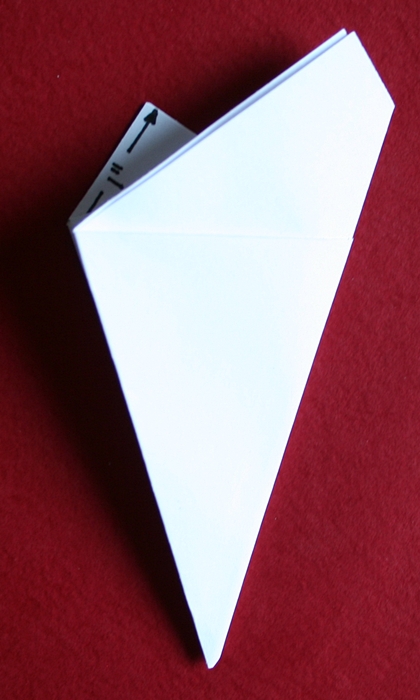
Cut 4 cream rectangles 2" x 2 5/5".  Locate the centers on each side and put a pencil dot.  Connect the dots with light pencil lines to create your diamond.  Score from top point to bottom point down center.  If you want that really glittery look, then you can do it like I did.  But I"m not resposible for any hair loss you may have along the way as I promise, you may want to pull it out, teehee.  But there is an easier way I'll share in a few minutes.  Wipe the cream diamond with an Embossing Magic or dryer sheet.  Stamp the decorative image on the diamond with a Glue Pad (Tsukineko), VersaMark may work, not sure.  Sprinkle with glitter.  It was a brilliant plan up until now!  Ha!    The glue pad doesn't completely hold the glitter and at this point it can be easily rubbed off.  So very carefully use a very fine brush to pick up any unwanted glitter, hopefully there is not much if you used Embossing Magic or your dryer sheet.  To fix the glitter in place spray it with a clear matte finish spray (Krylon).  But wait, one coat want do ...  I think I ended up with 3, making sure to let it dry in between coats.  I'm sorry there was just NO substitute embossing powder that gave me that glittery gold look I wanted.  And it matched my Champagne Stickles perfectly.   And for an easier method, just use VersaMagic and gold embossing powder.  After your 4 diamonds are dry, fold along the score line.  Adhere 2 at a time so that you now have 2 pairs.  Use a white tacky glue for this.  Measure and cut your gold cording.  You want to leave it looped at the top as your hanger or so you can attach a metal hanger, and leave lots extra coming out the bottom.  So tie off a loop at one end leaving the 2 tails hanging down.  Add tacky glue down the inside center of one side and all over the back side.  Glue the 2 side together.  You should now have the 2 gold tails haning out the bottom.  After it is dry, add beads.  Make sure you buy beads with holes big enough to thread the 2 pieces of the gold cording.  Tie a knot at the bottom of the beads to hold them in place.  Leave a little tail to adhere your image to.  Stamp the dove, trim, outline with 2-Way glue pen and sprinkle with gold glitter.  After it is dry, adhere to tail you left hanging below the beads.  When adhering actually hang the ornament, so you can get it adhered right where you want it.  Adhere Stickles around the edges.
I should have taken photo's.  The next ornament I post is similar and I will post step by step photo's with that one.

***************************************************
Project Details Holly Angel Card
Stamps : Layers of Color "Holly Angel" and "Sentimental Banners"
Copic Markers
Pink cardstock
Vellum with white snow flakes - unknown
doily
Ribbon - Offray double sided white satin ribbon
Deckled Scissors - Fiskars
Adhere front of A2 card to a larger peice of white cardstock.  Trim around edges with deckled scissors.  Trim pink cardstock and patterned vellum slightly smaller, wrap with white ribbon, tie bow and adhere to card front.  Adhere doily. Stamp angel and banner.  Color with Copic Markers.  Apply glue with 2-Way glue pen to wings, avoiding black lines as much as possible.  Sprinkle with glittern.  Use a tooth pick or paper poker to remove unwanted glitter over stamp lines.  After dried, adhere angel and banner to card front.
Thanks for stopping by!
Melisa

Sunday, September 18, 2011

Sneak Peak #4


Good afternoon Paper Crafters!  I'm just checking in today to remind you of the Layers of Color Blog Hop tomorrow!  There will be stamps given away from drawings on each designers blog and the Grand Prize winner from commenter's on the Layers of Color blog.  To qualify you must also "like" Layers of Color over on Facebook.  There will also be another drawing once the Layers of Color Facebook page reaches 300!  So lots of ways to win.  Please join us tomorrow morning!


Wednesday, September 14, 2011

Sneak Peek #3


Good Morning Paper Crafters!  Check out the "Vintage Postcard" image.  I love it!  
Please join us for the complete new release of fabulous Christmas images on Sept. 19th!  I don't have the details yet, but I know Laura will be giving away stamps as she always does.
We will be having a Christmas Ornament Blog Hop on Oct. 26th.

Thanks for stopping by!


**************************************************
Project Details
Stamps : Layers of Color "Reindeer Waltz" and "Vintage Postcard"
Patterned Paper : Little Yellow Bicycle (2008)
Chipboard : Maya Road
Stick Pins : Jennie Bowlin
Tuelle : Bazzill
Roses : Recollections (Michaels)

Monday, September 12, 2011

5 Star Ornament Tutorial


Good Morning Paper Crafters.  I have had so much fun creating projects with the Layers of Colors upcoming Christmas new release sets.  I ended up making several ornaments.  The first one is a 3-D 5 star ornament.  You make four folds and one cut.  I have included a photo tutorial that I hope will make it easy for you to create these as well.  If you do decide to create one, I'd love to see yours  ... just leave me a comment with a link.  I'm not sure when I will be posting them yet, but I have 4 more ornaments to share as well as a stocking gift card holder tutorial coming up ..... stay tuned!


AND ....  don't forget to join us Monday Sept 19th for the New Release Blog Hop where you will have the opportunity to win free stamps.  Want to see more new releases??  Check out the other LOC DT blogs ....  see the list and links in my side bar!


****  I did not create this template.  It is an origami technique that probably goes waaayyyyy back and who knows who created it.  I just want anyone to think I did.  I just wanted to create a tutorial to share with my readers ****


*************************************************

Project Details 
Stamps : Angelic art stamp set
patterned paper
Spellbinders : Classic Scalloped Circles Small
Grand Calibur
Glitter Glue : Glitz Stickles Champagne

Create 5 star ornament with patterned paper.  Ink peaks and valleys.  Cut scalloped circle using Spellbinders Scalloped Circles Small and Grand Calibur.  Stamp angel, color, and trim.  Adhere to scalloped circle and then adhere to ornament center.   Apply stickles around edges of the star and around edges of scalloped circle.  Create a small hole at top and string with gold cording.

**************************************************

Tutorial

Fold #1
Start with a 6x6 piece of paper.  Fold it in half.


Fold #2
Fold "Corner A" over to "B".  "B" is 1" down from top.


This is how it should look after you have made the fold.


Fold #3


Fold #4
This is what it looks like after Fold #3.  The dashed line shows you where Fold #4 will be.  Make the fold to match up "D" with "E".


This is what it looks like after you do Fold #4

Cut 
Make the cut as shown.


Trash the top half and begin unfolding your star.

You will have to reverse some of the fold lines.  I reversed my valley fold lines upward so I could ink them, then pushed them back down.  Ink the top folds as well.  I used patterned paper to create mine.  You will not be able to complete all the folds with thick cardstock. 


Saturday, September 10, 2011

Let the sneak peeks begin!!


Good Morning Paper Crafters!!  Today begins the sneak peeks for the upcoming Christmas New Releases from Layers of Color!  Sooooo many lovely Christmas stamps with that wonderful LOC flair that Laura and Nina bring.  From now until the big blog hop on Sept 19 all the design team members will be posting sneak peeks.  If you need a list of their blogs, check my side bar.  And you definitely don't want to miss the blog hop, because as usual, Laura will be giving away stamp sets!!

 
**********************************************

Project Details
This is just one of the beautiful images for a set called Christmas Blessings!
And Laura's image made this one so easy to put together.  I rub on chalk in the background.  Added glue with my ZIG 2-way glue pen inside the dove and sprinkled with glitter.  So sorry the photo doesn't show the glitter better.  This is a glitter fine white glitter by Stampendous.  I also added glue and glitter to the chipboard flourish, around the edges of the image, and around the edges of the card as well (Maya Road).  The glue pen works just like a pen and is easy to control.  It comes in several sizes. 

I LOVE flourishes and I'm on the look out for more chipboard ones, or dies where I can cut my own.  Let me know if you run across any.
lace - Hobby Lobby
roses - Micheals $1 bin
tuelle - Bazzill
string of pearls - Hobby Lobby

**************************************************
Please join us Sept 19th!
Have a great weekend and I'll see you again monday with another sneak peek!
hugs, Melisa

Related Posts Plugin for WordPress, Blogger...