Showing posts with label Manuf - Crafty Secrets. Show all posts

Monday, October 26, 2009

Crafty Secrets Baby Girl Card and Layout

Hi ladies.  Today I'm posting a  Layout I created using one of my Crafty Secrets Stamp Sets - Baby Girl Clear Art Stamp Set.  Check out the actually stamp set at the bottom of the post, so you can see how I used it.


Frame and Masking Tutorial
I began with my photo and matted it.  Next I had to determine the width of the frame around the photo.  The sides had to match the width of a series of the scallops if I wanted to finish the corners nicely.  If you take a look at the photo of the stamps for this set, you will see that the scalloped image as 6 scallops.  I stamped the image twice on a piece of scrap paper, end to end to help figure the measurements of the frame. 


I liked 7 scallops across by 10 scallops vertically.  So I measured across from edge to edge for 7 scallops, that equaled just short of 4", and again from edge to edge for 10 scallops - 5 5/8".  So now I had my measurement for my guidelines of the frame.  I cut a piece of white cardstock 6" x 7.5"  and penciled in my guidelines, creating a 4 x 5 5/8" rectangle (I used a pen on mine so it would show up for the photo).  You want the pencil lines light enough so that you can go back later and erase it.  When I am drawing squares or rectangles I use a tool called a t-square.  It is a drafting tool that allows you to have perfectly aligned edges.  And you can read more about how to use it HERE


So now I'm ready to stamp the scalloped border. 
In order to stamp the image along the penciled line, you need to mount your stamp on an acrylic block with lines on it.


You will line the white line on the block with the penciled line on the paper.  You might want to practice a couple of times before stamping on your project.  Practice by drawing a pencil line on a scrap piece of paper and see if you can stamp your image along that line.  Standing up over the stamp/block, helps you to be able to line it up.  Once you are confident you have that skill down, you are ready to stamp around your guidelines. Start in the left lower corner and stamp the first 6 scallops. 


In order to stamp just one more scallop, you have to mask off the 2 ends as shown below.  I know mines a little messy, but I was in a hurry to finish these tutorial photo's.


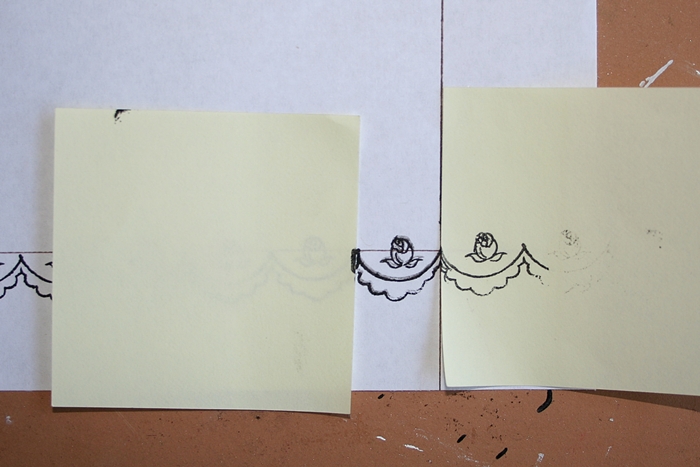
Take the post-it note mask off and stamp up the right side 6 more scallops.


Mask off 2 ends so that you can stamp 4 scallops to equal 10 up the right side.


Remove the mask and stamp 6 scallops along the top.


You will continue masking and stamping around the frame until you finish down the left side.

Here are some more details.  I love using stamped images to create my own little embellishments!


Patterned Paper : Crafty Secrets, Daisy D, Flower Bazzill
Ribbon Hobby Lobby, Spellbinders scalloped dies, Deckeled sissors

Monday, October 12, 2009

Crafty Secrets Thanksgiving Layout


Good Morning.  Here is a Thanksgiving Layout using the same Crafty Secrets Stamp set I showed you on Saturday.  I love fall and Thanksgiving, so this one was a lot of fun to create.  Hope you like it.  See details below as well as a link to where you can get this stamp set!  Thanks soooo much for taking the time to check out my projects.  Have a great week!


Frame Tutorial
This frame is easy, but requires alot of detailed cutting.  But I think it was worth it.  I use cuticle scissors when doing detailed cutting like this along the curvy area's.  The curve of the cuticle scissors just makes it easy to get around, especially in small spaces.  I simple stamped the image from this set (see photo below) on cardstock, colored and trimmed.  I layered the felt flourish trim around the photo first, then layered my stamped images over that using pop dots.  Stretch those creative muscles and think about how you can combine images from a set to create a frame.  I think you will like the results!

Paper : Crafty Secrets DP (beige), Daisy D DP (green), beige and dark brown cardstock
Ink : VersaFine with Clear Embossing Powder for all images, Palette Burnt Umber to distress edges of DP using eyeshadow applicator.
Other : Velvet Class A' Peel Stickers by Stampendous, Ribbon - unknown.  Corrugated cardboard painted dark brown using acrylic paint.  Cuticle scissors used to cut around images and pop dots to pop up some of the frame.  Deckled scissors by Fiskar.
Colorization : Prismacolor Pencils and OMS with Shimmerz.


Saturday, October 10, 2009

Artist Trading Card / Thanksgiving


Artist Trading Card 2.5" x 3/5"

This Thanksgiving Stamp set from Crafty Secrets had the cutest image and sentiment.  It made a cute little ATC, but could easily have been a card!  I created it for one of the Crafty Secrets Challenges over at Splitcoast Stampers.  

Stamp Set : Thanksgiving Clear Art Stamps - Crafty Secrets
Other : Ranger Crackle Paint
Ink : Brilliance Pearlescent Chocolate (swirlies in the corners)
Palette Burnt Umber (turkey, leaves and sentiment)
Colorization : Prismacolor Pencils and OMS, Shimmerz

You can view all of my ATC's HERE

Tuesday, October 6, 2009

Crafty Secrets Announcement !


I'm soooo excited to share with you that Sandy at Crafty Secrets has selected me to be their Guest DT Member this month!  How cool is that.  I love their Vintage look.  I'm been using their products for a couple of months now and started playing along with the Crafty Secrets Challenges over at SCS and PCP.  Great group of gals running the challenges.  We would love to have you join us !!

Their products are different from a lot of the other stamp companies.  In case you are not familiar with their products let me share a little about them.  They sell not only Clear Stamps, but also Pattern Paper Pads, and other vintage images via their Heartwarming Vintage Collection.  These range from cardstock weight printed images - Paper Scraps, Cotton Scraps, Sticker Scraps.  You have to see them so see how adorable they are.  Some of the Sheets of multiple images are only $1.75.  Excellent prices.  Ships fast as well.  Hurry and get yours ordered so  you can hop over to Splitcoast and play along with their weekly challenges.

You can order online.  Check out their HOME PAGE HERE.
Check out their BLOG HERE.
Check out other projects I have created using their products HERE !


Sandy said she needed someone to demo use of her products on layouts.  So I will be sharing more layouts with you this month!  Don't get stuck thinking that stamps a just for cards.  These little guys are so cute and I had a ball creating this layout using them.  They would be equally adorable on a birthday card or invitation.  How about a mini birthday album??  Too cute!

Supplies:
Stamps Crafty Secrets : Birthday Kids Clear Art Stamps
Paper : Carolee's Creations (polka dots), My Minds' Eye (yellow), Red Cardstock
Ink : Palette
Colorization : Prismacolor with OMS and my new favorite - Shimmerz
Tools : Cuttlebug Embossing Folders
Ribbon : unknown
Chipboard : Technique Tuesday (stars), Prima ("Boy"), and Thickers ("birthday")

Monday, August 31, 2009

Crafty Secrets - Bird Notes Layout

I have gone shabby chic crazy!! I love it! I've always wanted to try it and I love it! Last week I even hit local used book stores and vintage stores for emphemera (I really hate this word btw. How the heck to you say it? I need to do a word search.). I hit the jack pot and can't wait to go hunting again!! For today's post I'm sharing an 8x8 layout using my "Bird Notes" Crafty Secrets stamp set. The patterned paper is from Heartwarming Vintage - Classic Paper Pad. I created a card with this set last week. If you missed it, just scroll down a few post. See the details below of the stamped images I used!

So more about the layout. First off this is my little guy, you used to make my heart sing when he was the little cutie in this photo. But time flies, and then the grow up, now he's 21 and he makes my head want to explode!! Yes he still lives at home, rarely cleans his room and lets his laundry pile up. His room smells like stinky socks, yuck. I prefer to remember him as above, hehe!!
I gotta tell you about some of the stuff on this layout. On my shabby chic treasure hunt I came across this old music paper from 1920!!!!! Score! and the books cost $1 each! I also came across a huge bag of buttons for $12. Now that may sound like alot, but have you priced dressy buttons lately? This was definitely a deal. I don't know how old they are, but the button card said they were made by "Exquisit" and the original price was .29cents. I'm saving the button card to use on another project.
Other supplies : Sizzix Embossing Folders - came as a 3set. I couldn't find it online. I got mine at a local craft store. Stick pins - Prima. Blue Ribbon - Creative Imaginations. Beige Ribbon - notions department at Joanns Craft Store. Ink - Brilliance Pearlescent Chocolate. I LOVE this ink pad!
Techniques : I brushed Tattered Angels Creme de Chocolate over watercolor paper. I love that shimmery look and it worked perfect with the embossing folders. I sanded a little and walla!
My daughter plays violin so I have a few musical embellishments stored away. I used a wooded music note to trace the treble clef pattern on the back of my Hearwarming Vintage paper and cut it out. I inked the edges of almost everything with brown ink.
You can get Heartwarming Vintage Collection and Crafty Secrets Vintage stamps HERE.
Check out there blog HERE.

Friday, August 28, 2009

Crafty Secrets Christmas Joy Layout


Good Morning Ladies. This morning I want to share with you a old photo from waaayyyy back in 1971. Man I'm getting old. We were about 5 and 6 years old here. I will be 44 soon. This is me and my brother (who is no longer alive) standing in front of our very modest christmas tree complete with the shiney tinsel and plastic angel on top. My mom told me last night that even the curtains on the window were plastic. But we didn't care. Look at the huge smiles on our faces! What you can't see is that one of my brother's shoes was untied. Seeing this gave me a little smile, although my mom dressed him up and combed his hair perfectly for this photo, a little peice of his imperfect personality is shining through in that untied shoe, hehe. He was a stinker!! He got is so much trouble. Typical boy!

8x8 Layout
Patterned Paper : My Little Yellow Bicycle Ribbon : notions section at Joann's
Spellbinders Labels One S4-161 for frame Swirls : Quickutz Die
Red Stickles
Wooowhoooo!! I have created at least one project with all my Crafty Secrets sets! That means I've earned the right to order MORE!! I've already scoped out my next 2 sets!! Yesterday I ordered some of there Heartwarming Vintage Paper/Cut out sets. I can't wait to get them. I found the cutest black and white easter photo of me and my brother that I want to scrap! No one sells them locally so I order mine online. If you are interested in Crafty Secrets Stamps sets or Heartwarming Vintage paper products, you can get them HERE! At least for now. I read that they are working on a new site due to be up and running by the end of next month!
Related Posts Plugin for WordPress, Blogger...