Showing posts with label Altered Projects. Show all posts

Sunday, August 21, 2011

Birthday Party Ensemble Tutorial


Hello Paper Crafters.  Today I'm sharing a birthday party ensemble that is deliciously sweet!  Designed using various Pink Persimmon stamp sets.  But the primary set is Vintage Cupcake.  This set comes with a yummy cupcake and lots of adorable cupcake toppers to choose from.  It also has a wonderful scalloped border.  You can stamp it as an outline and then color the scallops or stamp the inside with colored ink using the solid image.  And of course stamping it on patterned paper would be just as cute!
This ensemble includes a table top center piece, gift bag with tag, card, gift card holder, and a gift bags for the guest.  The table center piece is designed using paper mache boxes and an inexpensive paper party hat.  I am including a tutorial for this project and for a gift card holder.  Hope you enjoy it!


Begin by painting paper mache boxes with vintage white paint.  Trim patterned paper and adhere around top box with Mod Podge.  You have to work fast with this because it dry's fast.  Use as little as possible, because it can warp the paper.  With a foam brush, apply to back of paper and secure to box. 

 Adhere paper ribbon around edge of small box lid and striped ribbon around edge of larger box lid.  I used my Aleene's tacky glue for this.

Remove larger box lid.  Stamp cupcake in black ink around box.  Because the box is round, you have to roll the stamp from one side to the other.  Stamp the cupcake image on various coordinating pattern papers.  Cut the cupcake liners and cupcake icing's out separately.  And then adhere them over the cupcake images on the box.


At this point I figured out that I didn't leave enough space to add the toppers : ( .  So I had to substitute buttons.  So make sure when you create yours that you stamp those cupcakes closer to the bottom edge!  Create a bow with the striped ribbon and adhere to the front of smaller box.


I created a decorative party hat to top off my paper mache birthday cake.  I purchased a set of paper hats that were on sale for $1 and embellished one.  Open up the hat from the back and lay it out flat.  Apply Mod Podge and adhere it to the backside of some patterned paper.  Once dry, trim off excess paper around the edges.  Bring the 2 edges together at the back of the hat and adhere together with Aleene's Tachy Glue.  Adhere an extra large chenille stem around the bottom of the hat.  Adhere a large pom pom at the top of the hat.

Create a coordinating birthday card, gift tag for the gift bag, and gift card holder for the guest of honor.  And gift bags for your guest.


I added one of the cute toppers and the scalloped border from the "Vintage Cupcake" set to the card.  I stamp the "Dutch Journal Circle" on cream cardstock and green patterned paper for the background.  Trim the inside circle from the cream image and adhere it over the green one.  I created the  pink scalloped circle using my  Spellbinders Classic Scalloped Circles and the Grand Calibur.


These little gift bags are so easy to assemble and come in a variety of colors from Creative Cuts and More (Square Bag #01)  They are pre-cut and pre-scored.  Just fold and adhere!  The sentiment on this one is from the "Vintage Greetings" set.  I used my Spellbinders Standard Circles and Scalloped Circles with the Grand Calibur to create the background on the front of the bag.


I used the "Vintage Greetings" and "Ric Rac Circles" for the sentiments on the tag.


This little gift card holder is also easy to create using a Scor-Pal.  The sentiment is from the "Hello Vintage Girl" set.


Trim cardstock 4.5" x 7".  Score, from the left side, at 2 3/4", 3 1/2", and 4 1/4".  Fold at score lines. 


Use your gift card to draw penciled guidelines and cut. 


(this is not the actual card, but a prop to show you where to glue)

Flip it over and adhere along the edge as shown.  Do not apply too much glue or you want be able to slide your gift card in the slot you have created. 


Stamp and embellish outside of gift card holder and secure with ribbon.


***********************************************************
Supply List

Stamps : Pink Persimmon
Hobby Lobby : paper mache boxes, patterned paper, paper ribbon, striped ribbon, large chenille stems, Mod Podge, Aleene's Tachy Glue.
Michaels : large pom pom
Deckled Scissors : Fiskars

****************************************************
You can view more of my tutorials HERE
You can view more of my Pink Persimmon projects HERE
You can view all of my Altered Projects HERE

Monday, February 14, 2011

Altered Paper Mache Heart Ornaments

Good Morning Papercrafters.  Today I am sharing 3 paper mache Valentine Ornaments I created.  I started with 3 pre-made paper mache heart ornaments from a local craft store.


This is the first time trying a project like this, so I think it will look much better the next time.  Since the ornaments were round, I needed to stamp on something that I would mold around the ornament.  So I used tissue paper.  The only problem was that I was determined I wanted the base color in beige, not white.  Well I didn't have beige tissue paper.  You would think I would have given up and just went with white ...  but no  .. .  that would have been too easy, teehee.  I decided I could color the tissue paper with ink, or paint.  And that's great, except he tissue paper color doesn't match my crackle paint color, so it doesn't blend well with the background. 


Now that I'm told you everything I don't like about it ...  let me tell you that the over all plan was a really good one that worked great and I will definitely try it again now that I have lived and learned!


Project Details

Stamps : The Love Chapter art stamp set by Nina Brackett for Layers of Color
Renaissance Hearts (marked down to $10.95), Royal Birds, and Regal Wings art stamp sets by Layers of Color. 
Paper Mache Ornaments pre-made, local craft store.

1. Coat each ornament with crackle paint and set aside to dry.
2. Stamp images on tissue paper ( I used pigment ink, Tsukineko VersaFine Onyx Black).
3. After the ink is dry, spread a few drops of water around the edge of the image.  The water allows you to tear the tissue paper easily.  Just make sure you don't get to close to the image and rip into it.  If you do get the water too close to the image, let it dry and start all over.  Better to do that, then tear into your image by accident.  When tearing, I keep 1 finger along the inside of edge of where I want to tear.  This also helps keep you from tearing to far in.  I like the torn look better than just cutting it with scissors.
4. After dry, use modge podge to apply image onto ornament, smoothing edges around curved area's.

At this point it's looking a little boring and definitely needs some red to spice it up.

5. Stamp bird, wings, hearts, and "L" onto beige cardstock with Momento Tuxedo Black and color with Copic marker.  Trim around the edges of each image and adhere to ornaments as shown. 
6.  Embellish with red rub-ons (I added the little swirly things).

The ornaments come with a gold cord coming out of the top.  I wanted red!
7. Tie red seam binding around gold cord at the top of the ornament.  Now pull the gold cord back and secure with a piece of tape/glue.  Ok there is probably a better way to do this, but I was in a hurry!  You could probably create a knot and then glue that to the top of the heart, and just cut the gold cord off.
8.  Embellish with little red roses (  I got mine at Michaels).


Thanks for stopping by!
hugs,
Melisa

You can view all of my VALENTINE projects HERE.
You can view all of my Altered Projects HERE

Wednesday, February 9, 2011

Mini Album #4 : Friends Altered Gift Tin

Hello Papercrafters! I'm sharing another Mini Album today.  I made this one a while back and just never shared, so the supplies are older.  But you can still be inspired by the idea!
This is altered Gift card tin I got at Michaels.  It's 3 x 5 " and perfect for storing a mini-album. 


I used the "Blush" 6x6 paper pad from a few years back.  Sorry, it's been discontinued.  I combined "friendship themed" embellishments I had been saving up, including chipboard and rub-ons.


And the patterned paper shapes and some punches added even more embellishing.  So when you are shopping for dp, consider the patterns and if they can be cut out, creating your own embellishments.


I had fun creating this little garden and thought it went perfectly wiht the "Plant a seed" quote on the pocket. 


There are 2 layers here that flip up.  Perfect for hiding journaling or photos.

I would love to recreate this one with current products and teach as a class someday, because it was so much fun!

I have several other mini albums I will be sharing in the future.  I would like to share 1 monthly, but not sure if I can keep up that pace.  We'll see.  If you miss them.  Just check the "Project - Mini Albums" label in my side bar to view them all!

You can view all of my Altered Projects HERE
You can view all my Mini-Albums HERE.

Thanks for stopping by!
and have a blessed week
Melisa

Tuesday, January 25, 2011

"March of the Snowmen" Blog Hop!

**** Winner for Blog Candy has already been drawn for my blog, but some of the others may have extended their deadlines for commenting, so check them out ***

Good Morning Papercrafters and welcome to another "March of the Snowmen" Blog Hop.  We had so much fun doing this last year that we decided to do it again.  We hope that you enjoy it as well.  We know the one thing that makes any blog hop sweeter ...  is BLOG CANDY!  And we have lots of it.  Over 1/2 the designers are offering up blog candy this year.  So read through each blog post carefully.

The official start time is 9am EST.
I love snomen and created 2 projects for the hop.

This is an altered sled photo frame I found at a local craft store.  It came as bare wood and I disassembled it by removing the brads and leather strap at the top.  I painted the wood and sprinkled with Diamond Dust.  I found the "Let it Snow" with a button pack at a local craft store.  The snowflakes are stamped in blue and embellished with jewels and manufactured white glitter snowflakes. The cute vintage image is by Crafty Secrets.


Recently I was hopping around and came across a project that had paperclay snowmen on it.  I made a mental note that I wanted to give it a try for this years blog hop, but now I can't find the link.  So whoever you were, thanks!  This launched me on a hunt for photo's of paperclay snowmen for inspiration, and in the process I came across a fabulous mixed media artist, Sue Pelletier.  She has a wonderful collection of paperclay snowmen that were published in Cloth, Paper Scissors!  Sue also teaches mixed media techniques.  I recently purchased one of her videos from Cloth, Paper Scissors and it was fabulous.  HERE.


Flicker is also a great resource for inspiration.  I have started my own little photo gallery of some of my favorites HERE.  One in particular that I fell in love with is this one.


Created by a wonderful artist Linda Silverthorne.  Her gallery is HERE.  And I was able to track down her Etsy store HERE.

And here are a few close-ups of my snowmen.
If you can roll a piece of clay into a ball, you can do this!
The hat was challenging though.


I covered mine with glitter.  I feel like this one needs a hat or something, but the project was already so tall ...

This hat was a challenge as well.  I had a hard time fitting the top of his head up into it.  But I was able to widdle out some of the inside until it fit on.


To learn some of the techniques about working with paperclay, I watched several video's over at YouTube HERE.  Now I did mine a little different because I didn't use the styrofoam, but I learned some things about working with the paperclay.  It takes here a total of 5 videos to finish the snowman ornament.

I'm the last one on the list, so if you haven't finished, then hop up to the top of the list to finish.
All links have been updated directly to the participants post.  So feel free to check them out anytime.
Melisa Waldorf - YOU ARE HERE

*************************************************

You can view all of my Altered Projects HERE

Thank you soooo much for stopping by.  Please join me friday.  I will be posting another cardboard art project for the Layers of Color Faith Art Friday.
Melisa

Sunday, October 17, 2010

Altered Bird Cage Home Decor


Good Morning Papercrafters.  Today I am thrilled to have participated in the Stampin' Sisters for Christ Challenge.  I just love this challenge blog and wish I had time to play along more often.  These ladies are so very special in what they do on their challenge blog.  Each Sunday they provide a bible verse to inspire us!  In addition they have wonderful sponsors each week and this week the sponsor is Layers of Color!
Today's verse is ...
Matthew 6: 9-13 "This, then, is how you should pray: 'Our Father in heaven, hallowed be your name, your kingdom come, your will be done on earth as it is in heaven. Give us today our daily bread. Forgive us our debts, as we also have forgiven our debtors. And lead us not into temptation, but deliver us from the evil one."
And the challenge is ...
Make a card/project that features prayer; either someone praying, or a verse about prayer, or a greeting that lets someone know you are praying for them.
I had so much fun with this project.  My guest bedroom (when we get our new house in the spring, is going to be shabby chic).  I have already bought the bed linens and I want to fill the room with shabby pieces of art.  So here is another project for that room ...


I had so much fun creating this one.


1. Spray metal birdcage with white spray paint.  After this is dry, apply crackle paint.
2. Embellish with pearl trim (Hobby Lobby).
3. Add a branch (purchased in the floral department at Hobby Lobby) to the inside of the cage.  To make it look more realistic paint it brown and add brown crackle paint.
4. Add floral embellishment to outside of cage (Prima).
5. Stamp butterfly images, color, and trim. Apply black glitter with a glue pen.
6. Adhere to outside of cage.
7. Type bible verse and print.  Trim to a banner.


Aren't these butterfly images gorgeous??  They are from a Layers of Color set called "Flutterescent"!

You can view all of my Altered Projects HERE


Don't forget to hop over and play along with Stampin' Sisters for Christ this week!!

Have a blessed Sunday!

Friday, September 17, 2010

Altered Cigar Box


Last week I was searching for items I could use in my art, at a local antique store, and found this wonderful wooden cigar box for $2.50.  I also found some tiny bottle brush trees that I hope to use with a Christmas or winter scene in the future.  Pink Persimmon sells these adorable little chipboard houses, Vintage Colonial House by Melissa Frances and I have been wanting some.  Now I have to get them so I can use my little trees!!  Do you ever go to "antique stores" looking for great finds like these??  Not all of it is "antiques".  And you know what they say, "One man's junk is another man's treasure".  You have to be careful though.  Some of that stuff is priced crazy. 

I knew as soon as I seen the cigar box what I was going to do with it, because it has been one of those projects I've been planning on creating for a while.  I wanted to make a gift card set for my sweet mother-in-laws birthday in november and had been considering what I would store them in.


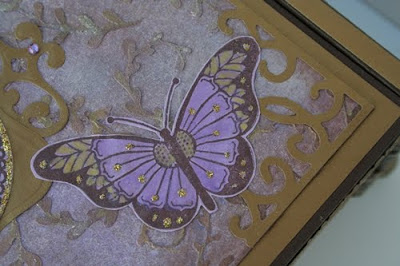
 I used "Butterfly Collector" and an art stencil - "Botanical Swirls",  by Layers of Color.


 If you have been following me for very long, then you know I LOVE butterflies.  And this set by Layers of Color is so gorgeous.  Especially that medallion.  Wanna see my butterfly shadow box I created earlier in the year??  Check it out HERE.  Sorry to get off subject, but it is one of my most favorite projects I have ever created and enjoyed seeing it as I walked through my diningroom this spring.  I even wrote a little poem to go with it with the intentions of creating a framed project using the poem, to set beside my butterfly box.  I'll have to add that next spring!

Tutorial
This project was a little messy to create, but worth it.  I could have just used patterned paper, but wanted more of a handmade, textured feel.  So, I created my own background. 


I honestly wasn't sure where I was going when I began the process and the end result was an accumulation of errors and layering color until I got the look I wanted.  So I will describe the process the best that I can, but know that what you should take from this is that sometimes you just have to sit down and play with color and mediums until you get the look you want.  My first panel turned out horrible.  But I learned from that and I'm very pleased with the results of my second panel. 

I started with a heavy cold pressed watercolor paper and trimmed to the size of the top of the box.  I watered down some acrylic paint, Making Memories Wisteria and brushed it over the paper.  I completely covered it with this wash and then let it dry.  Then I used my stencil to create some texture.  I used stencil adhesive, but the modeling paste is so thick, it might not be necessary.  Sorry, I haven't tested it.  With a palette knife (Just a plastic knife with a bent handle for easier handling.  Found in local craft store in the art section for about $1.  Well worth it, because that angled handled really helps) I spread light modeling paste (also found in the art section of local craft store) over the stencil.  Use the palette knife to level the paste and wipe off the excess.  Let this dry.  I really rushed mine and used a heat gun to help it along, because I had to move the stencil over to cover the entire panel.  You can see the raised area's created with the modeling paste a little better in this photo.


Next I realized I wanted two shades of purple.  So I used a stipple brush to pounce on another purple, Brilliance Pearlescent Purple.  These inks have just a little shimmer to them.  I inked up the Tim Holtz applicator tool with Pearlescent Chocolate and gently began adding it to the raised, modeling paste design.  Some of the ink got on the background, but that was ok.  I also distressed up the edges with it as well.  Then I decided I wanted to use gold as an accent, so I added a little gold pigment ink to the background.  It didn't really show up very well.  At this point I decided I had covered up too much of the lightest color purple I started with and began to pounce on some Brilliance Moonlight White to lighten some of the area's.  See how this process works, teehee.  And lastly I wanted the modeling paste swirls to stand out a little more. So I used a tiny paint brush and began adding Shimmerz Golden Wheat and Shimmerz Blingz Gold Glimmer here and there.  I didn't want to cover all of the swirls, because I wanted different shades.  By this time I had a mess and took a break to clean up the stencil / palette knife and my stipple brushes. 


I found a very old piece of DP in my stash by Colorbok that was a little lighter purple than the background.  I stamped my butterflies with Pearlescent Chocolate (This is my all time favorite brown ink.  I use it all the time, especially around the edge of images or projects to distress them).  Heat set.  Cut around edges with cuticle scissors (You have so much more control when cutting small images, or around curved lines, with cuticle scissors).  Add Shimmerz Golden Wheat and Lilac with a very small paint brush as shown.  If I got too much on a brown line, I used a tooth pick to scratch it off while it was still wet.  Add Stickles Glitz - Champayne to the little dots on the butterfly wings and on the body of the smaller butterflies.  Also add it to the outer border of the butterfly medallion.  Set this aside to dry.

Use Spellbinders Labels 1 and one of the Fancy Tags layered over one another to create a background for the butterfly pendant.


I realized that I needed  something in the corners so I found this really awesome Sizzlet set with decorative corners, Architectural Accents Set.  I think they turned out great!


After I finished the top panel, I painted the box brown.  I cut the side panels and ran them throught my Big Shot with a Cuttlebug embossing folder, then adhered them to the sides. I covered the top of the box with gold paper and then my butterfly panel.  I added these really awesome "feet".  They are by Tim Holtz.

There is nothing worse than having someone describe a process to you and not having an idea what they are talking about.  So, here are some photo's of some of the other tools I used to create this:


I like this stipple brush because the hairs are different lengths and soft.  Mine looks like this, but the handle is solid wood.  Unfortunately there is no manufacturer on the handle and I would love to find more of them.

I hope you were inspired to get really messy and try something new this week. If you find this tutorial inspiring and use it on a project of your own, I would love to see it!!
Thanks again for stopping by!

You can view all of my Altered Projects HERE
You can view all my Altered Cigar Boxes HERE

Thursday, July 29, 2010

Altered Stamp Blocks !

Good Morning.

I'm in a really chipper mood because I FINALLY finished 19 projects for 33 Dare to Get Dirty Challenges over at SCS!  This was a huge accomplishment for me because I'm so slow.  But I learned how to pick up speed and throw things pretty quick thanks to these challenges.


One of the challenges was to re-purpose.  So I did something I've done before and didn't have to put alot of thought into.  I remove all my stamps from wooden blocks, put them on cling mount, and store them by catagory in notebooks.  I have saved ALOT of the larger blocks to turn into mini pieces of art that I can sit around the house.  The original idea was to do a set for each holiday.  I'm still working on that, teehee. 


I started by selecting blocks that were different sizes and tried to figure out which 3 complimented each other.  I think these 3 worked out great.  Then I went through all my chipboard letters.  I knew I wanted each font to be different as well as a different size, so it was a matter of playing around with them to I got the combo I liked.  I have TONS of these all filed by letter, so it's not to difficult of a process.  Next I spray painted the backs and sides with black paint. 


I picked out some 7 Gypsies paper (their paper makes everything look good, right!) and trimmed it down for each block for a background.  I stamped alot of the images from this set and originally started out trying to color them with my copics, but it just wasn't working with the muted colors of this paper.  So I went with paper piecing using papers from the same paper pad.  I covered my chipboard letters with papers from the pad as well.  Just a reminder ...  the way you get the edges so smooth when altering the letters is to use Basic Grey file set along the edges.  The set comes with different shaped files for getting in small area's, holes, etc.


Once I planned out each of the layouts with the letters and paper pieced images.  I realized that I needed some more in the background.  So stamped some of the images from this set and  from the Flourishes set in the background and around the edges and that kinda brought it together.  I never know what I'm gonna end up with.  I just had a general idea of a look I wanted and started playing.

I hope this inspires you to do some playing of your own today!  Creating ART makes me so happy!

Have a great day and thanks for stopping by!

You can view all of my Altered Projects HERE
Related Posts Plugin for WordPress, Blogger...